Makers bring the “Push Button, Receive Bacon” meme to life
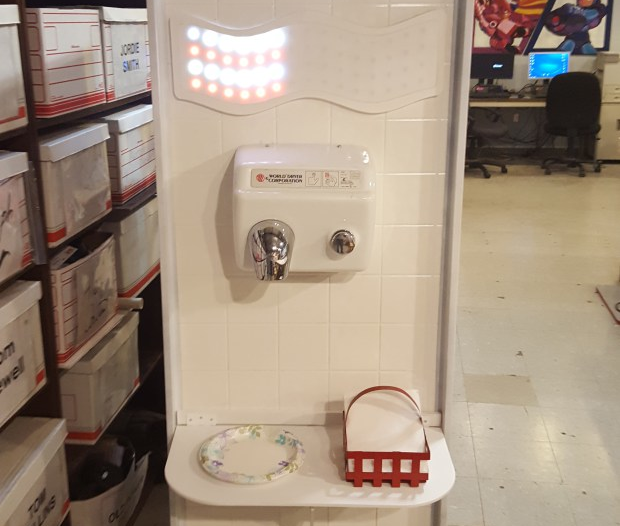
“Push Button, Receive Bacon” is a popular catchphrase and graffiti tag often spotted next to the graphic instruction on hand dryers. Well, the Hammerspace Workshop team has decided to bring that meme to life with their latest project for the upcoming Maker Faire Kansas City. In order to raise awareness of the link between bacon and hand health (kidding, of course), they’ve modified the standard bathroom accessory to display wait time and provide its user with a dose of bacon-related pop culture knowledge before dispensing.
A multi-segment display was CNC routed in the shape of bacon and populated with 10mm LEDs. A standard bacon dispenser relay board controls this display. To entertain and inform the user, a variety of bacon themed pop music will be dispensed immediately and continuously until bacon has been provided. An Adafruit audio FX board stores and plays back the .ogg files containing the bacon related wisdom and culture.
The Push Button – Receive Bacon machine has an extended magazine to supply bacon strips on command. For this prototype we have used a Sharper Image CD Power Tower to hold the bacon strips until they can be used to save a hand. The shelves are constructed of plasma cut stainless steel and held in place with 3D-printed clips that mount into the original device as if the bacon shelf was a jewel case. The tabs that are already present in the tower provide a kind of encoder to ensure repeatable precision and smooth delivery of the bacon. The folding flap design allows for tighter clearance between the bacon magazine and the bacon encrispenator.
And finally, the bacon motivator receives the bacon from the encrispenator and uses vibrational motivation to deliver the hot bacon down a custom engineered stainless chute.
The user then receives the bacon from the bacon nozzle in the usual fashion. After applying the bacon to both palms, the bacon may be eaten to replace lost electrolytes.
You can read more about the project on Make:, and see it in acton below.