Posts with «diy» label

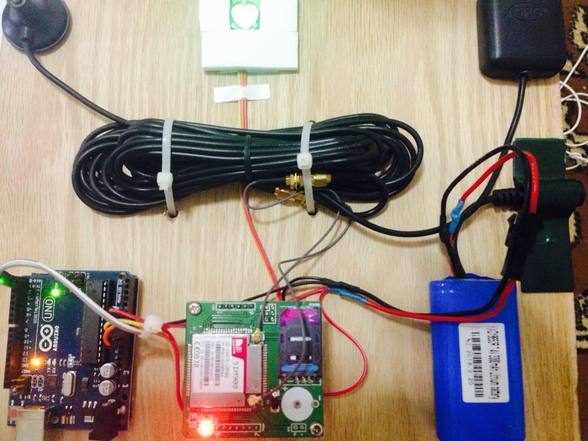
Testing a Heart Pulse Alarm based on Arduino Uno

Murad is a student of Mechatronics and Engineering at Tafila Technical University in the town of Tafila, in Jordan. He made a submission to our blog presenting his DIY project of a Heart Pulse Alarm based on Arduino Uno.

The HPA (Heart Pulse Alarm) is a portable device prototyped to measure the pulse rate and the body temperature of who’s wearing it. If the device receives an unusual heart pulse, it will send a sms message to paramedics to act quickly. He designed the device to help people who have cardiac problems and they lack  the resources for personal and professional assistants in his country.

Check the bill of materials and code on his blog.


Arduino Blog 18 Nov 16:59
arduino  arduino uno  diy  featured  gps  heart-beat  sms  uno  

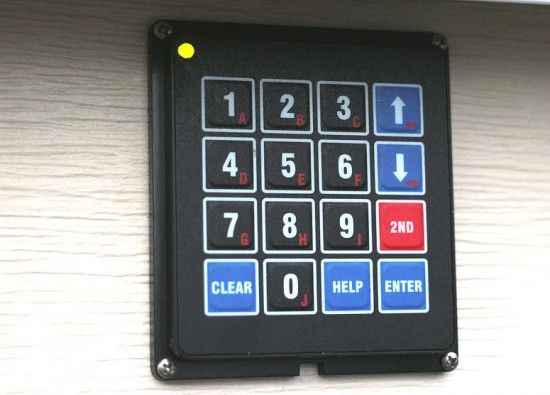
DIY Garage Door KeyPad Project

Arduino user SamJBoz needed a way to quickly gain access to his garage when he did not have the remote. He designed a simple entry system with 4 digit access codes to allow himself, family and friends to gain quick access to the garage when a remote is not at hand, running on a 5V Arduino Pro Mini. The keypad allows for up to 10 4-digit pin numbers, has a user set master pin number to create and delete user pin numbers and flashes 2 color error codes if something goes wrong.

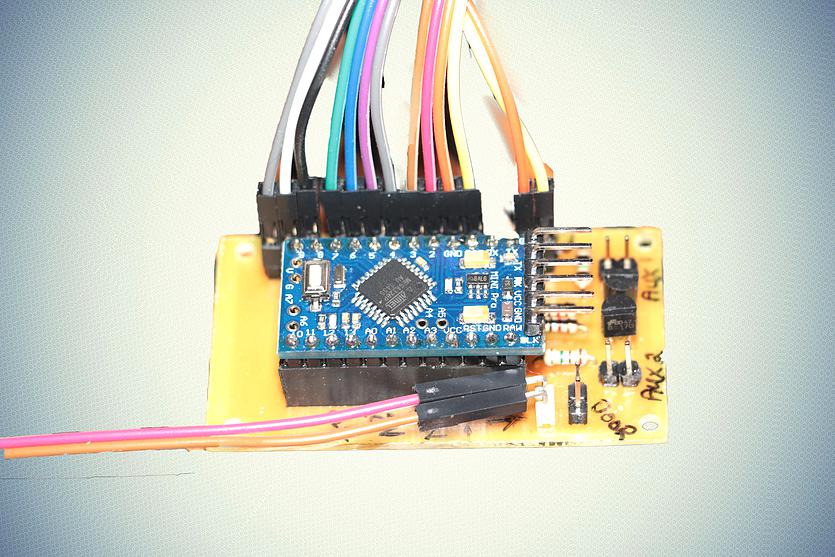
The hardware BoM consists of a 4×4 keypad, an Arduino Pro Mini, a small custom PCB and a few external electronic parts to complete the design.

He’s been using it flawlessly for a year and you could try to build one too: all the documentation is on github comprehensive of Eagle PCB files for the main board, the Arduino code, BoM, a user manual and some useful construction tips.

Make your DIY smart glasses running on Arduino

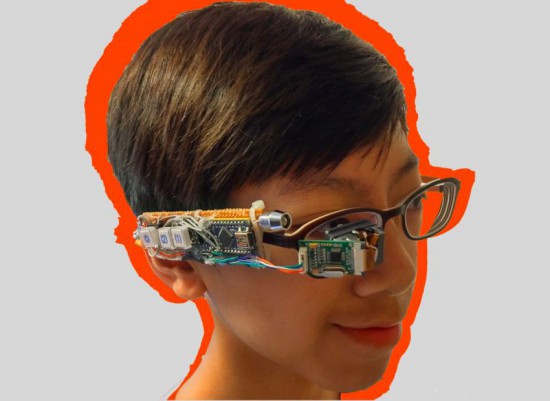
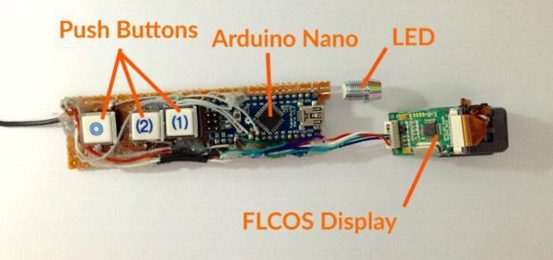
Jordan Fung is a 13-year-old maker and programmer based in Hong Kong. He recently developed Arduino-based smart glasses called Pedosa Glass, which are able to activate, in this first release, a flashlight and a timer:

The Pedosa Glass is powered by a single Arduino Nano running an “operating system” developed by me.
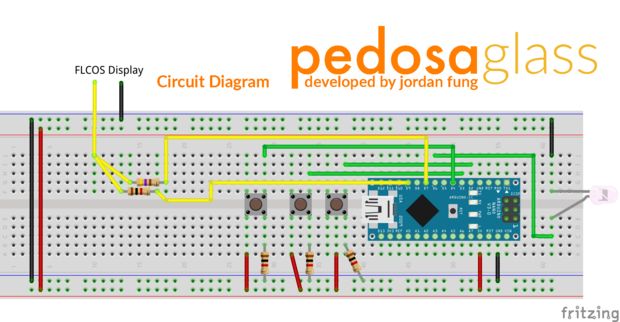
There is a tiny FLCOS display in the front. The AV signal from the Arduino will be displayed on it. It is equipped with 3 push buttons, in which 2 of them are control buttons and one of them be the home button, also equipped with a super-bright white LED for use as a flashlight.

In the picture below you can explore the electronic scheme:


Jordan is working hard to add new applications and features to the project but in the meanwhile he shared his work on a great tutorial on Instructables.

Making beyond the Wall: get to know chinese makers

Last June Arduino partnered with Seeedstudio to manufacture Genuino boards for the chinese market and during Maker Faire Rome Massimo Banzi took part to an interesting panel to promote  4 chinese delegates from business, education, design and research domains presenting their work and discussing what does it mean to be a maker in China. (in the pic from left to right, Lin, Massimo, Alessio, Jin, Chenille & Flamingo).

The panel titled Making beyond the Wall and moderated by Alessio Jacona tried to address the growing maker movement in China which is not so visible to the European community while the hype of manufacture in Shenzhen, the Chinese Silicon Valley, is gaining more and more international media attention.
Flamingo was the first presenter of the session. Indeed he was also the first person to use Arduino boards in China back in 2007. As an evangelist, he taught physical interactions in China Central Academy of Fine Arts and even started the digital firm K1ND Beijing with Ogilvy China, which focus on interactive design with open source technologies for business projects.

He introduced LightBot (watch video on youku) made in collaboration with Jun Huang, an architect based in China. It’s an installation using LEDs as a brush to draw on light-sensitive canvas. The material on the wall glows after being exposed to light, particularly ultraviolet light, and fades away after some time. Lightbox is powered by an Arduino controlling 1024 LED lights installed on the pallet and stepper motors to control the movement.

Then it was the turn for  Jin  introducing Minibuilder and Candy Project (we featured her work in our blog earlier) created during her fellowship at Iaac. With her international background, Jin explained how she realized how the culture of making in China is focusing more on hardware startups with strong potential to accelerate thanks to great manufacturing opportunities. Whereas in the West, people see it more as a hobby or prefer to explore the conceptual development in a lab environment.  Nowadays she is implementing a new VR projects in China.

Later Lin explained his work as a tutor at the University of Science and Technology in Beijing and also his commitment as a community manager of mechanics and robotics in arduino.cn forum, the community of Arduino fans who also participated to Arduino Day. He worked on various projects and applied Arduino in hemiplegia rehabilitation equipment through sensor feedback and in a gearbox to detect malfunctions through vibration, temperature and stress.

Last but not least, Chenille talked about how he wrote the first book about Arduino in China and more recently, translated the third edition of Getting started with Arduino book into Chinese. He’s now working on a brainwave-controlled music player.

The panel was a good chance to present to an european crowd real experiences from the voice of chinese makers and sharing good practices for future collaborations.

Are you based in China and  want to share a project made with an Arduino or Genuino board? Submit it to the blog, we’d like to feature it and tell your story!

A DIY smartwatch designed by a kid for kids

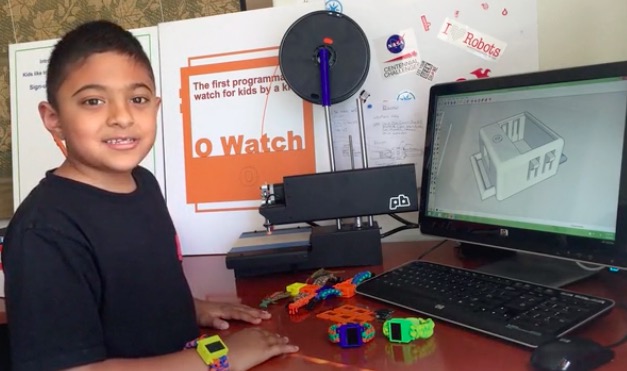
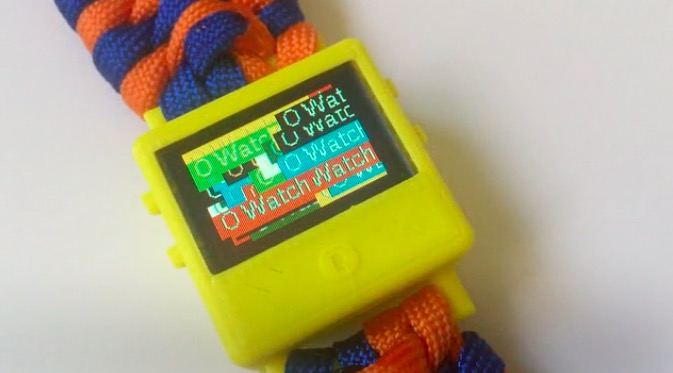
Omkar is a special 8 years old who created a wearable device called O Watch: an Arduino Zero-based smartwatch kit for kids. The project, recently kickstarted, allows young people to learn programming, 3D printing and a bit of craft while making their own smartwatch and customizing it. The kit will be released with a series learning tools including a kid-friendly website with easy tutorials, examples and a community to share creations.

He’s not new to DIY tech and learning as he’s been doing a few workshops to teach Arduino to other kids and likes it when they get excited about making Arduino projects. Omkar told us:

I was first interested in robots. But my dad got me started with projects that light up LEDs that were easier to learn and code myself. (ps: my dad did not let me get a robot kit at first :).

I decided to do a wearable project because there were many of them I saw in the news and I thought they were cool. I wanted to make a smartwatch so that I could wear it myself and share my project with my friends in school.

If you are a kid and are new to making, O Watch could be a great starting point as you’ll learn about coding, 3d printing, craft and also sharing. The Arduino IDE will be your  primary programming tool for the watch, the case can be 3D printed in a color of your choice and you’ll experiment on how to knot yourself a cool band to wear it.

What are you waiting for? You have just a few days to back the project on Kickstarter and have an O Watch delivered to your home!

Arduino Blog 08 Sep 23:03

A DIY Seizure Alarm based on Arduino Micro

Chad Herbert’s son Daniel was diagnosed with Benign Rolandic Epilepsy in 2014. It’s a type of epilepsy the Epilepsy Foundation says accounts for about 15 percent of all Epilepsies in children and the good news is that most children grow out of it.

The bad news is that Daniel’s most affected by his condition at night or early morning while he sleeps. That’s why Chad invested in a sleep monitor/alarm for his bed that detects when he’s having a full tonic-clonic seizure.

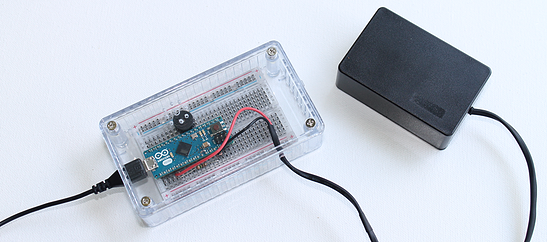
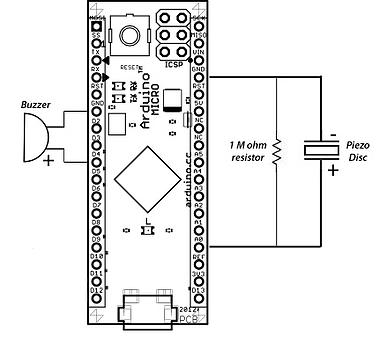
At the same time though, he decided to work on a DIY version of a seizure alarm  running on Arduino Micro. The starting point was Arduino’s “Knock” example project with the sketch code originally created in 2007 by David Cuartielles and modified by Tom Igoe in 2011:

While shopping around for the exact type of monitor/alarm my wife and I wanted, I found out a few things:

  • They are hard to find. I believe the one we ended up with was manufactured by a company in Great Britain.
  • They are expensive. The one we ended up getting cost in the $400-$500 range.
  • The one we have isn’t totally cumbersome, but it’s not easy to pack up and take with you somewhere.

Figuring these things out, I decided to search for a way to build a simple seizure alam that’s both relatively inexpensive and easy to transport. I’m sure there are people out there who have children that suffer from seizures that simply cannot afford equipment such as this even though they truly need it. Thanks to the folks in the Arduino community, I was able to accomplish both things I was setting out to do.

Discover how it was made on his blog.


This Arduino Basic Kit has everything a newbie maker could ask for

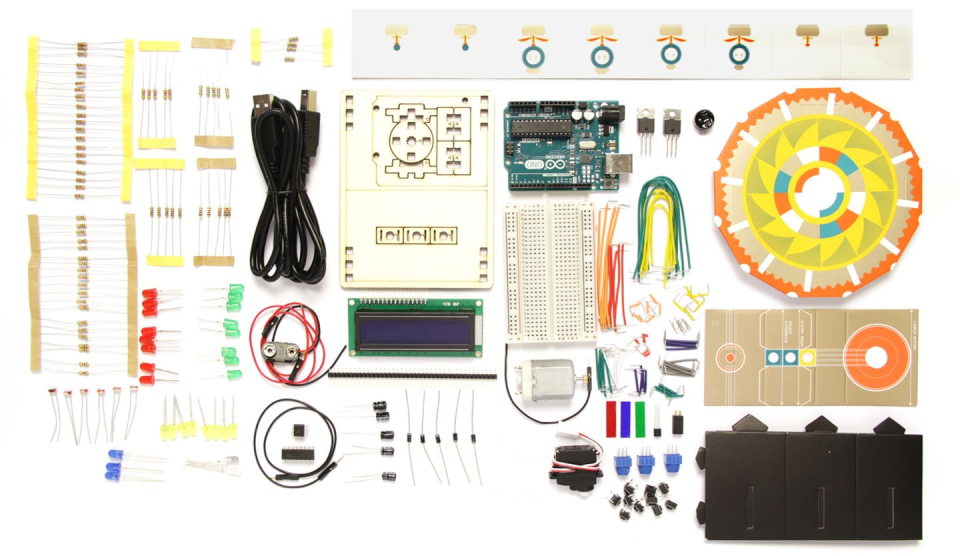
It's easy to think about tinkering around with Arduino, but take more than 30 seconds to look at the platform, and suddenly it becomes daunting: not only do you need an Arduino itself, but to get started you need resisters, wires, LEDs, screens and a host of other components that are almost always sold separately. Have no fear, newbies: there's a new Arduino Basic Kit in town, and it has all the spare parts a beginner could want.

Source: 123D Circuits

Engadget 29 Jul 04:31
arduino  build  diy  maker  misc  projects  

This Arduino Basic Kit has everything a newbie maker could ask for

It's easy to think about tinkering around with Arduino, but take more than 30 seconds to look at the platform, and suddenly it becomes daunting: not only do you need an Arduino itself, but to get started you need resisters, wires, LEDs, screens and a host of other components that are almost always sold separately. Have no fear, newbies: there's a new Arduino Basic Kit in town, and it has all the spare parts a beginner could want.

Filed under: Misc

Comments

Source: 123D Circuits

Engadget 29 Jul 04:31
arduino  build  diy  maker  misc  projects  

Smile! This plant wants to take a selfie with you

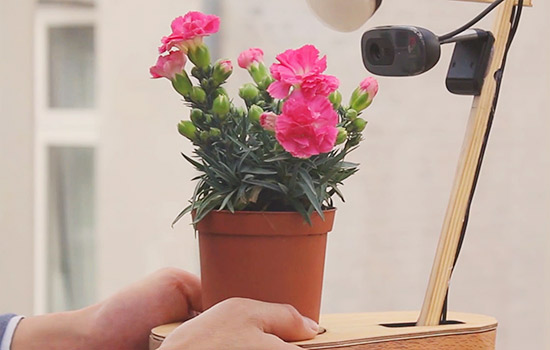
Selfie Plant is an interactive installation taking pictures of itself using Arduino Yún, Facebook Graph APIs and then uploads them to Facebook. It was developed by a group of students at the Copenhagen Institute of Interaction Design during “The secret life of objects” course held also by Arduino.cc team. The final prototype was placed in the exhibition of the school, to see the interaction of the audience with it and you can see the result on Facebook.

The Selfie Plant is an attempt to provoke some thoughts above genre of expression. The Selfie Plant expresses itself in the form of nice-looking selfies, which it clicks according to its mood, weather or occasion. It mimics human behaviour, by giving it’s best pose and adjusting the camera angle to take the perfect selfie.


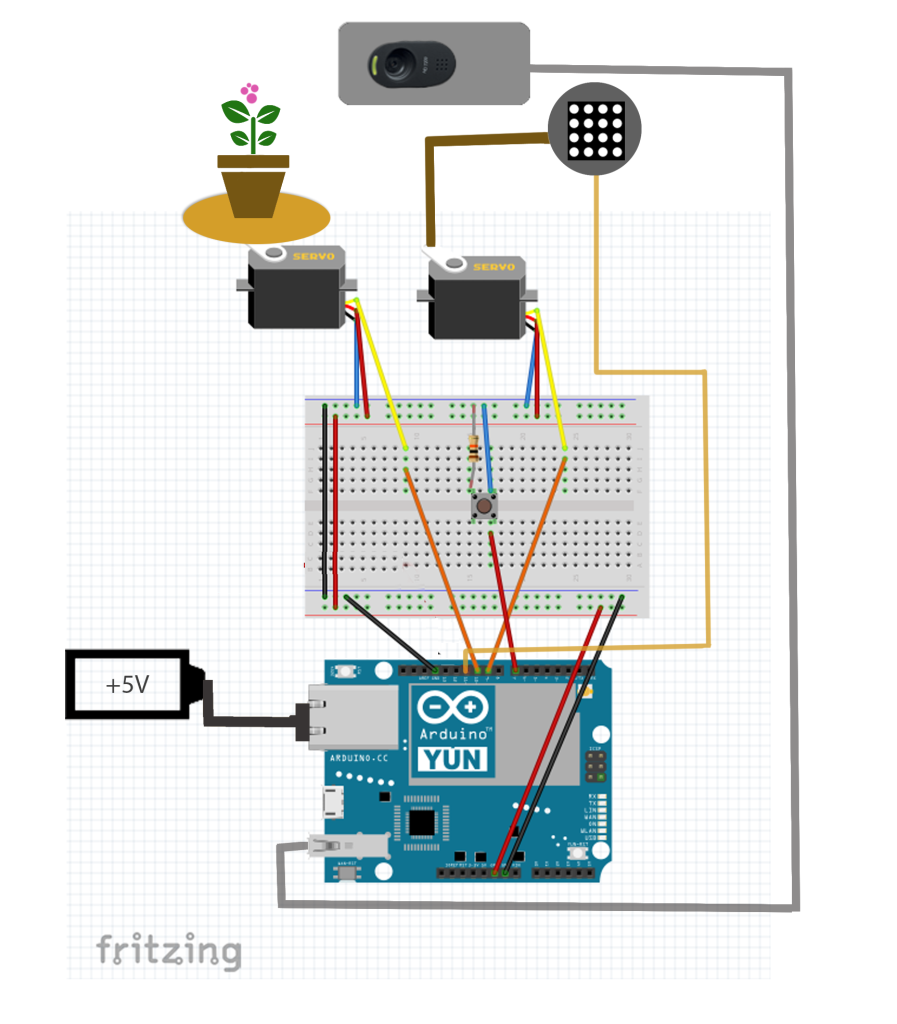
In the documentation on Github you can find all the details of the project composed by an Arduino Yún, controlling 2 servo motors and adjusting the positions of the plant and the camera stick; a python script (facebook.py) which communicates with Facebook’s graph API to post the captured photos on plant’s Facebook profile. In addition you’ll need also a LED Matrix, a Bread Board and 5 Volt Battery.

Here’s a preview of the diagram:


Smile! This plant wants to take a selfie with you

The Selfie Plant is an interactive installation taking pictures of itself using Arduino Yún, Facebook Graph APIs and then uploads them to Facebook. It was developed by a group of students at the Copenhagen Institute of Interaction Design during “The secret life of objects” course held also by Arduino.cc team by Joshua Noble and Simone Rebaudengo. The final prototype was on display at the class exhibition, to observe the interaction of the audience with it, and the results are on Facebook.

The Selfie Plant is an attempt to provoke some thoughts above genre of expression. The Selfie Plant expresses itself in the form of nice-looking selfies, which it clicks according to its mood, weather or occasion. It mimics human behaviour, by giving it’s best pose and adjusting the camera angle to take the perfect selfie.

In the documentation on Github you can find all the details of the project composed by an Arduino Yún, controlling 2 servo motors and adjusting the positions of the plant and the camera stick; a python script (facebook.py) which communicates with Facebook’s graph API to post the captured photos on plant’s Facebook profile. In addition you’ll need also a LED Matrix, a Bread Board and 5 Volt Battery.

Here’s a preview of the diagram: