Posts with «clock hacks» label

The Flowing Pixels of Time Wait for No Man

The hourglass dramatically depicts the flow of time; gravity pulling grains of sand inevitably downward. So it is with the Bits of Time project by [Frank Andre]. The pixels drop, stopping only when the battery dies. Or, when your eggs are ready. (Pssst, it’s also on Hackaday.io.)

Look, Ma! No GIF!

The project starts with a couple of [Frank’s] PixBlocks. A processor is added to one PixBlock to serve as the controller for both after they are connected via the serial bus. A tilt switch, with a debouncing circuit, is connected to an IO pin. This tells the processor the orientation of the box and therefore which way the pixels should flow.

Two  switches set the duration of the timer in 15 second increments. A third starts the timer. When the box is rotated the pixels start flowing in the opposite direction. With code available on GitHub the system can be programmed for other effects such as changing colors, flickering, or even text display.

You’ll agree this is a bit less intimidating than the MacGyver-ish kitchen timer we covered last year.


Filed under: clock hacks, led hacks

LED Pendulum Pulses Out Clock Face

You have to admit [Dylan Rush’s] clock is a real swinger. Literally. You’ve seen the desk novelties where an arm with leds mounted on it sweeps out a message? [Dylan] did the same thing to make a clock but instead of drawing numbers, he actually draws an analog clock face. Y’know one of those round things with arms?

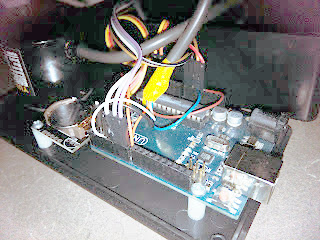
Behind the clock is an Arduino driving a MAX7219 LED controller. Using the MAX7219 was a challenge because it expects a grid of LEDs while the clock needs a linear array. [Dylan] used a line of individual LEDs wired to match what the controller wanted. A rotary encoder tells the processor the position of the arm so the Arduino sketch can determine which LEDs should be lit to show the time and clock face.

What’s even more amazing is [Dylan] created this before clocks became infamous.

Swing over to the video after the break.


Filed under: Arduino Hacks, clock hacks, led hacks

KIM-1 Clock

Over on hackaday.io, [Arduino Enigma] posted the code for his clock that runs on a KIM Uno (the KIM-1 clone we mentioned late last year). Although the KIM Uno has a few demos preloaded (including Microchess and a scientific calculator), all of them take some interaction. The clock makes the KIM Uno a more dynamic desk display since it does something useful without any user interaction (once you set the clock, of course).

The project shows the code stored in ROM, but you can’t directly enter the program into ROM (which is really EEPROM on the host Arduino). The trick is to enter the address (that is press AD and then 0, 4, 0, 0) and then mash down the reset button for about a second. Then you can press DA and enter the hex codes provided (pressing + after each byte). Since the code is in nonvolatile storage, you can start it at any time by setting the time in RAM and executing the code at address 400.

The program is short and sweet, making it is easy to enter and a great opportunity to brush up on understanding your 6502. However, the simplicity means it doesn’t range check your initial time settings, so don’t tell it that it is 32:99 or something like that. The code isn’t commented, but it is pretty simple, once you realize one thing: the first instruction, SED, sets the 6502’s decimal mode so no conversion between hex and decimal is needed.

Each part of the time (hours, minutes, and seconds) is stored in RAM at locations 0024, 0025, and 0026. The NEXTD routine uses the X register to scan through each part of the time, adding 1 or 0 as appropriate (stored in RAM location 0029). If the time part matches the corresponding table entry at CARRYT (that is, 60, 60, or 24 also indexed by the X register), then the code does not take the branch to CONTIN and reloads the increment (location 0029) with zero, so the next digits will not advance. If it does match, the increment stays as 1 and the current part returns to a zero value.

You may notice the time is stored back to locations starting at 0024 and 00F9. That’s because 00F9 is where the KIM-1 ROM looks for data to write to the display when calling the ROM-resident subroutine at 1F1F. The X register ranges from 0 to 2, corresponding to the seconds, minutes, and hours. Once all the time is updated, the loop at L1 displays the time and delays for about one second.

A neat piece of coding and a great example of the power of the 6502’s decimal mode. This would look even better with [Scott’s] enhanced version of the KIM-1 UNO.


Filed under: Arduino Hacks, classic hacks, clock hacks

Instrument Cluster Clock Gets The Show On The Road

While driving around one day, [Esko] noticed that the numbers and dials on a speedometer would be a pretty great medium for a clock build. This was his first project using a microcontroller, and with no time to lose he got his hands on the instrument cluster from a Fiat and used it to make a very unique timepiece.

The instrument cluster he chose was from a diesel Fiat Stilo, which [Esko] chose because the tachometer on the diesel version suited his timekeeping needs almost exactly. The speedometer measures almost all the way to 240 kph which works well for a 24-hour clock too. With the major part sourced, he found an Arduino clone and hit the road (figuratively speaking). A major focus of this project was getting the CAN bus signals sorted out. It helped that the Arduino clone he found had this functionality built-in (and ended up being cheaper than a real Arduino and shield) but he still had quite a bit of difficulty figuring out all of the signals.

In the end he got everything working, using a built-in servo motor in the cluster to make a “ticking” sound for seconds, and using the fuel gauge to keep track of the minutes. [Esko] also donated it to a local car museum when he finished so that others can enjoy this unique timepiece. Be sure to check out the video below to see this clock in action, and if you’re looking for other uses for instrument clusters that you might have lying around, be sure to check out this cluster used for video games.

The mechanics in dashboards are awesome, and produced at scale. That’s why our own [Adam Fabio] is able to get a hold of that type of hardware for his Analog Gauge Stepper kit. He simply adds a 3D printed needle, and a PCB to make interfacing easy.


Filed under: car hacks, clock hacks

Large Seven-Segment Clock Build Takes Time To Perfect

[Kevin Rye] built a discrete TTL based seven-segment clock, and he wasn’t too happy with the ugly insides compared to the nice enclosure he built for it. He embarked on creating another large seven-segment clock to put inside that enclosure.

Clocks, and specifically seven-segment based ones, aren’t anything new to write about. This particular project, which is still work in progress, is interesting. [Kevin] is an experienced hacker, but the problems he encountered and resolved along the way could prove useful to a fellow hacker someday.

To start with, he tried rectifying his old build. But in his own words “You can polish a turd, but it’s still a turd.” Five years later, he’d had enough. He’s built a lot of other clocks, but rather than repurposing them, he decided to start from scratch. He quickly breadboarded an Arduino, some displays and drove them using the Multiplex7seg library. That library supports only four characters, so he was back to the drawing board. With a fresh start, his design is now moving along nicely. For now, he’s designed three boards for the display, two boards for the colons between digits, the main Arduino-clone controller board and a 3D printed front frame to hold the displays. It will be nice to finally see that enclosure receive some fitting occupants and bring this build to closure.


Filed under: clock hacks

Strapping an Apple II to Your Body

Now that the Apple wristwatch is on its way, some people are clamoring with excitement and anticipation. Rather than wait around for the commercial product, Instructables user [Aleator777] decided to build his own wearable Apple watch. His is a bit different though. Rather than look sleek with all kinds of modern features, he decided to build a watch based on the 37-year-old Apple II.

The most obvious thing you’ll notice about this creation is the case. It really does look like something that would have been created in the 70’s or 80’s. The rectangular shape combined with the faded beige plastic case really sells the vintage electronic look. It’s only missing wood paneling. The case also includes the old rainbow-colored Apple logo and a huge (by today’s standards) control knob on the side. The case was designed on a computer and 3D printed. The .stl files are available in the Instructable.

This watch runs on a Teensy 3.1, so it’s a bit faster than its 1977 counterpart. The screen is a 1.8″ TFT LCD display that appears to only be using the color green. This gives the vintage monochromatic look and really sells the 70’s vibe. There is also a SOMO II sound module and speaker to allow audio feedback. The watch does tell time but unfortunately does not run BASIC. The project is open source though, so if you’re up to the challenge then by all means add some more functionality.

As silly as this project is, it really helps to show how far technology has come since the Apple II. In 1977 a wristwatch like this one would have been the stuff of science fiction. In 2015 a single person can build this at their kitchen table using parts ordered from the Internet and a 3D printer. We can’t wait to see what kinds of things people will be making in another 35 years.


Filed under: clock hacks, wearable hacks
Hack a Day 09 Apr 00:01

Laser-Cut Clock Uses Planetary Gear

[wyojustin] was trying to think of projects he could do that would take advantage of some of the fabrication tech that’s become available to the average hobbyist. Even though he doesn’t have any particular interest in clocks, [wyojustin] discovered that he could learn a lot about the tools he has access to by building a clock.

[wyojustin] first made a clock based off of a design by [Brian Wagner] that we featured a while back. The clock uses an idler wheel to move the hour ring so it doesn’t need a separate hour hand. After he built his first design, [wyojustin] realized he could add a planetary gear that could move an hour hand as well. After a bit of trial and error with gear ratios, he landed on a design that worked.

The clock’s movement is a stepper motor that’s driven by an Arduino. Although [wyojustin] isn’t too happy with the appearance of his electronics, the drive setup seems to work pretty well. Check out [wyojustin]’s site to see the other clock builds he’s done (including a version with a second hand), and you can peruse all of his design files on GitHub.

Looking for more clock-building inspiration? Check out some other awesome clock builds we’ve featured before.


Filed under: Arduino Hacks, clock hacks

Hat-Mounted Clock Requires Mirror For Wearer To Tell Time

[gfish] was planning on attending Burning Man and wanted to make something unique (and useful) to wear. He decided on a hat/clock hybrid. Just slapping a clock on a hat would be too easy, though. [gfish] wanted his hat to change time zones both via manual switches or physical location.

On the front of the hat there are 2 hands, as most clocks have. Each one is attached to one of two concentric shafts that run to the back of the hat. Each hand is individually controlled by an RC vehicle servo. Those of you familiar with RC servos know that a servos’ max rotation is about 180 degrees and is certainly not enough for a full revolution required by the clock. To fix this, there is a 3:1 gear set that allows a 120 degree rotation of the servo to move the clock hand a full 360 degrees. With this method, each hand can’t move past 12 and instead has to quickly move counter-clockwise to get where it needs to be in order to again start its journey around the clock face.

Mounted inside the hat there is an Arduino that controls the clock, a GPS shield to determine location and an RTC to maintain accurate time. Mounted on the side of the hat is a control panel that contains an overall on/off switch as well as a rotary switch for selecting a specific timezone or for engaging GPS mode. The whole thing is powered by a 9 volt battery.

If you like unnecessarily complicated top hats, check out this WiFi enabled message displaying one.


Filed under: clock hacks, wearable hacks
Hack a Day 14 Feb 21:00

Pac-Man Clock Eats Time, Not Pellets

[Bob’s] Pac-Man clock is sure to appeal to the retro geek inside of us all. With a tiny display for the time, it’s clear that this project is more about the art piece than it is about keeping the time. Pac-Man periodically opens and closes his mouth at random intervals. The EL wire adds a nice glowing touch as well.

The project runs off of a Teensy 2.0. It’s a small and inexpensive microcontroller that’s compatible with Arduino. The Teensy uses an external real-time clock module to keep accurate time. It also connects to a seven segment display board via Serial. This kept the wiring simple and made the display easy to mount. The last major component is the servo. It’s just a standard servo, mounted to a customized 3D printed mounting bracket. When the servo rotates in one direction the mouth opens, and visa versa. The frame is also outlined with blue EL wire, giving that classic Pac-Man look a little something extra.

The physical clock itself is made almost entirely from wood. [Bob] is clearly a skilled wood worker as evidenced in the build video below. The Pac-Man and ghosts are all cut on a scroll saw, although [Bob] mentions that he would have 3D printed them if his printer was large enough. Many of the components are hot glued together. The electronics are also hot glued in place. This is often a convenient mounting solution because it’s relatively strong but only semi-permanent.

[Bob] mentions that he can’t have the EL wire and the servo running at the same time. If he tries this, the Teensy ends up “running haywire” after a few minutes. He’s looking for suggestions, so if you have one be sure to leave a comment.


Filed under: Arduino Hacks, clock hacks

What is the Matrix…Clock?

We’re surprised we haven’t seen this kind of clock before, or maybe we have, but forgot about it in the dark filing cabinets of our minds. The above picture of [danjhamer’s] Matrix Clock doesn’t quite do it justice, because this is a clock that doesn’t just tick away and idly update the minutes/hours.

Instead, a familiar Matrix-esque rain animation swoops in from above, exchanging old numbers for new. For the most part, the build is what you would expect: a 16×8 LED Matrix display driven by a TLC5920 LED driver, with an Arduino that uses a DS1307 RTC (real-time clock) with a coin cell battery to keep track of time when not powered through USB. [danjhamer] has also created a 3D-printed enclosure as well as added a piezo speaker to allow the clock to chime off customizable musical alarms.

You can find schematics and other details on his Hackaday.io project page, but first, swing down below the jump to see more of the clock’s simple but awesome animations.


Filed under: Arduino Hacks, clock hacks