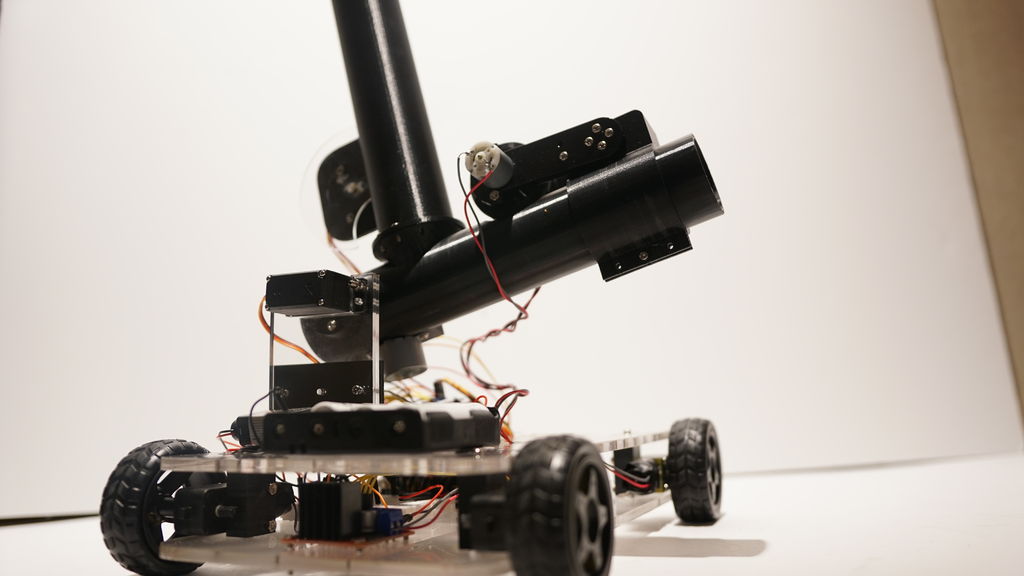
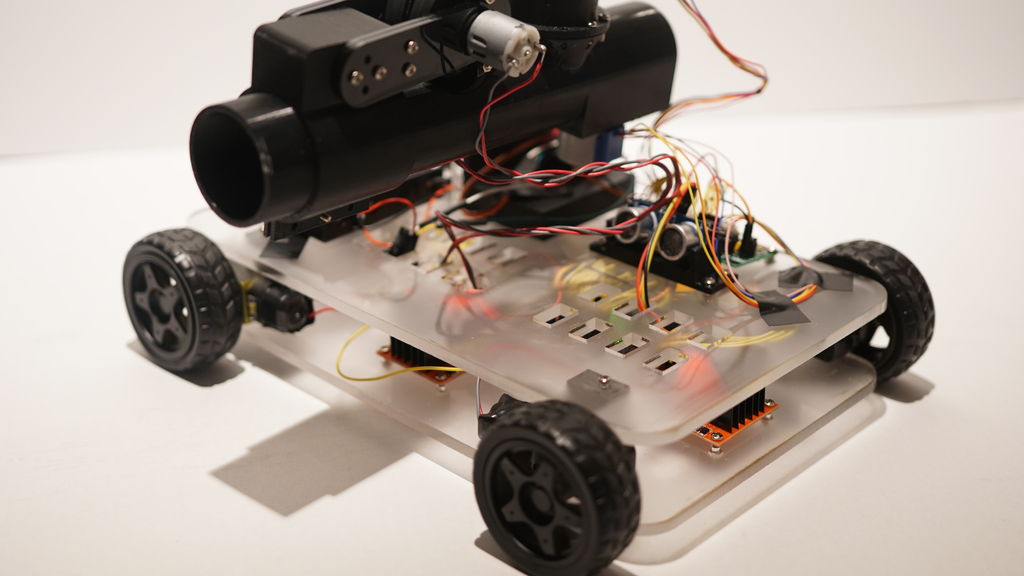
If you want to “enhance your athletic training regimen,” or perhaps just have a bit of fun with robotically launched ping pong balls, then be sure to check out the Pingo apparatus shown in the video below. This robot moves back and forth on four DC motor-powered wheels, searching for targets with an ultrasonic rangefinder.
When something comes into view, Pingo adjusts its ping pong launching tube’s angle to match the target distance, then loads a ball and flings it into the air with a pair of spinning disks.
The device is controlled by an Arduino Mega and uses a half-dozen DC motors, a pair of steppers, and even a servo to accomplish its mission.
[Elite Worm] wrote in to tell us about a cool little keyboard designed to make playing a certain game a whole lot easier. One of the ways you can move your character is with the numpad in directional mode plus Control and Shift, but those are too far apart to drive blindly with one hand. This is all the motivation [Elite Worm] needed to build a custom keyboard with only the essentials.
The keyboard is controlled by an Arduino Pro Micro, which is fairly standard for this type of build — it’s usually that or a Teensy. [Elite Worm] used Cherry MX browns for a nice tactile feel, and added LEDs for a purple-white under-glow. We love the way the printed keycaps turned out, and are impressed because tolerances are notoriously tight for those fruity switch stems.
Starting to think of a few uses for a small custom keypad? This thing is wide open, and [Elite Worm] will even send you the PCB files if you ask nicely. See if you can get past the break without your mouse, and check out the build video while you wait.
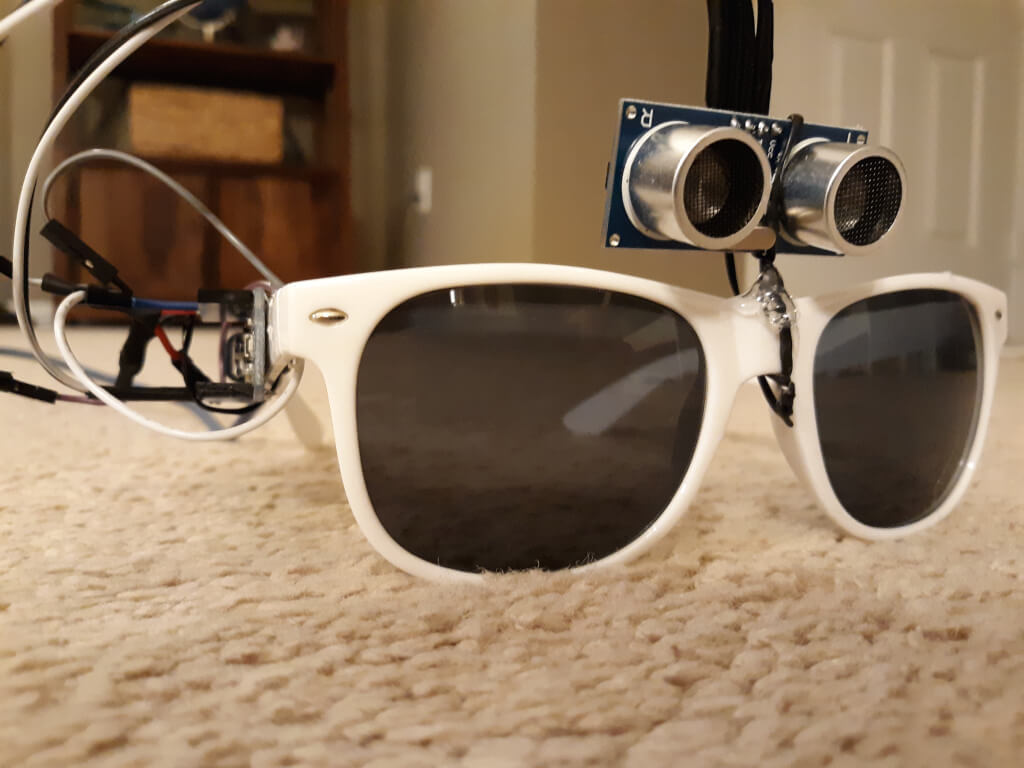
Touching your face is a subconscious behavior that we all do, and it is also an easy way to pick up illnesses like the coronavirus and flu. However, like many infectious diseases, proper hygiene can help reduce your risk. With this in mind, Nick Bild designed a simple solution in the form of a modified pair of glasses to provide a subtle reminder not to go near your eyes, mouth, and nose.
The project, which Bild calls Sentinel, consists of an ultrasonic sensor mounted on top of the bridge and an Arduino Nano along the temple. Whenever a hand (or object) is detected in close proximity to the face, a red warning LED lights up in the wearer’s peripheral vision.
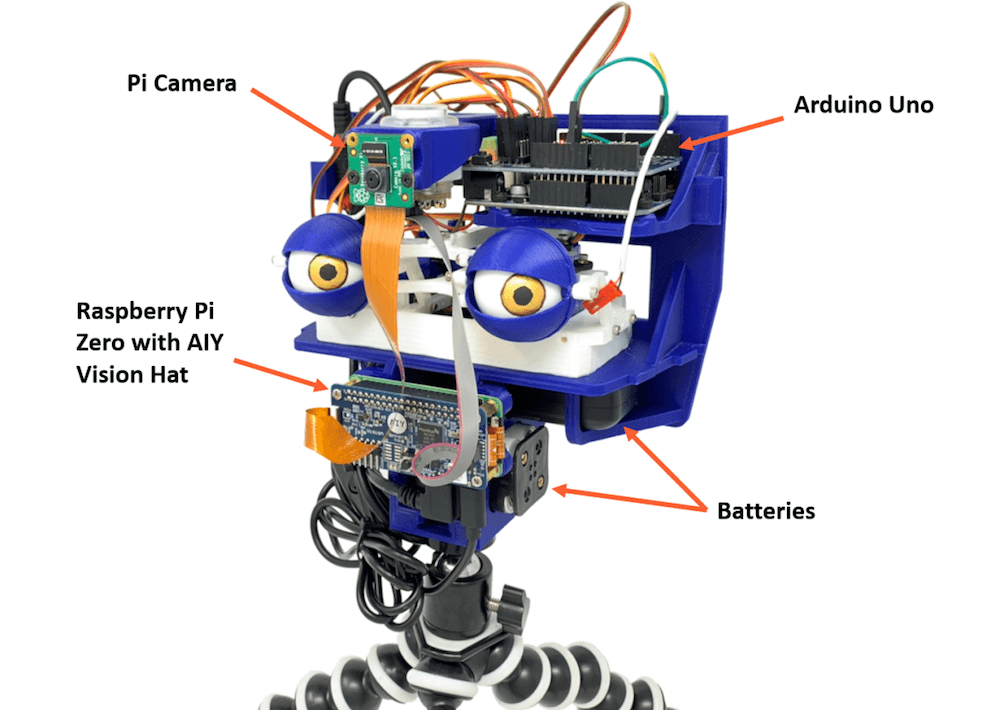
When you step out in public, you’ll often be filmed by a number of cameras and perhaps even be analyzed by tracking software of some kind. The Watchman robot head by Graham Jessup, however, makes this incredibly obvious as it detects and recognizes facial movements, then causes a pair of eyeballs to follow you around.
The 3D-printed system — which is a modified version of Tjhazi’s Doorman — uses a Raspberry Pi Camera to capture a live video feed, along with a Raspberry Pi Zero and a Google AIY HAT for analysis.
This setup passes info on to an Arduino Uno that actuates the eyeballs via a 16-channel servo shield and a number of servos. The device can follow Jessup up, down, left, and right, making for a very creepy robot indeed!
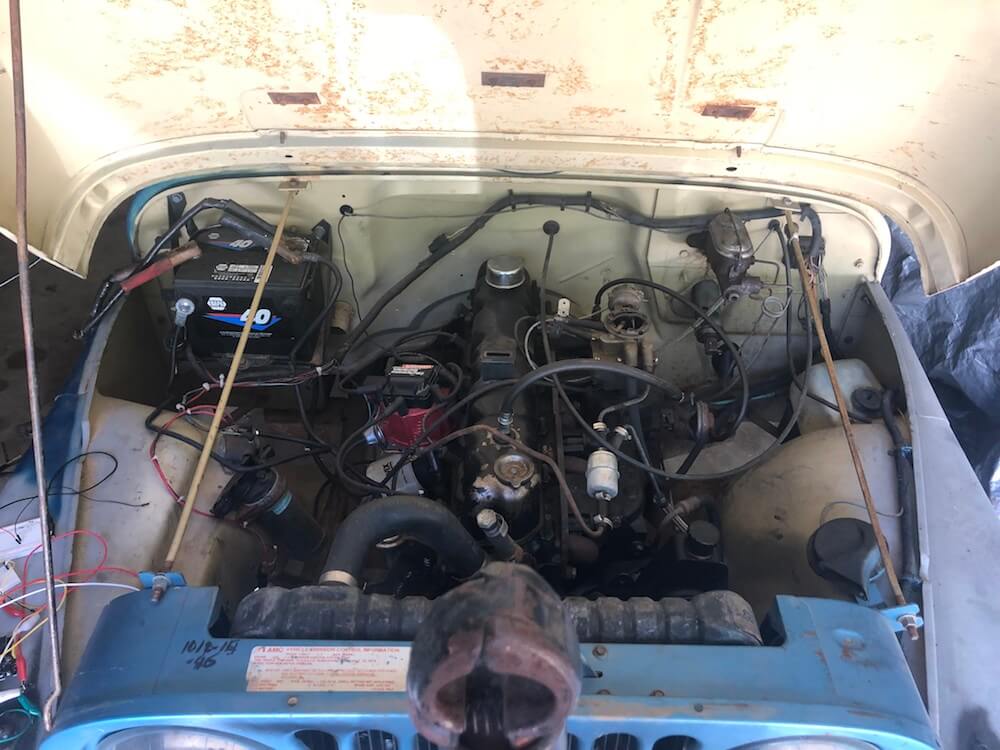
The build uses the laptop’s Enhanced Dictation functionality to convert text into speech, and when a Python program receives the proper keywords, it sends an “H” character over serial to an Arduino Uno to activate the vehicle.
The Uno uses a transistor to control a 12V relay, which passes current to the Jeep’s starter solenoid. After a short delay, the MacBook then transmits an “L” command to have it release the relay, ready to do the job again when needed!
As a fan of Iron Man, Forsyth channeled his inner Tony Stark and even programmed the system to respond to “JARVIS, let’s get things going!”
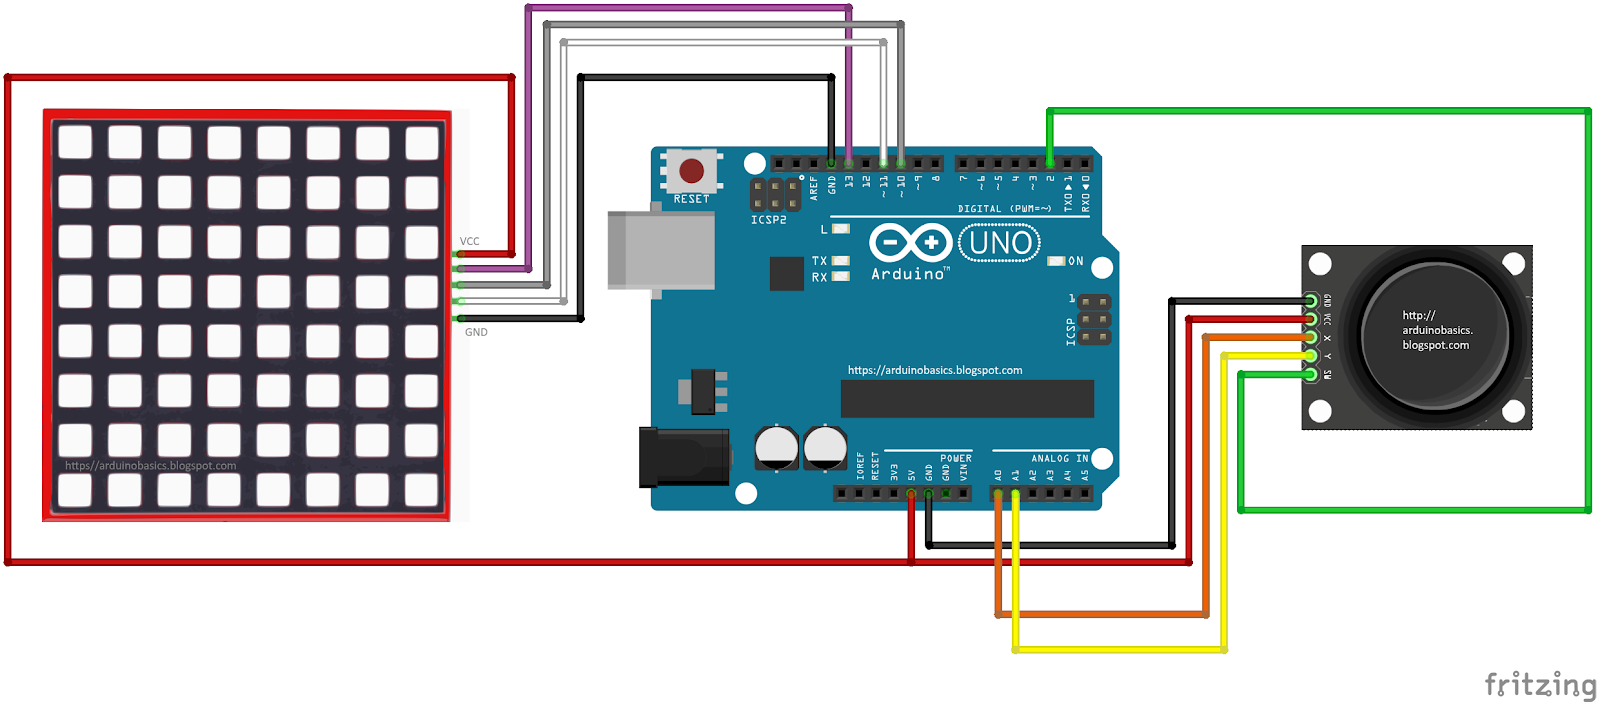
In this project, we will use a little joystick to move a pixel around an 8x8 LED matrix. The joystick has a built-in button, such that when you press down onto the joystick, the colour of the pixel will change from red to blue to green. This is a very simple project, however, controlling the matrix adds a certain level of complexity. You will need to understand binary notation and bit-shifting techniques to grasp the concept of this tutorial.
All of the parts used in this project can be obtained from digitspace.com
The SPI library is required for this project. However, this library is built into the current version of the Arduino IDE. No additional download is required. Just make sure to include it at the top of the sketch.
Arduino Code
The Arduino IDE can be downloaded from the official Arduino website: here. Copy and paste the following code into your Arduino IDE and upload it to the Arduino UNO.
As you can see from the video above, the pixel changes colour when the button is pressed. The position of the pixel relates to the position of the joystick. The lag between the joystick movement and pixel movement is minimal, and very satisfying.
Conclusion
This was a very fun and satisfying project that showcases the interaction between a joystick and a 8x8 LED matrix with the help of an Arduino UNO. This project was sponsored by the kind people at digitspace. Without their sponsorship, this tutorial would not have been possible. Please visit their website for some nice deals on Arduino related products.
If you found this tutorial helpful, please consider supporting me by buying me a virtual coffee/beer.
Fighting fire with robots may take jobs away from humans, but it can also save lives. [Mell Bell Electronics] has built a (supervised) kid-friendly version of a firefighting robot that extinguishes flames by chasing them down and blowing them out.
This hyper-vigilant robot is always on the lookout for fire, and doesn’t waste movement on anything else. As soon as it detects the presence of a flame, it centers itself on the source and speeds over to snuff it out with a fan made from a propeller and a DC motor.
Here comes the science: fire emits infrared light, and hobbyist flame sensors use IR to, well, detect fire. This fire bot has three of these flame sensors across the front that output digital data to what has got to be the world’s smallest Arduino – the ATmega32U4-based PICO board that [Mell Bell] just so happens to sell. Cover your mouth and nose and crawl along the floor toward the break to see how responsive this thing is.
Firefighters aren’t the only brave humans involved in the process of keeping the forests standing, or who feel the rising pressure of automation. Hackaday’s own [Tom Nardi] wrote a piece on a dying breed called fire lookouts that will no doubt ignite your interest.
There have been plenty of Z80 computer builds here on Hackaday, but what sets them apart is what you do with them. [Andrew] writes in with his Z80 single-board computer made from scratch, using the Arduino standard headers for its I/O. In turn, since he needed an easy way to program the flash memory which holds the software to run on the Z80, he used an Arduino Mega as a debugger, making the SBC an Arduino shield itself.
Using such a common header pinout for the Z80 computer allows it to be used with a variety of readily-available Arduino shields. This compatibility is achieved with an analog-digital converter and a 3.3 V regulator, mimicking the pins found in an Arduino Uno. The code, available on GitHub, includes an extensive explanation and walkthrough over the process in which the Mega takes over the bus from the Z80 to function as a fully-featured debugger. Programs can be loaded through embedding an assembly listing into the Mega’s sketch, or, once the debugger is up you can also upload a compiled hex file through the serial connection.
Music and synchronized lighting can be a beautiful combination, evident by panGenerator’s recent installation that was commissioned by the M?skie Granie concert tour in Poland.
The interactive sculpture was comprised of 15 drums that trigger waves of light traveling toward a huge helium-filled sphere floating above the area, appearing to charge it with sound and light energy as the instruments are played.
“The audience was invited to drum collectively and together create an audio-visual spectacle – intensity of which depended on the speed and intensity of the drumming. That fulfilled the main goal of creating interactive art experience in which the audience can actively participate in the event rather than just passively enjoy the music, gathering and playing together.”
The project incorporated 200 meters of addressable RGB LEDs and measured in at roughly 300 square meters, making it likely the biggest such build ever seen there. According to the designers, each of the drums featured a custom PCB equipped with an Arduino Nano and microphone, and used an MCP2515-based CAN setup for communication.
All of this was assembled and taken down seven times over two months in cities around the country. Be sure to check out this dazzling display in action in the video below!
This post is from Massimiliano Pippi, Senior Software Engineer at Arduino.
The Arduino IoT Cloud platform aims to make it very simple for anyone to develop and manage IoT applications and its REST API plays a key role in this search for simplicity. The IoT Cloud API at its core consists of a set of endpoints exposed by a backend service, but this alone is not enough to provide a full-fledge product to your users. What you need on top of your API service are:
Good documentation explaining how to use the service.
A number of plug-and-play API clients that can be used to abstract the API from different programming languages.
Both those features are difficult to maintain because they get outdated pretty easily as your API evolves but clients are particularly challenging: they’re written in different programming languages and for each of those you should provide idiomatic code that works and is distributed according to best practices defined by each language’s ecosystem.
Depending on how many languages you want to support, your engineering team might not have the resources needed to cover them all, and borrowing engineers from other teams just to release a specific client doesn’t scale much.
Being in this exact situation, the IoT Cloud team at Arduino had no other choice than streamlining the entire process and automate as much as we could. This article describes how we provide documentation and clients for the IoT Cloud API.
Clients generation workflow
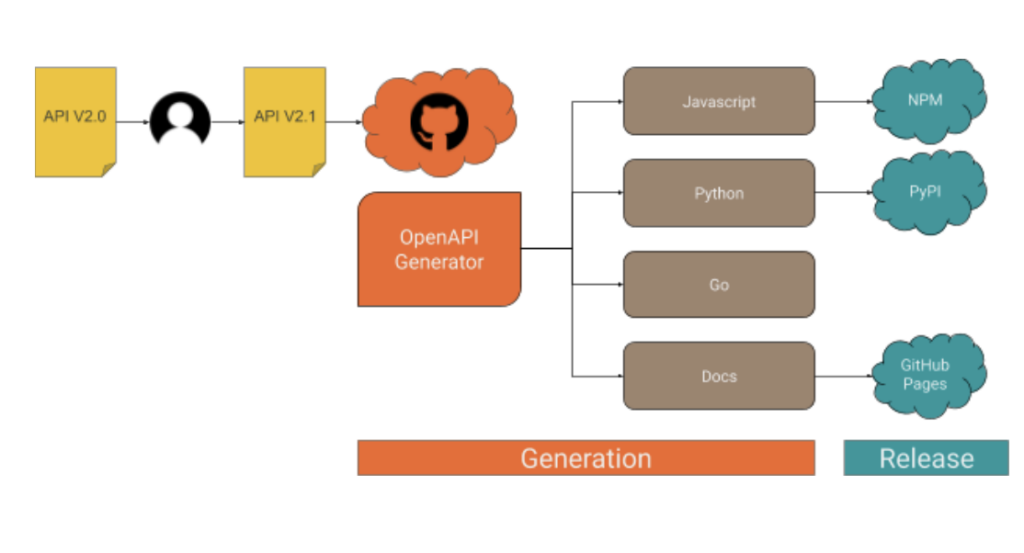
When the API changes, a number of steps must be taken in order to ship an updated version of the clients, as it’s summarized in the following drawing.
As you can see, what happens after an engineer releases an updated version of the API essentially boils down to the following macro steps:
1. Fresh code is generated for each supported client. 2. A new version of the client is released to the public.
The generation process
Part 1: API definition
Every endpoint provided by the IoT Cloud API is listed within a Yaml file in OpenAPI v3 format, something like this (the full API spec is here):
/v2/things/{id}/sketch:
    delete:
      operationId: things_v2#deleteSketch
      parameters:
      - description: The id of the thing
        in: path
        name: id
        required: true
        schema:
          type: string
      responses:
        "200":
          content:
            application/json:
              schema:
                $ref: '#/components/schemas/ArduinoThing'
          description: OK
        "401":
          description: Unauthorized
        "404":
          description: Not Found
The format is designed to be human-readable, which is great because we start from a version automatically generated by our backend software that we manually fine-tune to get better results from the generation process. At this stage, you might need some help from the language experts in your team in order to perform some trial and error and determine how good the generated code is. Once you’ve found a configuration that works, operating the generator doesn’t require any specific skill, the reason why we were able to automate it.
Part 2: Code generation
To generate the API clients in different programming languages we support, along with API documentation we use a CLI tool called openapi-generator. The generator parses the OpenAPI definition file and produces a number of source code modules in a folder on the filesystem of your choice. If you have more than one client to generate, you will notice very soon how cumbersome the process can get: you might need to invoke openapi-generator multiple times, with different parameters, targeting different places in the filesystem, maybe different git repositories; when the generation step is done, you have to go through all the generated code, add it to version control, maybe tag, push to a remote… You get the gist.
To streamline the process described above we use another CLI tool, called Apigentools, which wraps the execution of openapi-generator according to a configuration you can keep under version control. Once Apigentools is configured, it takes zero knowledge of the toolchain to generate the clients – literally anybody can do it, including an automated pipeline on a CI system.
Part 3: Automation
Whenever the API changes, the OpenAPI definition file hosted in a GitHub repository is updated accordingly, usually by one of the backend engineers of the team. A Pull Request is opened, reviewed and finally merged on the master branch. When the team is ready to generate a new version of the clients, we push a special git tag in semver format and a GitHub workflow immediately starts running Apigentools, using a configuration stored in the same repository. If you look at the main configuration file, you might notice for each language we want to generate clients for, there’s a parameter called ‘github_repo_name’: this is a killer feature of Apigentools that let us push the automation process beyond the original plan. Apigentools can output the generated code to a local git repository, adding the changes in a new branch that’s automatically created and pushed to a remote on GitHub.
The release process
To ease the release process and to better organize the code, each API client has its own repo: you’ll find Python code in https://github.com/arduino/iot-client-py, Go code in https://github.com/arduino/iot-client-go and so on and so forth. Once Apigentools finishes its run, you end up with new branches containing the latest updates pushed to each one of the clients’ repositories on GitHub. As the branch is pushed, another GitHub workflow starts (see the one from the Python client as an example) and opens a Pull Request, asking to merge the changes on the master branch. The maintainers of each client receive a Slack notification and are asked to review those Pull Requests – from now on, the process is mostly manual.
It doesn’t make much sense automate further, mainly for two reasons:
Since each client has its own release mechanism: Python has to be packaged in a Wheel and pushed to PyPI, Javascript has to be pushed to NPM, for Golang a tag is enough, docs have to be made publicly accessible.
We want to be sure a human validates the code before it’s generally available through an official release.
Conclusions
We’ve been generating API clients for the IoT Cloud API like this for a few months, performing multiple releases for each supported programming language and we now have a good idea of the pros and cons of this approach.
On the bright side:
The process is straightforward, easy to read, easy to understand.
The system requires very little knowledge to be operated.
The time between a change in the OpenAPI spec and a client release is within minutes.
We had an engineer working two weeks to set up the system and the feeling is that we’re close to paying off that investment if we didn’t already.
On the not-so-bright side:
If operating the system is trivial, debugging the pipeline if something goes awry requires a high level of skill to deep dive into the tools described in this article.
If you stumble upon a weird bug on openapi-generator and the bug doesn’t get attention, contributing patches upstream might be extremely difficult because the codebase is complex.
Overall we’re happy with the results and we’ll keep building up features on top of the workflow described here. A big shoutout to the folks behind openapi-generator and Apigentools!