I had a lot of trouble with motor driver boards and my Wild Thumper 4WD chassis - in the end I bought a more expensive motor controller said to handle 60A. I am controlling the paired (left/right side) motors by PWM signal and it now drives forward/backwards/left/right etc.
Last spring [Mike] built a foam rocket launchpad which was a hit with the kids in his neighborhood. But the launch system was merely a couple of buttons so the early enthusiasm quickly wore off. He went back to the drawing board to make improvements and really hit the jackpot!
The original launch system had one button for building up air pressure with a second big red button of doom for launching the rocket. The problem was a complete lack of user feedback; all the kids could do is guess how long they needed to hold the button to achieve the highest launch. This revision adds flashing LEDs to hold the attention of the wee ones but to also function as a gauge for the new pressure control system. The visually fascinating control board also includes a removable key to prevent accidental launches.
The particulars of this are as you’d expect: it’s a bunch of plumbing to manage the air pressure, an Arduino to control it all, and additional electronics in between to make them work together.
We’re especially impressed by the leap in features and quality from the first version to this one. It’s a testament to the power of quick proofs-of-concept before committing to a more involved build. Great work [Mike]!
We’ve seen rocket launchers for adults and some neat mission control panels but [Mike’s] kid friendly launch controller really is out of this world (sorry, couldn’t resist). You’ll find a video demo of this launcher after the break.
You may wonder why anyone would want to learn Morse code. You don’t need it for a ham license anymore. There are, however, at least three reasons you might want to learn it anyway. First, some people actually enjoy it either for the nostalgia or the challenge of it. After all, . Another reason is that Morse code can often get through when other human-readable schemes fail. Morse code can be sent using low power, equipment built from simple materials or even using mirrors or flashlights. Finally, Morse code is a very simple way to do covert communications. If you know Morse code, you could privately talk to a concealed computer on just two I/O lines. We’ll let you imagine the uses for that.
In the old days, you usually learned Morse code from an experienced sender, by listening to the radio, or from an audio tape. The state of the art today employs a computer to randomly generate practice text. [M0TGN] wanted a device to generate practice code, so he built it around an Arduino. The device acts like an old commercial model, the Datong D70, although it can optionally accept an LCD screen, something the D70 didn’t have.
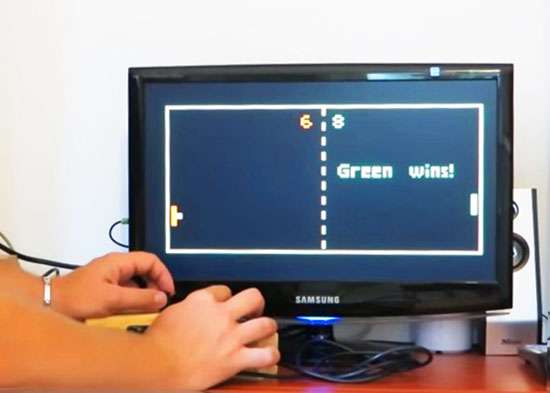
Everyone knows Pong, the first commercially successful arcade video game machine originally release by Atari in 1972. In those years the game helped to establish the video game industry and nowadays is often used by makers to experiment with creating game consoles with Arduino.
Thanks to the VGAx library done by Smaffer, based on the previous work done by Nick Gammon, I have done a little color game for an Arduino Uno working for a VGA monitor. See for details here:
The target was to use an Arduino Uno board without special shields and supporting IC.
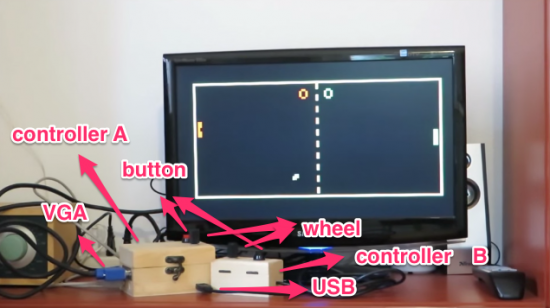
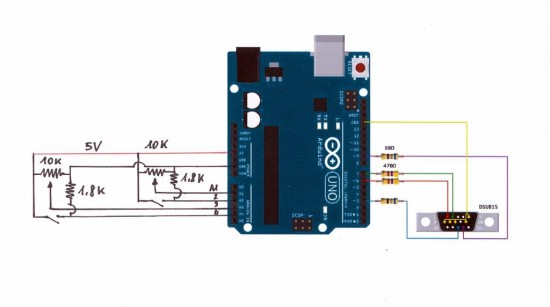
the fundamental components are a button, a potentiometer, few resistors and DSUB15 connector.
Tale a look at the video to see it in action:
Follow the step-by-step guide on Instructables to build one yourself.
In August of 2014, something new started showing up in the markets of Shenzen, the hi-tech area of China where the majority of the world’s electronics components are made. This is the ESP8266, a WiFi SoC (System on a Chip) that can connect to 802.11b/g/n networks on the 2.4GHz band. It can be addressed with SPI or a serial connection, and has an AT command set that makes it behave rather like an old-style modem. Basically, it has everything you would need to connect a device to a WiFi network, with the ESP8266 chip itself handling the complicated business of finding, joining and transmitting/receiving over a WiFi network.
That’s nothing particularly new in itself: WiFi connection devices like the TI CC3000 have been around for longer, and do much the same thing. The difference was the price. While the TI solution costs about $10 if you buy several thousand of them, the ESP8266 costs less than $7 for an individual board that can plug straight into an Arduino or similar. Buy the chip in bulk, and you can get it for less than $2.
The ESP8266 is more than just a WiFi dongle, though: it is a fully fledged computer in itself, with a megabyte of flash memory and a 32-bit processor that uses a RISC architecture. This can run applications, turning the ESP8266 into a standalone module that can collect and send data over the Internet. And it can do this while drawing a reasonably low amount of power: while receiving data, it typically uses just 60mA, and sending data over an 802.11n connection uses just 145mA. That means you can drive it from a small battery or other small power source, and it will keep running for a long time.
It wasn’t an easy ship to write applications for in the early days, though: it was poorly documented and required a dedicated toolchain to work with. This made it more of a challenge than many hackers were comfortable with. That changed earlier this year, though, when the Arduino IDE (Integrated Development Environment) was ported to the chip. This meant that you could use the much easier to write Arduino functions and libraries to write code for the chip, bringing it within reach of even the most casual hacker.
A decapped ESP8266, with area of interest marked by Reddit user swimmerdude. The big area on the right is memory
Why Is the ESP8266 Important?
The ESP8266 almost achieves the holy trifecta of electronics: cheap, powerful and easy to work with. Before this, if you wanted to add a wireless connection to a project, you had to use more power-hungry devices like USB WiFi dongles, or squish everything into a serial connection and use a wireless serial link. Either way added to the complexity of the project: you either needed a system that supported USB and had WiFI OS support, or you had to put up with the limitations of wireless serial links, which typically offer very limited bandwidth. The advent of WiFi SoCs removed these limitations because the SoC did the heavy lifting, and WiFi offered much more bandwidth. And the ESP8266 did this all at a very low cost: do some digging on eBay and you can get an ESP8266 board for less than $2. So, it is no surprise that we are starting to see the ESP8266 showing up in commercial products.
How Can I Use the ESP8266?
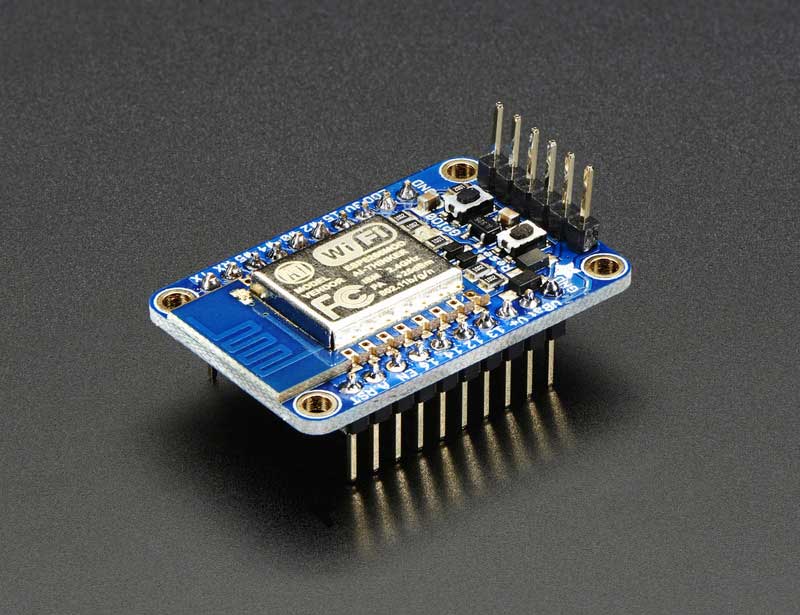
With the popularity of the ESP8266 for adding WiFi to projects, it is no surprise that there are a lot of options for trying it out. On the hardware side, ESP8266 development boards are available from a number of places, including Seeedstudio, Sparkfun and Olimex. Adafruit also has a nice ESP8266 board that breaks out all of the signals for easy breadboard use, and adds a 3.3V output, so it can drive an external device. It is also FCC approved, which is important if you are looking to sell or use the devices you build commercially. Some users have also been building their own development boards, which add features such as LCD displays and buttons.
The Adafruit Huzzah ESP8266 dev board
On the software side, the easiest way to get into the ESP8266 is to use the Arduino compatible mode. This involves loading custom firmware that turns the chip into a mid-range Arduino board, which makes for much easier programming. The people behind this project have produced a list of supported ESP8266 boards: buying one of these will make the installation process easier, as they have noted which data lines in the Arduino SDK correspond to the physical pins on the board. These boards also provide easy access to the reset lines that you have to use to install the Arduino compatible firmware.
The third option is to flash NodeMCU to the ESP8266 module. This turns it into a Lua interpreter. Scripting can be done in real-time to prototype your program, then flashed to the EEPROM to make your program persistent and remove the need for a serial connection.
Beginners will be comfortable with both the Arduino and NodeMCU approaches, but experienced users should be able to wade straight in and start writing code for this cheap, powerful and fairly easy to use chip.
Recently a CrashSpace member asked about my little portable AVR dev platform. It’s small, compatible without avrdude hacks, and cheap enough to not worry about. Though it’s a gaffer-taped together setup, it’s served me well for about 10 years. It’s in a go-bag about the size of my laptop’s power supply, so it’s often with me. [...]
Recently a CrashSpace member asked about my little portable AVR dev platform. It’s small, compatible without avrdude hacks, and cheap enough to not worry about. Though it’s a gaffer-taped together setup, it’s served me well for about 10 years. It’s in a go-bag about the size of my laptop’s power supply, so it’s often with me. [...]
The Amazon Echo is an attempt to usher in a new product category. A box that listens to you and obeys your wishes. Sort of like Siri or Google Now for your house. Kickstarter creator [Joshua Montgomery] likes the idea, but he wants to do it all Open Source with a Raspberry Pi and an Arduino.
The Kickstarter (which reached its funding goal earlier this month) claims the device will use natural language to access media, control IoT devices, and will be open both for hardware and software hacking. The Kickstarter page says that Mycroft has partnerships with Lucid and Canonical (the people behind Ubuntu). In addition, they have added stretch goals to add computer vision and Linux desktop control to Mycroft.
With or without Mycroft, people are going to hack things like this together. If you dream of being able to start your teapot with the command “Computer. Tea. Earl Grey. Hot.” then Mycroft might be a pretty good leg up on getting started. We’ve also seen Echo integration with Roku and even Nest. We imagine an open platform would spawn a lot of interesting hacks. You can find out more about Mycroft’s plans in the video below.
Building your own clock is practically a rite of passage as a Maker. 3D-print this Arduino-based desktop clock with a jumbo seven-segment LED display that glows from within.
Today SeeedStudio launched an intriguing new Kickstarter project, the RePhone. Reminiscent of Google's Project Ara, the RePhone is a modular phone built from open source components.