Posts with «arduino» label

DIY Minion robot made with scrap and Arduino

Primary image

What does it do?

Runs around avoiding obstacles... and falling sometimes :)

     Hello!

     I guess you guys already know that I have a little baby. Even though he's small, he's already very watchful seeing the robots running around the house (we had much fun together with the mBot and his lights). So I made this buddy thinking it would be fun for him as well.

     Currently I have not worked much with scraps, but I have a lot of them at my lab.

Cost to build

Embedded video

Finished project

Complete

Number

Time to build

Type

URL to more information

Weight

read more

Let's Make Robots 11 Dec 16:45
arduino  diy  minion  

Making a Vintage Star Wars AT-AT toy walk with an Arduino

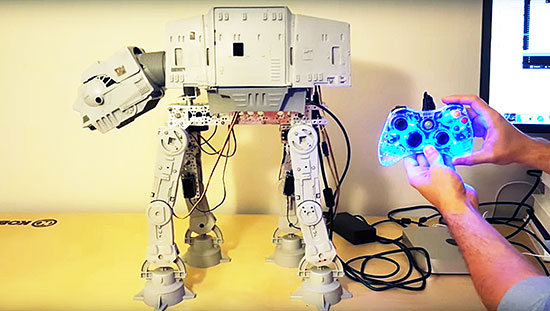
Dave Stein is a software engineer during the day and a tinkerer on Arduino projects in his free time after work. He submitted on the blog his first Arduino project with the goal of powering his old AT-AT Walker toy (mid 1980s) with Arduino Uno and make it walk and perform some of the functions we see in the Star Wars movies.

AT-AT (All Terrain Armored Transport) are four-legged combat walkers 22.5mt (73.8ft) tall of the Galactic Empire, one of its most famous military symbols introduced  in “Star Wars V: The Empire strikes back”, and we may see them again in the next weeks on “Star Wars: The Force Awakens” the upcoming episode of the saga opening December 18th.

The AT-AT walker toy updated by Dave is controlled by a wired Xbox 360 controller that interfaces with a computer and transports a signal to the Arduino Uno for walker movement:

The left and right triggers move the walker forward and backward while the right stick moves the head horizontally. If you have ever played with this toy you may remember it was clumsy and difficult to move. In my project I wanted to learn about and conquer the difficulties of quadrupedal movement. The realization process for my project involved a massive amount of trial and error, research, and failures. I have to say that I failed many more times than I succeeded with configuring the servos with the Arduino. I went down many long roads to learn about prototyping with the breadboard, soldering, and redesigns of the final product. The most difficult part of the project aside from adjusting the gait of the walker for balance and movement was providing enough power to the servos without frying the microcontroller or any of the components. I was finally able to overcome these difficulties by implementing the Adafruit servo shield.

Check AtAt Project website for all info, parts list and upcoming tutorial!

Robot Listens to Commands–Literally

Where you might see a can, [Adam Kumpf] sees a robot. [Adam’s] robot (named [Canny]) doesn’t move around, but it does have expressive eyebrows, multicolored eyes, and a speaker for a mouth. What makes it interesting, though, is the fact that it receives audio commands via the headphones it wears. You can see [Canny] in action in the video below.

The headphones couple audio tones to [Canny’s] microphone using AFSK (audio frequency shift keying). [Canny] uses an opamp to bring the microphone level up and then uses a 567 PLL IC to decode the audio tones. [Adam] selected two clever frequencies for the mark and space (12345 Hz and 9876 Hz). In addition to being numerically entertaining, the frequencies are far enough apart to be easy to detect, pass through the headphones with no problem, and are not harmonically related.

The 567 IC detects only one of the tones. Ignoring one tone is not always great for noise rejection, but for this use should be more than adequate and cuts the parts count down. To avoid false commands, the data contains markers, lengths, and checksums. The 567 feeds the Arduino, which handles all the robot control.

How do you create the sounds that go to the headphones? You use a Web page. Of course, you could generate the low baud rate tones in other ways, too. AFSK modems are common in Ham radio circles, and there are certainly plenty of modem designs. Then again, there is something pleasing about the simplicity of this circuit. The appeal of [Canny] doesn’t hurt any, either.


Filed under: Arduino Hacks, robots hacks
Hack a Day 10 Dec 09:01

Jolly Tracker forces holiday cheer with a shock to the face

The holiday season is supposed to be a happy time. But lets be honest, between the stress of picking out gifts, racking up credit card debt you can't afford and being forced to spend time with your creepy uncle there isn't a lot to smile about. Enter the JöLLY Tracker. It's a wearable of a different kind -- one that monitors just how much you smile. And, if you're not keeping that frown turned upside down, it gives you a gentle "reminder" to smile in the form of an electric shock... to the face.

Jolly Tracker forces holiday cheer with a shock to the face

The holiday season is supposed to be a happy time. But lets be honest, between the stress of picking out gifts, racking up credit card debt you can't afford and being forced to spend time with your creepy uncle there isn't a lot to smile about. Enter the JöLLY Tracker. It's a wearable of a different kind -- one that monitors just how much you smile. And, if you're not keeping that frown turned upside down, it gives you a gentle "reminder" to smile in the form of an electric shock... to the face.

Source: Hacky Holidays

Jolly Tracker forces holiday cheer with a shock to the face

The holiday season is supposed to be a happy time. But lets be honest, between the stress of picking out gifts, racking up credit card debt you can't afford and being forced to spend time time with your creepy uncle there isn't a lot to smile about. Enter the JöLLY Tracker. It's a wearable of a different kind -- one that monitors just how much you smile. And, if you're not keeping that frown turned upside down, it gives you a gentle "reminder" to smile in the form of an electric shock... to the face.

Arduino Announces New IoT Board, Gives Away 1,000

Arduino just released a new board and partnered with Microsoft to ask you for your best project.

Read more on MAKE

The post Arduino Announces New IoT Board, Gives Away 1,000 appeared first on Make: DIY Projects, How-Tos, Electronics, Crafts and Ideas for Makers.

Meet the new MKR1000 and win it in an amazing contest!

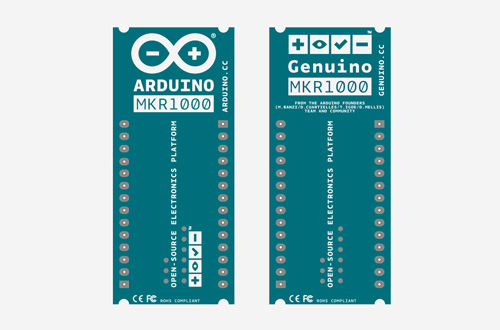
It’s a great pleasure to introduce the new member of the Arduino and Genuino family: MKR1000 is a powerful board that combines the functionality of the Zero and the connectivity of the Wi-Fi Shield.

It’s based on the Atmel ATSAMW25 that is part of the SmartConnect family of Atmel Wireless devices, specifically designed for IoT. It offers the ideal solution for makers seeking to add Wi-Fi connectivity with minimal previous experience in networking.

The new board will be available for purchase from February 2016 but starting today #1000 MKR1000 can be won in the World’s Largest Arduino Maker Challenge in collaboration with Hackster.IO and Microsoft.

We want to celebrate the maker community so we thought there’s no better way to do that than encourage inventors, artists, makers, hobbyists or professionals and developers to create on Arduino. The contest is very flexible – choose anything you want to build from environmental sensors to gaming, augmented reality, robotics or UAVs using the power of Arduino.cc boards and Windows 10.

The 1,000 makers who submit the best project ideas will receive the newly released Arduino MKR1000 (US only) and Genuino MKR1000 (Outside US) boards. Then three finalists submitting the best completed projects will be awarded with a fully-funded trip to Maker Faire Shenzhen, New York or Rome; a chance to present their creation at the Microsoft and the Arduino and Genuino booths; a professional video production of the project; and a whopping $500 gift certificate to Adafruit.

Contest starts today,  December 9th 2015, when participants can sign up or log into Hackster and enter to win the new MKR1000 board by pitching the idea. Idea submissions close on January 15, 2016 at 11:59 PM (PT).

Save the date and participate now!


Meet the new MKR1000 and win it in an amazing contest!

It’s a great pleasure to introduce the new member of the Arduino and Genuino family: MKR1000 is a powerful board that combines the functionality of the Zero and the connectivity of the Wi-Fi Shield.

It’s based on the Atmel ATSAMW25 that is part of the SmartConnect family of Atmel Wireless devices, specifically designed for IoT. It offers the ideal solution for makers seeking to add Wi-Fi connectivity with minimal previous experience in networking.

The new board will be available for purchase from February 2016 but starting today #1000 MKR1000 can be won in the World’s Largest Arduino Maker Challenge in collaboration with Hackster.IO and Microsoft.

We want to celebrate the maker community so we thought there’s no better way to do that than encourage inventors, artists, makers, hobbyists or professionals and developers to create on Arduino. The contest is very flexible – choose anything you want to build from environmental sensors to gaming, augmented reality, robotics or UAVs using the power of Arduino.cc boards and Windows 10.

The 1,000 makers who submit the best project ideas will receive the newly released Arduino MKR1000 (US only) and Genuino MKR1000 (Outside US) boards. Then three finalists submitting the best completed projects will be awarded with a fully-funded trip to Maker Faire Shenzhen, New York or Rome; a chance to present their creation at the Microsoft and the Arduino and Genuino booths; a professional video production of the project; and a whopping $500 gift certificate to Adafruit.

Contest starts today,  December 9th 2015, when participants can sign up or log into Hackster and enter to win the new MKR1000 board by pitching the idea. Idea submissions close on January 15, 2016 at 11:59 PM (PT).

Save the date and participate now!


Corkscrew LASER “Hologram”

If you watch much science fiction, you know that in the future, there’re plenty of 3D holographic displays. From Princess Leah’s distress call to the Star Trek holodeck, there’s no shortage of computers that can make realistic images. It might not be up to holodeck standards, but [freedscript] created a 3D display for an Arduino using a chopstick, a motor, some paper, and a LASER. Of course, it isn’t actually a hologram, but neither is half the stuff you see on TV (Star Trek’s holographic characters were disturbingly solid for standing waves). The display is a type of volumetric display.

The idea is deceptively simple. A paper corkscrew spins and a laser spot perpendicular to the axis of rotation can create a point that appears to be anywhere in a slice of the volume enclosed by the outer perimeter of the corkscrew. You can see in the video below that the device is simple to build, although the results are not overwhelming. If the corkscrew is too big, the edges will have to move too fast. Also, you need a lot of LASERS, including one to sense the index point of the corkscrew.

Still, it is impressive to see an Arduino driving a 3D display, and the system is simple enough to hack if you’d like to experiment. We’ve looked at other optios for 3D displays before, both using lasers and using computer projectors. Maybe Princess Leah’s distress call will soon be a reality.


Filed under: Arduino Hacks
Hack a Day 09 Dec 06:00