Posts with «arduino uno» label

Easy ‘USB-ake’ Oven with Arduino Uno

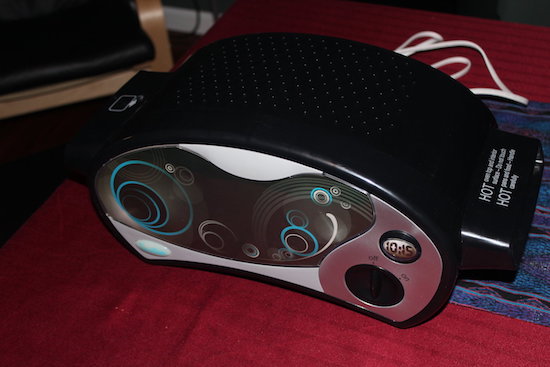
After procuring a new Easy-Bake Oven, engineer Jason Cerundolo decided to convert it to run off of USB. According to his project write-up, “USB-C spec allows for 100 Watts of power to be transferred through the connector, and that is the power rating for the oven, so it should work.”

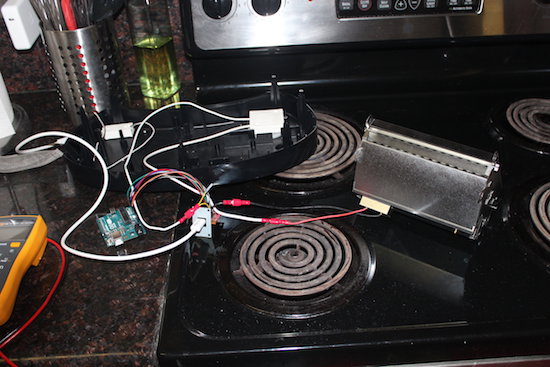
The biggest modification in this build was dividing the heating element into six segments in order to power it with 20V allowed over USB-C. Finding a suitable charger for this device was also a bit of a challenge, but after 20 minutes, it was able to reach 300° F, producing five strangely-shaped but likely still tasty cookies!

For the electronics, I used my USB-C breakout board with the FUSB302B PHY and an Arduino Uno. I wired I2C plus interrupt between the two. I connected VBUS from the breakout board to VIN on the Arduino to power it. Then, I connected +3V3 from the Arduino to the VDD on the breakout board to power the FUSB302B, as well as +5V to V_pullup on the breakout board. I also connected VBUS to the switch, then to the modified heating element and back to GND. To make the connections easier, I crimped spade connectors onto jumper wires. Finally, I plugged the modified light into pin 13 on the Arduino.

You can check out more about Cerundolo’s project, and find his code on GitHub.

Talk to the (low-cost robotic) hand!

Though this low-cost robotic hand by Maker “MertArduino” might not be the best platform for manufacturing, or even world domination, it does show off some interesting physical build techniques. The DIY device can mimic a human’s hand wirelessly via a pair of Arduino Unos and nRF24L01 modules.

For construction, the fingers and thumb are made out of springs and foam, and nylon cords are used to pull them closed with a small servo for each digit. Control is accomplished by flex sensors attached via zip ties to a glove. It’s a great demonstration of how you don’t actually need a 3D printer or other advanced CNC machinery to craft something really unique!

You can see the project in the video below, and check out more hacks on Mert Arduino’s YouTube channel!

WinchBot is a robotic arm composed of 3 winches and 5 servos

Using an Arduino Uno along with a Raspberry Pi for control, hacker “HomoFaciens” came up with this clever delta-style robot.

If you were going to make a robot with five servos, many Makers would make a robot arm with them and call it a day. HomoFaciens, however, who is known for making amazing machines with minimal tools and improvised materials, instead made something that seems to be a cross between a delta robot and a Skycam.

His device, called “WinchBot,” uses three winches attached to an equilateral triangle frame to move a slider on a central pivoting square rod. This allows the robot’s 5-axis “hand” to be positioned within the robot’s work area. The servos are then tasked with keeping everything in the correct orientation, as well as opening and closing the gripper as needed.

If you’d like more details than given in the very entertaining video seen here, be sure to check out the project’s write-up.

Heat up a small pool with this solar-powered system

Imgurian “ElectricYFronts” has created an Arduino-controlled solar heating system for his kids’ paddling pool.

Small semi-portable above ground pools can be fun, but are generally not heated. The “Solar Paddle” system, however, raises the temperature of the pool from a chilly 68 degrees Fahrenheit to a much warmer 83 degrees (20 to 28 Celsius). It does this by piping water into and out of the pool, then heating it in over 200 yards of black watering pipe on top of a shed.

Water is cycled via an impeller pump, which is powered by a solar panel along with a battery to keep power even over fluctuations. A few buttons and an LCD panel allow things to be changed around without opening up the Arduino Uno’s enclosure.

You can see more on how this heater was made on Imgur.

A cool infinity mirror-style bottle opener

In his quest to create “the coolest wall-mounted bottle opener in the entire world,” it would appear that YouTuber “Never Stop Seeking” has succeeded.

As seen below, the infinity mirror-style unit is made of plexiglass and two-way mirror film, and equipped with Arduino Uno-controlled RGB LED strips that are activated by a proximity sensor as you open a beer or soda. He even included a magnetic catch for his bottle caps!

Want to build one of your own? Good news, Never Stop Seeking plans on sharing more details along with a how-to video in the coming days.

This animatronic device turns speech into sign language

Using a couple Arduinos, a team of Makers at a recent McHacks 24-hour hackathon developed a speech-to-sign language automaton.

Alex Foley, along with Clive Chan, Colin Daly, and Wilson Wu, wanted to make a tool to help with translation between oral and sign languages. What they came up with was an amazing animatronic setup that can listen to speech via a computer interface, and then translate it into sign language.

This device takes the form of two 3D-printed hands, which are controlled by servos and a pair Arduino Unos. In addition to speech translation, the setup can sense hand motions using Leap Motion’s API, allowing it to mirror a person’s gestures.

You can read about the development process in Foley’s Medium write-up, including their first attempt at control using a single Mega board.

Remotely control a sumo bot with a gaming wheel

Using an Arduino Uno, Nano, and two Bluetooth modules, engineering student “Roboro” can now remotely control his sumo robot.

Like many hackers, Roboro had an old gaming controller that he wasn’t using, in this case an Xbox steering wheel and pedals. Naturally, he converted it into a controller for his sumo robot, which can now be driven manually. This involved wiring the wheel controls into an Uno; the smaller Nano was used onboard the bot.

Rewiring a controller is nothing new, but what is also quite interesting from a hack point of view is that the Arduinos communicate over Bluetooth. When initiated, the controller connects itself to the robot, which can then be driven around (as long as it doesn’t get stuck in the hardwood).

You can see more details of this build on Roboro’s project page.

Power a 1980s MicroVox with an Arduino Uno

After digging through an extremely complete manual, Monta Elkins used an Arduino Uno to make a MicroVox speech synthesizer do his bidding.

The bad thing about obsolete gear is that it is generally very hard to hook up to modern equipment. The great thing for Makers, though, is that many of the devices from one’s childhood (or before) can now be driven with inexpensive tools such as Arduinos. Some of them, like the 1982-vintage MicroVox model that Elkins got his hands on, even include a manual with schematics and components listed.

After going over his new find and the enclosed manual, the video really hits a highlight around 13:45, when he powers it on to hear it burp out “ready” in a deep monotonous tone that may bring back memories of the robotic future you remember fondly. He finally hooks up the Uno just after that, and gets it to spit out an “interesting” catch phrase just after 16:30.

You can read more about the project on Hackaday and see other projects by Elkins on his YouTube channel here!

Arduino Blog 23 Feb 22:11

Make sure guests never miss your house with these numbers

If you’d like for someone to visit you, it’s quite helpful if you have the house number displayed somewhere on your premises. Rather than simply rely upon someone reading the numbers as they drove by, “Superbender” has decided to do something a bit different make his home stand out.

During the day, you can identify Superbender’s residence by the giraffe mailbox, but to help point the house out by night, he came up with the glowing Arduino Uno solution seen in the video here.

The numbers were cut on a scroll saw and RGB LED strips were added in the back to enable them to illuminate. The setup allows for one color per night, or the numbers can change every three seconds in “party mode.”

The software was tested on an Uno, then transferred to an ATmega328P in a DIY control board. You can read more about this project on Instructables and watch a demo of it below!

Bring some zen to your living room with this CNC end table

Why settle for a some boring furniture, when you can have your own sand and rock display powered by an Arduino Uno and stepper motors instead?!

According to his write-up, Instructables user “MakrToolbox” gets many ideas that never leave the pages of his Moleskin notebook. Although it has to be difficult to decide which ones gets to live in reality, this Zen Garden CNC End Table seems like it was a great build choice.

The table consists of a piece of plate glass covering a “garden” of sand and stones. On top of this is a metal ball that moves around via a joystick on the side of the table, traversing the sand and making interesting shapes, like a giant Etch A Sketch. The ball is pulled around with a magnetic servo-powered gantry system underneath.

Look like something you’d love to have in your living room? Be sure to check out the project’s page for more!