Posts with «arduino mega» label

Staging Beckett with 11 motors and Arduino Mega

Happy Days is an installation inspired by the work of the Irish avant-garde novelist Samuel Beckett who wrote the namesake play in two acts in the 60s. Designer and visual artist Irena Kukric created it in collaboration with Canny Sutanto and the aim of exploring narrative in the form of an installation. The five-minute play is staged using ten servo motors and a DC motor with an Arduino Mega and VVVV live programming environment:

We were beginners with Arduino and motors so we started out pretty basic, trying to move several motors at once. We decided to use VVVV platform in addition when we realized we needed a timeline for our script for the play. With this timeline, it was easier to deal with details such as when we want to move which motor under which angle and such. For beginners with coding, this visual programming environment is very approachable and the entrance level is much lower.

It is easier and faster to get to your desired outcome. What is great about VVVV and Arduino is that there is the Firmata library that enables you to work with both platforms in conjunction so even artists and designers with lower level coding skills are able to go from concept to realization quite easy. We used Arduino Mega which was very convenient considering the number of our motors and the pins that Mega has to offer. After we had our final order of cables and pins, we even made our own shield for it.

The play was staged without human actors or conventional (verbal) dialogue  as performing a ritual in the play overshadows the performer, the object of the ritual can survive on its own. Therefore, they used these objects or rather props from the play and made them actors, animating them with motors, as you can see in the video below:


A High altitude balloon sensing the earth’s atmosphere

The project Emanuel Bombasaro submitted to the Arduino blog is about a high altitude balloon he launched on August 21st over Denmark. The balloon, called Titan 1, is made of a helium-filled latex balloon,  a payload box holding the flight computer, sensors and a parachute (36” diameter). A GoPRO camcorder mounted inside the payload box and capturing an image every second.

The flight computer is an Arduino Mega which logs position (GPS), pressure, temperature, humidity, luminosity, earth magnetic field, acceleration and spin, measured by a variety of sensors:

At 1:10 we jump from cloud level (~3200m) towards reaching the peak altitude of 35393m. Immediately the moon appears on the right and is visibile again and again. 2:05 the fragments of the bursted balloon can be seen and up it goes back to earth. 3:00 we drop down to cloud level (~3200m) and soon after hit the ground.

This is the list of modules and sensors connected to the Arduino Mega:

  • MTX2 Radiometrix
  • MTX2 434 MHz Radio Module.
  • HX1 VHF Narrow Band FM 300 mW Transmitter, 144.800 MHz, used for APRS.
  • MAX-M8 GPS module used for position (longitude, latitude and altitude) and time acquisition.
  • DS18B20 Temperature sensor on HABuino showing the temperature of the flight computer compartment. This temperature should remain most near to 20 ” C. Any temperature variation will e?ect the transmission frequency of the radio module.
  • MCP9808 Maximum accuracy digital temperature sensor measuring air temperature.
  • HTU21DF Temperature and humidity sensor measuring air temperature and relative humidity of the air.
  • MPL3115A2 Precision altimeter mainly used for measuring atmospheric pressure, but also temperature and altitude is detected.
  • TSL2561 Light to digital converter BST-BMP180 Pressure sensor mainly used for measuring atmospheric pressure, but also temperature and altitude is detected.
  • L3GD20 3D gyroscope
  • LSM303DLHC 3D accelerometer and 3D magnetometer module
  • LSH20 Saft LSH 20 battery used as power supply with 3.6 V and 13.0 A h. The power feeds into the low input voltage synchronous boost converter TPS61201 on the HABuino shield.

Check the detailed documentation with Flight Computer Software sketch on this Design Mission PDF document.

You can also explore the Flight Data Report showing the collected mission data graphically on this PDF.

Arduino Blog 09 Sep 21:58

Play like a spy with L.E.A.P. Engine


Toronto-based collaborative duo Hopkins Duffield created a gaming environment running on Arduino Mega in which the player battles a laser wielding A.I. security system gone awry. It’s like being in an action movie, walking in a pitch black room filled with the hollow sound of a machine breathing and a series of red laser fences slicing through the fog-filled air!

Laser Equipped Annihilation Protocol (The L.E.A.P. Engine) is a an installation that :

explores the personality of a snarky and mysterious game sentience who has infected a room with technological systems that challenge players and collect data. With a limited amount of time, the player must pass through a complicated series of changing and alternating laser patterns without tripping any of the lasers in order to deactivate the system and win the game. If the player trips a laser or if the timer runs out, it’s game over.

The gaming installation uses Max 6, Max For Live, an Arduino Mega 2560 R3 and custom electronic circuits. They also used a special modification of Lasse Vestergaard’s and Rasmus Lunding’s ArduinoInOutForDummies designed to allow communication between Arduino 2560 and Max 7. In Max, laser patterns are written using MIDI.

Take a look at the video to discover how they made it:

Arduino Blog 26 Aug 11:17

Xbee and Arduino sent to space by NASA

Last July 7 at Wallops Flight Facility, NASA launched Black Brant IX , a suborbital sounding rocket to test “wireless-in-space” with XBee and Arduino :

Onboard the rocket was an experiment testing Exo-Brake technology. XBee was used to collect sensor data including temperature, air pressure, and 3-axis acceleration parameters. NASA is considering Exo-brakes as a possible solution for returning cargo from the International Space Station (ISS), orbiting platforms or as possible landing mechanisms in low-density atmospheres. This was one of many tests used to analyze its effectiveness, but the first to incorporate an XBee connected sensor network. If you would like to read more about the Exo-brake, check out this article.

As part of a program to determine potential applications of wireless technologies in space, NASA chose XBee® ZigBee modules and Arduino Mega  explaining that:

Wireless sensor technology allows measuring important parameters such as aerodynamic pressure and temperature at the apex of the Exo-Brake during re-entry. It is very difficult to instrument a deployable parachute like the Exo-Brake, and wireless sensor modules provide the means for this type of measurement where it is difficult to run wires,” said Rick Alena, computer engineer at NASA Ames.

The NASA team constructed a gateway using an Arduino Mega, XBee, and Iridium module. The Arduino Mega was used to manage communications between the local XBee wireless network and the long-range Iridium satellite uplink. It was chosen as part of a NASA initiative to use commercial off-the-shelf components where possible, and to employ rapid prototyping tools to efficiently explore new ideas.

See the diagram below to get a detailed view into how the network was configured.


Arduino Blog 31 Jul 17:20
arduino mega  featured  mega  space  xbee  

A self-driving vehicle using image recognition on Android

Dimitri Platis is a software engineer who’s been working with his team on an Android-based self-driving vehicle which uses machine vision algorithms and techniques as well as data from the on-board sensors, in order to follow street lanes, perform parking manoeuvres and overtake obstacles blocking its path:

The innovational aspect of this project, is first and foremost the use of an Android phone as the unit which realizes the image processing and decision making. It is responsible for wirelessly transmitting instructions to an Arduino Mega, that controls the physical aspects of the vehicle. Secondly, the various hardware components (i.e. sensors, motors etc) are programmatically handled in an object oriented way, using a custom made Arduino library, which enables developers without background in embedded systems to trivially accomplish their tasks, not caring about lower level implementation details.

[...]

On the software dimension of the physical layer, an Arduino library was created (based on a previous work of mine [1], [2]) which encapsulated the usage of the various sensors and permits us to handle them in an object oriented manner. The API, sports a high abstraction level, targeting primarily novice users who “just want to get the job done”. The components exposed, should however also be enough for more intricate user goals. The library is not yet 100% ready to be deployed out of the box in different hardware platforms, as it was built for an in house system after all, however with minor modifications that should not be a difficult task. This library was developed to be used with the following components in mind: an ESC, a servo motor for steering, HC-SR04 ultrasonic distance sensors, SHARP GP2D120 infrared distance sensors, an L3G4200D gyroscope, a speed encoder, a Razor IMU. Finally, you can find the sketch running on the actual vehicle here. Keep in mind that all decision making is done in the mobile device, therefore the microcontroller’s responsibility is just to fetch commands, encoded as Netstrings and execute them, while fetching sensor data and transmitting them.


Check the Arduino library on Github, explore the circuit below and enjoy the car in the video:

Here’s the essential bill of materials:

  • Electronic Speed Controller (ESC)
  • Servo motor (Steering wheel)
  • Speed encoder
  • Ultrasonic sensors (HC-SR04, SRF05)
  • Infrared distance sensors (SHARP GP2D120)
  • Gyroscope (L3G4200D)
  • 9DOF IMU (Razor IMU)
Arduino Blog 15 Jul 10:01

“I am a maker in the making”

Moushira Elamrawy is an Egyptian multidisciplinary designer and technologist based in the city of Cairo and founder of Rishalaser, a new concept for laser cutters that is opensource, portable, DIY, and easy to use. She wrote a piece on iAfrikan about becoming a maker and discovering Arduino. It’s an inspiring text and we want to share it on this blog.

——–

Confession: I used to be an architect (possibly still am!), and then I started tinkering with things.
The architecture engineering school I graduated from did not have a workshop space. The first time I met a CNC router in real life was three years after i graduated.

It is hard to discover what you don’t know even exists. Which is somehow, why I had zero imagination of how those awesome Theo Watson installations could possibly work.

I had no business fiddling with electronics whatsoever. My coding and programming skills were limited to some knowledge of ActionScript, some C, and that was about it.

I read about Openframeworks, installed it, went through examples, tutorials and thought “Nice, I can change parameters that in return would change behavior, fantastic..but ..then..what?!”

By that time, I was an architect working in Morocco, between an office that was based in Fez and a construction site based in a beautiful small southern village close to the Algerian borders, called Mhamid ElGhizlane. It normally took me a little over a day and a half to travel from Fez to the construction site.

I had a radio, which I considered my companion in those interesting border areas. Before Morocco, I was living in Sinai mountains, working on a similar desert development project, where the radio would normally catch signals of Saudi Arabia, Israel, and Jordan. The Moroccan Sahara, on the other hand, got me signals from Algeria, with lots of different dialects. Radio feels like travelling within time within places. It makes you really feel the distance you crossed.

[...]

In May 2012, I attended a beginners workshop for Arduino, lead by Bilal, who was visiting Egypt. During the workshop, I controlled an LED via Arduino.

It was magical.

I never used the board before, I barely understood any syntax, yet in 15 min, I did something cool . . that actually works. Arduino: I am in Love, I thought.

It is easy. It is just that starting alone isn’t easy. Going back home, I went through some examples and I felt oh..I can do stuff. I can do all these stuff actually. Oh, wait, there is also: Processing!

By September 2012, I moved to Barcelona for my masters, which started by a fabrication course in Fablab. I was Alice in wonderland. Then physical computing course started, and Alice’s wonderland was getting more vast.

Everything was awesome. The exact skill set that I wanted to learn. But I needed more, a lot more, time to absorb this whole new world. I thought of taking a gap year, but then, week after week, it turned out that once the ball gets rolling everything is accelerated.

Thanks actually to my sister for pushing me to trust that the ball will get rolling. She herself was moving from translation to graphics design one year before me. It is a family thing.

Arduino was THE treasure.

At the end of the day, all those fantastic surreal systems that I was fascinated by could be done with some components and an Arduino. The amount of associated open source resources is tremendous. The forum is awesome and people actually respond.

Through Arduino, I learned more about microcontrollers, I could program standalone circuits. Then the ball kept rolling, I learned eagle, I can mill some boards, I can solder (err, that was troublesome!), I can interface stuff, I can build sensors, I can work with data, I can build RF sensors, then I became obsessed with antennas, signal processing, and RFID.

I am still learning and learning, but it is much easier now.

Coming from this background, I always go back with time 4 or 5 years ago and recall how I used to react to a “closed box” new technology?

How life would have changed if machine interaction have been made easier, or basically how my life would have changed if machines had the opportunity to step out of their labs and talk to more people.

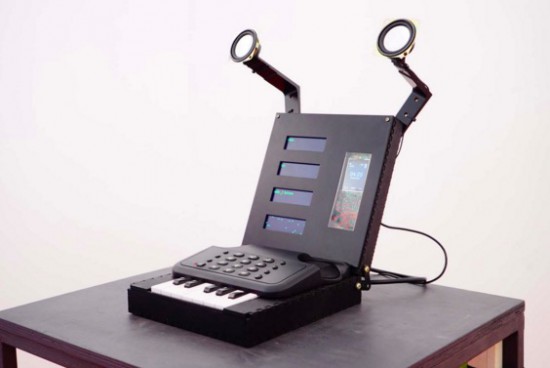
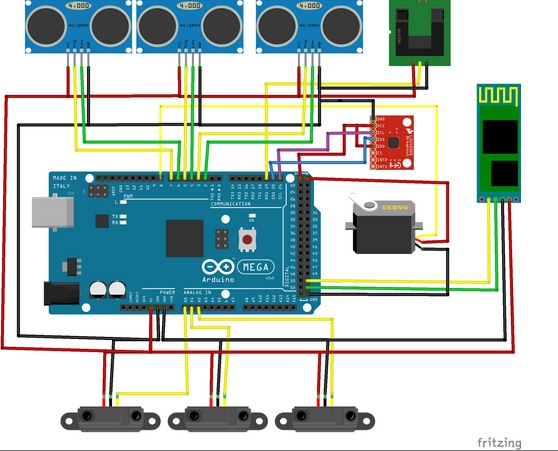
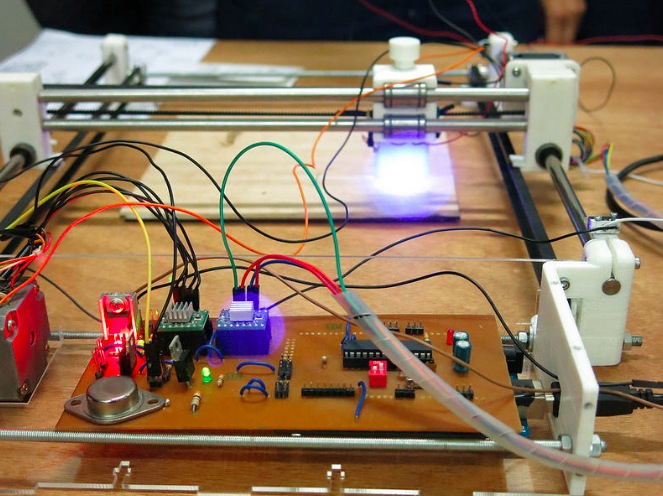
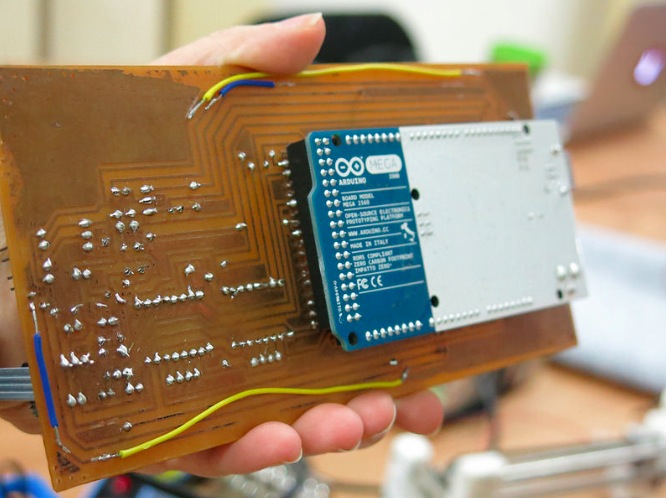
Making technology more portable and more accessible, is one reason why I started the mobile operated laser cutter project last year, of course, the project would have never been realized without the team that continued with enthusiasm.

Another wonderful project that I just co-started is Jebaleya Talks, with the hope of giving voice to women of Saint Katherine village in Sinai, by introducing them to smart textiles! Well, lets see how this will evolve..

While working in the desert in Sinai, the project foreman was my mentor, his words of wisdom still echo in my ears

“Everything comes along..with patience. If you could just wait”.

Apparently, he had a point!

E-mails are a distraction.

Meetings are boring.

Regular jobs suck your inner clock.

Take a sabbatical and learn what you want to learn and start anew.

At least try.

Oh, and during your sabbatical, give Arduino a try, it might change your life as well.

Let’s just hope that Arduino founders will keep embracing the same energy they started the project with, and that the big whales leave Arduino alone, so that it stays, open and libre just as how it helped liberate many creative energies and minds.

Keep reading on iAfrikan

Every word is like an unnecessary stain on silence

« Every word is like an unnecessary stain on silence and nothingness » is a sentence from Samuel Beckett but also the title of Eugenio Ampudia’s last artwork created and installed with the support of Ultra-lab  and running on Arduino Mega and GSM Shield:

The exhibition room has in its center a rectangular mirror made of water that reflects the room and the visitors. The perfect still water, metaphor of silence, is broken by the irruption of sporadic waves. These movements, the stain on silence, are provoked by the visitors’ interactions. In the heart of the water tank, a dispositive is able to receive calls and to open a valve. To each visitor’s call, so a series of movements is generated and break the calm.

Ultra-lab realized the technical part of the artwork thanks to an Arduino Mega, the Arduino GSM shield and various valves open and close by the Arduino Mega when a call is received by the shield. The dispositive is particularly interesting for its adaptation in a water context and for connecting valves.

Thanks to it, the artwork succeed to express beautifully the paradox between a destructive attraction for words and communication to which it’s hard to resist in order to prefer a finally inaccessible contemplation.

The work can be visited in the exhibition room Abierto X Obras in in the Spanish art center Matadero Madrid until the 17th of May 2015 and below you can watch a video interview with the artist:

Arduino Blog 09 Mar 20:01

Wood Lizzie is a DIY Soap Box Cart controlled via Wi-Fi

In the following 10-minute video, the Currah team is showing us all the details of Wood Lizzie, a project experimenting with Arduino Mega and Wi-Fi Shield, a very flexible steering system and the virtually unlimited control range afforded by WiFi and Internet Protocol:

The original plan was to construct one of the two-wheeled robots very popular with hobbyists but it was eventually decided that the resulting vehicle would be of very limited application and capable only of traversing smooth surfaces. However, note that the current design can be viewed as the drive of a two-wheeled robot coupled with a trailer by means of a 360 degree pivot. A slip ring capsule within the pivot enables the heavy battery and bulky control system to be separated from the drive and located on the trailer thereby distributing weight evenly between the four wheels.

DIY soap-carts were pretty common among kids in the first part of the 20th century and built from old pram wheels, scrap wood and, typically, soap boxes. They could provide a lot of fun for the family at very low cost and in recent years there’s a new interest in them especially to those appreciating their vintage look!


The ESP8266 Becomes a Terrible Browser

The ESP8266 are making their way over from China and onto the benches of tinkerers around the world for astonishing web-enabled blinking LED projects and the like. [TM] thought he could do something cooler with his WiFi to UART module and decided to turn one into a web browser.

There’s no new code running on the ESP8266 – all the HTML is being pushed through an Arduino Mega, requesting data from a server (in this case our fabulous retro edition), and sending the data to the Arduino serial console. The connection is first initiated with a few AT commands to the ESP module, then connecting to the retro server and finally dumping everything received to the console.

It’s not much – HTML tags are still displayed, and images are of course out of the question. The result, however, isn’t that much different from what you would get from Lynx, meaning now the challenge is open for an Arduino port of this ancient browser.


Filed under: Arduino Hacks, wireless hacks

THP Semifinalist: Farmbot

The FarmBot team has been pretty busy with their CNC Farming and Gathering machine. The idea is to automate the farming process with precise deployment of tools: plows, seed injection, watering, sensors, etc. An Arduino with an added RAMPS handles the movement, and a Raspi provides internet connectivity. Their prototype has already experienced four major iterations: the first revision addressed bigger issues such as frame/track stability and simplification of parts. Now they’re locking down the specifics on internet-of-things integration and coding for advanced movement functions.

The most recent upgrade provides a significant improvement by overhauling the implementation of the tools. Originally, the team envisioned a single, multi-function tool head design that carried everything around all the time. Problem is, the tool that’s in-use probably works best if it’s lower than the others, and piling them all onto one piece spells trouble. The solution? a universal tool mounting system, of course. You can see them testing their design in a video after the break.

If the FarmBot progress isn’t impressive enough—and admittedly we’d have called project lead [Rory Aronson] crazy for attempting to pull this off…but he did it—the FarmBot crew started and successfully funded an entire sub-project through Kickstarter. OpenFarm is an open-source database set to become the go-to wiki for all things farming and gardening. It’s the result of [Rory] encountering an overwhelming amount of generic, poorly written advice on plant growing, so he just crowdsourced a solution. You know, no sweat.


The project featured in this post is a semifinalist in The Hackaday Prize.


Filed under: Crowd Funding, The Hackaday Prize