Posts with «arduino mega» label

Smart Foosball Keeps Score using Arduino Mega

Thinkers and makers at Handsome created an automated Foosball Scoreboard using an Android tablet and Arduino Mega 2560:

the Arduino is responsible only for detecting a) a goal scored and b) the gate in which it was scored. After a goal is detected the Arduino sends this data to Android tablet.

You can explore the details of the project on this blog, the sketch on Github, and watch the video below:


Arduino Delta Robot (driven by DC motors)

Primary image

What does it do?

Draws jittery lines

Driven by the sudden longing for a personal Delta Robot I found myself building one.

Cost to build

$300, 00

Embedded video

Finished project

Number

Time to build

80 hours

Type

URL to more information

Weight

3000 grams

read more

Visualizing “data visualization” with Leds and bubbles

“Data transparency” is a project by Jiayu Liu, a designer and media artist, interested in physical data visualisation and interactive code. The installation runs on Arduino Mega: when the microphone senses a person’s blow, it transforms it in a Led animation and then activates the bubble machine for 8 seconds. The project is not aiming to visualize any specific data but “data visualization” itself:

In my point of view, data is not dissimilar to a conclusion of our past, and we need it for our future. When we see a data from a computer, it is something that has already happened. We use intelligent methods of computing science to analyze the data so that to predict the future. We are living in a world of data, and data is like a language objectively describing our past. In this work, I take more attention on rethinking and recalibrating the role of data in our lives, and the relationship between the virtual world we build as a main method of data storing, analyzing and visualization and ourselves.

Also, I am thinking of that it is better to make sense of the role of data visualization before really visualizing it. Finally, I found a good perspective to see how data connects with our lives, which is Time.
Therefore, the project is not aiming to visualize any specific data but what I am trying to visualize is the “data visualization” itself. I would like to bring a new experience to the viewer in different space. So I want to create a interesting play space and bubble game to the viewer . Let them have a really funny and relaxing experience.

Take a look at the “making of” video below to see it in action:

FogFinder turns foggy air into a reliable water source

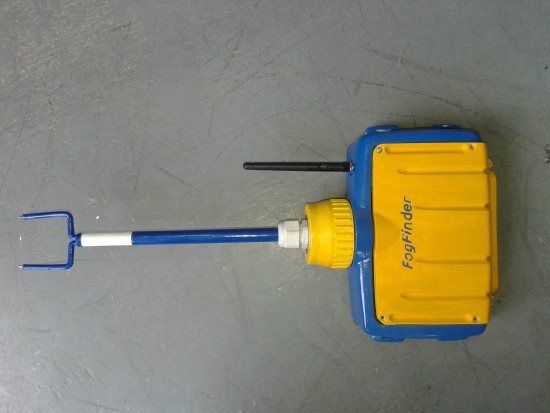
Scientists in Chile are turning foggy air into a reliable water source for nearby residents using a new sensor connected to  Arduino Mega and XBee module. The project is called FogFinder and was developed by Richard LeBoeuf in collaboration with Juan Pablo Vargas and Jorge Gómez at the Universidad de los Andes. It’s a system to generate new renewable source of water for communities and reforestation through use of a probe and wireless communications technology to develop a liquid water flux map for fog harvesting.

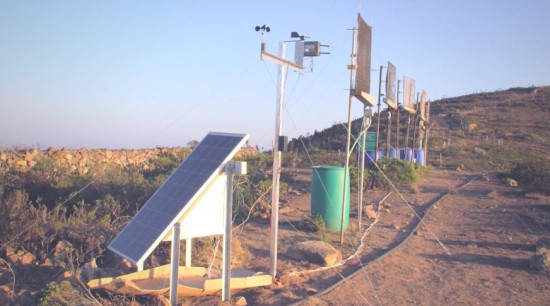
Fog collectors are common in arid climates in Chile where rain runs scarce and are typically installed on hillsides and remote areas where fog is abundant. The innovative part of the project lies in determining where to install these collectors, how to orient them, and understanding how efficient they are at collecting water from the air. This can be done with a new type of sensor called the “Liquid Water Flux Probe” to measure the availability of water at current and potential fog collector sites. The sensor measures the liquid water content and speed of the fog and can be used to understand the optimal location and orientation for each of the collectors.

Matt Ahart  of Digi, the company producing Xbee modules , told us:

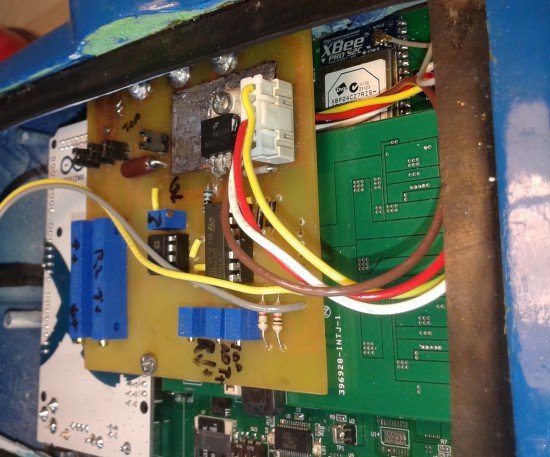
“The primary function of the Arduino Mega is to simplify data collection and processing. The development team also made use of software libraries that simplified the use of sensors and API mode configuration for the XBee radios.
Another important reason for using Arduino, is that the Fog Finder project was created by students with only a few months to complete the design and creation of the device. A great thing about Arduino is that the learning curve is very fast and students can quickly start making contributions instead of spending weeks or months trying to understand the software and hardware.”

The FogFinder project has received support from the Universidad de los Andes through its Fondo de Ayuda de Investigación, Andes Iron – Dominga, and the Pontificia Universidad Católica de Chile. In 2014 it was finalist in the Wireless Innovation Project sponsored by the Vodafone Americas Foundation.

Arduino Blog 21 Jan 21:06

Step inside a unique Electromechanical Lithophone

Bespoke Electromechanical Instrument was built by Jay Harrison as part of a dissertation undertaken on the Creative Music Technology degree course at Staffordshire University. The instrument, running on Arduino Mega 2560 is designed  to allow each note to be independently placed in a space:

The project involved the creation of an electromechanical system capable of autonomously playing a bespoke Lithophone musical instrument. The underlying idea was to create a Lithophone that allowed the audience to literally step inside it, giving a unique spatial and acoustic surround experience. Designing an autonomous electromechanical was the thought to be the most effective and reliable solution to achieving this.

The Arduino Mega 2560 was used to interface Max/MSP with the physical circuitry. Control messages/signals would be sent out of a Max/MSP patch using Maxuino, these signals would then be interpreted by the standard firmata sketch loaded onto the board and would go on to trigger and control the 24 rotary solenoids and 24 servo motors that work to produce the notes.

In the video below the instrument is arranged in a 24-foot surround configuration and the audience is invited to experience the instrument from within offering a unique spatial dimension to the Lithophone intended to completely envelop the listener:

Arduino Blog 18 Jan 21:13

Into the void with lights and shadows

Rodrigo Carvalho is a designer and interactive new media artist from Porto (Portugal) researching on real-time relations between sound, image and movement in audiovisual interactive spaces. He submitted to Arduino blog his latest project “Into the void” running on Arduino Mega:

First version of “Into the Void”, a series of audiovisual installations exploring physical structures creating light and shadows with immersive audiovisual spaces.
A array of triangles is placed on the floor, each one has a LED strip on the back which are connected to an Arduino. On MAX, series of random numbers generators and different probabilities trigger a signal to each triangle, making it turn on or off.
At the same time that a triangle is triggered a MIDI message is sent to Ableton Live and plays notes on a MIDI Instrument and an OSC message is sent to Processing for the Visual output.


The installation was created in collaboration with Ana Duarte, André Sousa and Daniel Correia and you can find more info at this link.

Arduino Blog 07 Jan 19:23

LED strips installation beyond Xmas

The installation of Dmitry Morozov (:: vtol: :)”Wave is my nature” exhibited at the Mars center in Moscow is focused on the concept of Wave as the basis of all audiovisual art:

The project draws from the theory of Wave–particle duality which considers the light to be a particle and a wave at the same time. In this case, the notion of the “wave” is uniform for the sound wave, light wave and a “tangible” kinetic wave with wide amplitude, physically presented in the space as stretched cables moved by a system of motors. The piece also refers to the topic of physical modeling of the wave processes which take place in various media and materials: “string”, “data flow”, “visualisation of sound”, “sonification of light” etc. In general, the installation can be viewed as a kinetic spacial light installation which reacts to the presence of audience and creates an autonomous sound and light composition.

The artist used led strips, servo motors, 2-channel sound system, ir motion sensors running on Arduino Mega and Arduino Uno:

Watch a fin-propelled underwater robot prototype

The robotic prototype swimming under water propelled by fins, it was developed at the Control Systems and Robotics Laboratory of the Technological Educational Institute of Crete, in Heraklion (Greece) and it’s controlled by an Arduino Mega:

Each fin is comprised of three individually actuated fin rays, which are interconnected by an elastic membrane. An on-board microcontroller generates the rays’ motion pattern that result in the fins’ undulations, through which propulsion is obtained. The prototype, which is fully untethered and energetically autonomous, also integrates an IMU/AHRS unit for navigation purposes, a wireless communication module, and an on-board video camera. The video contains footage from experiments conducted in a laboratory test tank to investigate closed loop motion control strategies, as well as footage from sea trials.

the Arduino runs a custom-developed real time firmware that implements two Central Pattern Generator (CPG) networks to generate the undulatory motion profile for the robot’s fins. The robot  contains a  7.4V lipo battery powering also a Bluetooth module for wireless communication and a video camera to record footage of the missions.


Arduino Pinout ASCII art ready to go

To enable easy documentation of pin assignments, BusyDuckMan created a couple of ASCII art of Arduino Uno and Mega boards marking ports, PWM and coms. You can now then simply copy and paste as a comment into your code and document in an easy way how the arduino is connected to other devices:

They can be pasted into code comments, (use /* and */ in the arduino IDE to create a block comment). They can also be useful in forums, when you need a quick arduino diagram, but don’t want to fire up an image editor.


Give me your number and get a unique micro-noise piece

Prankophone  is the new interactive installation by Dmitry Morozov (his amazing projects have been featured on this blog ).  This time he created  a sound object, a hybrid of synthesizer, telephone and logic module:

The main principle of the object’s functioning is as follows: depending on the current mode, the apparatus calls to random or pre-defined recipients and plays them algorithmic melodies created from their phone numbers. The speakers transmit both the synthesized sounds and the sound from answering person. The common sound layer is involving a random recipient who doesn’t suspect anything. The person who answers the phone can’t hear any other sounds except for the synthesized ones.

You can play with it in 4 different modes:

Autonomous mode –  it generates the numbers by itself and tries to reach them, and play them the sounds.
Manual mode – when you dial any number by pressing standard phone keys it gets automatically transformed into sounds.
Keyboard mode – mode of dialing the number on the one-octave keyboard where 10 keys correspond to 10 digits.
Live mode – the number is defined by any of the previous methods, but the sounds are reproduced not automatically but from the keyboard, thus the user may “communicate” through sound with the person who answered.
It runs on Arduino Mega and you can listen to its sounds on the following video: