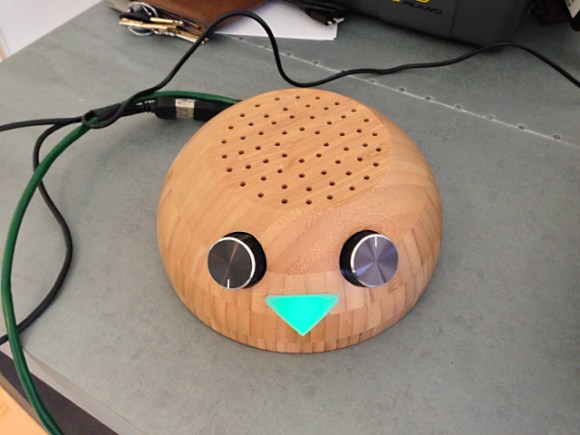
Posts with «arduino hacks» label

KegDroid makes drinking beer more fun

Are you bored with just drinking beer? Are your friends constantly sneaking into your house and stealing your sacred beverages? If so, perhaps you need KegDroid – the Android controlled beer tap created by [Paul Carff].

Looking for a way to add more excitement to drinking his beer, [Paul] spiced up his tap with a little extra technology. He added an Android tablet for touchscreen navigation of the menus, an Arduino to control the flow sensors and solenoid valves, and an NFC reader to act as security for restricted access.  Users must be authenticated before they are allowed to pour any alcohol.

Your name and photo are pulled from your Google+ account as you’re logged in, then you simply select your beverage of choice, and if you’d like a one, eight, or twelve ounce pour. Flow sensors automatically shut off when you have the desired quantity.

Seems like you get more foam than beer, but all in all it’s a cool bar top app.

Check out the video after the break.


Filed under: android hacks, arduino hacks, beer hacks

Dumpster diving nets 100 Arduino-powered motor controllers

Never one to pass up the recycle pile at work, [Scott] usually doesn’t find much. A few old hard drives, maybe a ancient laptop every once in a while, but on very rare occasions he finds something actually useful. This latest haul is a gaggle of stepper motor drivers that, with a bit of work, can be reverse engineered and turned into an Arduino.

After prying into one of the plastic-enclosed boards, [Scott] found a LED, a quartet of transistors for powering the motor, and an ATMega168 microcontroller. Interestingly, most of the pins for the 168 were already broken out on the DA15 connector on each controller. The only thing needed was to build a programmer to dump the Arduino bootloader onto these little widgets.

After much trial and error (and building a new programming interface), [Scott] now has 100 Arduinos with a single stepper motor controller built in. He’s already made a toy light cycle rotate on a small stepper (after the break) and blink a LED, but with this many widgets, we’re wondering what crazy contraption [Scott] will come up with.


Filed under: arduino hacks

Giving the Arduino deques, vectors and streams with the standard template library

The Arduino IDE is extremely similar to C++, but judging from the sketches you can find on the Internet, you’d never know it. Simpler Arduino projects can make do with just toggling IO pins, reading values, and sending serial data between two points. More complex builds fall into the category of real software development, and this is where the standard Arduino IDE falls miserably short.

[Andy] saw this lack of proper libraries for more complicated pieces of software as a terrible situation and decided to do something about it. He ported the SGI Standard Template Library to bring all those fun algorithms and data structures to any AVR chip, including the Arduino.

Going over what’s included in [Andy]‘s port reads just like a syllabus for an object-oriented programming class. Stacks, queues, and lists make the cut, as do strings and vectors. Also included is just about everything in the   and headers along with a few Arduino-oriented additions like a hardware serial and liquid crystal streams.

With all these objects floating around, [Andy] says it will make an impact on Flash and SRAM usage in an AVR. Still, with all the hullabaloo over faster and larger ARM micros, it’s nice to see the classic 8-bit microcontroller becoming a bit more refined.


Filed under: arduino hacks, Software Development

The Arduino Due is finally here

After a years-long wait, an ARM powered Arduino is finally due. The Arduino Due will finally be released this coming Monday.

On board the Arduino Due is an Atmel-sourced ARM Cortex M3 microcontroller running at 84 MHz. The Due has an impressive list of features including a USB 2.0 host, compatibility with the Android ADK (lest you still need an IOIO), 12 analog inputs with 12-bit resolution, 2 analog outputs running at 12 bits, a CAN interface, and more input pins than you can shake a stick at.

For a full list of features, you can grab this PDF we picked up when we saw the Due at Maker Faire NYC

This hardware update to the Arduino platform makes a lot of very cool builds very possible for even the beginner hardware hacker. Of course the Due will be used for controlling drones and UAVs, laser cutters and 3D printers, and playing WAV files from the analog outputs. The much improved hardware opens up a lot of other possible builds including making your own guitar pedals – DSP is a wonderful thing – and reading the telemetry from your car in real-time via the CAN bus.

Although it’s not available right now, you will be able to buy an Arduino Due for $49 USD this coming Monday at your favorite electronics retailers. 


Filed under: arduino hacks, ARM
Hack a Day 20 Oct 16:00

Stacking GPS, GSM, and an SD card into an Arduino shield

A few years ago, [Phang Moh] and his compatriots were asked by a client if they could make a vehicle tracking device for oil tankers all around Indonesia. The request of putting thousands of trackers on tanks of explosives was a little beyond [Phang Moh]‘s capability, but he did start tinkering around with GPS and GSM on an Arduino.

Now that tinkering has finally come to fruition with [Phang]‘s TraLog shield, a single Arduino shield that combines GPS tracking with a GSM and GPRS transceiver. There’s also an SD card thrown in for good measure, making this one of the best tracking and data logging shields for the Arduino.

The shield can be configured to send GPS and sensor data from devices attached to an I2C bus to remote servers, or a really cool COSM server. [Phang] is selling his TraLog for $150, a fairly good deal if you consider what this thing can do.

Seems like the perfect piece of kit for just about any tracking project, whether you want to know the location of thousands of oil tankers or just a single high altitude balloon.

Tip ‘o the hat to [Brett] for finding this one.


Filed under: arduino hacks, cellphones hacks, gps hacks

Hacking Beer Cans for Fun and Publicity

Although beer is generally a good way to get people to come to your trade show booth, [Robofun.ru] decided to put a new spin on things. Instead of (or possibly in addition to) giving out beer, they decided to turn 40 Staropramen beer cans into a keyboard.

This was done using an Arduino hooked up to four Sparkfun MPR121 Capacitive Touch Sensor Breakout Boards, allowing them to act as keys. These inputs are translated via the Arduino into a standard output (we assume USB) that can be plugged into any computer.  Additionally, a Sparkfun MP3 trigger board was used to control the sound effects.  Rounding out the build, a Raspberry Pi computer was used to run the human machine interface, a large plasma display.

Be sure to check out this keyboard in action after the break. If this isn’t enough alternative input fun, why not check our post about how to make a banana piano and giant NES controller.


Filed under: arduino hacks, beer hacks, Raspberry Pi

Nebulophone microcontroller synthesizer project sounds great

Judging from the video (found after the break) the Nebulophone is one of the best sounding DIY synthesizers we’ve seen. Especially when you consider the simplicity of the hardware design. It uses an AVR chip and an OpAmp. The rest of the parts are just a few handfuls of inexpensive components.

The device was developed by Bleep Labs, and they sell the synthesizer kit seen on the left. But since it’s an open source project you can follow their design to fabricate your own, which is what [BlinkyBlinky] did with his offering seen to the right.

An ATmega328 drives the device, which is the chip often used in the Arduino Duemilanove. The keyboard is a set of traces hooked to the microcontroller. These are tinned pads on the kit PCB, but the DIY version simply uses some adhesive copper foil with a jumper wire soldered to it. The keys are played with a probe that makes the electrical connection, a common practice on these stylophone type designs. Chances are you have everything on hand to make this happen so keep it in mind for that next cold winter weekend that’s making everyone a bit stir crazy.

[Thanks Wybren]


Filed under: arduino hacks, musical hacks

Arduino parking lot attendant

Here’s an automatic parking gate for toy cars. There’s no need to press a button, the electronics detect the presence of a vehicle on either side of the gate, raising it after verifying that the lot is not already full. It’s the same idea as counting how many people enter a room in order to switch the lights but the hardware is just a bit different.

The system is controlled by a pair of sensors in the paper which serves as the parking lot. There are three sheets of heavy stock, the top and bottom both have aluminum foil on them, with the center layer  as a separator. There are holes cut in the separator where the hash marks are seen above. By adding a little pressure to the car when you drive it up to the gate this completes a circuit instructing the Arduino that there’s a vehicle in position.

You can see a demonstration, as well as the guts of the build, in two videos after the break.

[via Reddit via Freetronics]


Filed under: arduino hacks, toy hacks

Using Arduino shields with the Raspi

With hundreds of Arduino shields available for any imaginable application, it’s a shame they can’t be used with the Raspberry Pi. Breaking out the Raspi GPIO pins to Arduino-compatible headers would allow makers and tinkerers to reuse their shields with a far more capable computing platform.

The folks over at Cooking Hacks realized a Raspi to Arduino shield bridge would be an awesome device, so they made their own, complete with a software library that allows you to port your Arduino code directly to the Raspberry Pi.

There are a few limitations with the Raspberry Pi’s GPIO headers; the Raspi doesn’t have analog inputs, so the Cooking Hacks team added an 8-channel digital to analog converter. Along with analog inputs and the headers required to pop a shield on the board, there’s also a socket for an XBee module.

The software library contains most of the general Arduino functions such as digitalWrite() and digitalRead(). There Serial, Wire, and SPI libraries are also implemented, allowing any device that communicates through UART, I2C, or SPI to talk directly to the Raspberry Pi.

While the Raspi Arduino bridge doesn’t allow for PWM in the same capacity as an Arduino, you’re always welcome to whip up a servo or LED shield for this neat little adapter.


Filed under: arduino hacks, Raspberry Pi

Single sided Arduino is a great introduction to PCB etching

After you’ve taken the plunge and decided to learn how to etch your own circuit boards, you’ll quickly find even the simplest boards are still out of your grasp. This is due mostly to the two-layer nature of most PCBs, and turn making a homemade Arduino board an exercise in frustration and improving your vocabulary of four-letter words.

After looking around for an easy-to-manufacture single-sided Arduino board, [Johan] realized there weren’t many options for someone new to board etching. He created the Nanino, quite possibly the simplist Arduino compatible board that can be made in a kitchen sink.

Billing it as something between the Veroduino and the Diavolino, [Johan]‘s board does away with all the complexities of true Arduinos by throwing out the USB interface and FTDI chip. A very small parts count makes the Nanino much less expensive to produce in quantity than even the official Arduino single sided board.

For an introduction to etching your own PCBs at home, we couldn’t think of a better first board. As an Arduino, you’re guaranteed to find some use for it and the ease of manufacture and low parts count makes it the perfect subject for your hackerspace’s next tutorial series.


Filed under: arduino hacks