The Arduino software environment, including the IDE, libraries, and general approach, are geared toward education. It’s meant as a way to introduce embedded development to newbies. This is a great concept but it falls short when more serious development or more advanced education is required. I keep wrestling with how to address this. One way is by using Eclipse with the Arduino Plug-in. That provides a professional development environment, at least.
The code base for the Arduino is another frustration. Bluntly, the use of setup() and loop() with main() being hidden really bugs me. The mixture of C and C++ in libraries and examples is another irritation. There is enough C++ being used that it makes sense it should be the standard. Plus a good portion of the library code could be a lot better. At this point fixing this would be a monumental task requiring many dedicated developers to do the rewrite. But there are a some things that can be done so let’s see a couple possibilities and how they would be used.
The Main Hack
As mentioned, hiding main() bugs me. It’s an inherent part of C++ which makes it an important to learning the language. Up until now I’d not considered how to address this. I knew that an Arduino main() existed from poking around in the code base – it had to be there because it is required by the C++ standard. The light dawned on me to try copying the code in the file main.cpp into my own code. It built, but how could I be sure that it was using my code and not the original from the Arduino libraries? I commented out setup() and it still built, so it had to be using my version otherwise there’d be an error about setup() being missing. You may wonder why it used my version.
When you build a program… Yes, it’s a “program” not a “sketch”, a “daughter board” not a “shield”, and a “linker” not a “combiner”! Why is everyone trying to change the language used for software development?
When you build a C++ program there are two main stages. You compile the code using the compiler. That generates a number of object files — one for each source file. The linker then combines the compiled objects to create an executable. The linker starts by looking for the C run time code (CRTC). This is the code that does some setup prior to main() being called. In the CRTC there will be external symbols, main() being one, whose code exists in other files.
The linker is going to look in two places for those missing symbols. First, it loads all the object files, sorts out the symbols from them, and builds a list of what is missing. Second, it looks through any included libraries of pre-compiled objects for the remaining symbols. If any symbols are still missing, it emits an error message.
If you look in the Arduino files you’ll find a main.cpp file that contains a main() function. That ends up in the library. When the linker starts, my version of main() is in a newly created object file. Since object files are processed first the linker uses my version of main(). The library version is ignored.
There is still something unusual about main(). Here’s the infinite for loop in main():
	for (;;) {
		loop();
		if (serialEventRun) serialEventRun();
	}
The call to loop() is as expected but why is there an if statement and serialEventRun? The function checks if serial input data is available. The if relies on a trick of the tool chain, not C++, which checks the existence of the symbol serialEventRun. When the symbol does not exist the if and its code are omitted.
Zapping setup() and loop()
Now that I have control over main() I can address my other pet peeve, the setup() and loop() functions. I can eliminate these two function by creating my own version of main(). I’m not saying the use of setup() and loop() were wrong, especially in light of the educational goal of Arduino. Using them makes it clear how to organize an embedded system. This is the same concept behind C++ constructors and member functions. Get the initialization done at the right time and place and a good chunk of software problems evaporate. But since C++ offers this automatically with classes, the next step is to utilize C++’s capabilities.
Global Instantiation
One issue with C++ is the cost of initialization of global, or file, scope class instances. There is some additional code executed before main() to handle this as we saw in the article that introduced classes. I think this overhead is small enough that it’s not a problem.
An issue that may be a problem is the order of initialization. The order is defined within a compilation unit (usually a file) from the first declaration to the last. But across compilation units the ordering is undefined. One time all the globals in file A may be initialized first and the next time those in file B might come first. The order is important when one class depends on another being initialized first. If they are in different compilation units this is impossible to ensure. One solution is to put all the globals in a single compilation unit. This may not work if a library contains global instances.
A related issue occurs on large embedded computer systems, such as a Raspberry Pi running Linux, when arguments from the command line are passed to main(). Environment variables are also a problem since they may not be available until main() executes. Global instance won’t have access to this information so cannot use it during their initialization. I ran into this problem with my robots whose control computer was a PC. I was using the robot’s network name to determine their initial behaviors. It wasn’t available until main() was entered, so it couldn’t be used to initialize global instances.
This is an issue with smaller embedded systems that don’t pass arguments or have environment values but I don’t want to focus only on them. I’m looking to address the general situation that would include larger systems so we’ll assume we don’t want global instances.
Program Class
The approach I’m taking and sharing with you is an experiment. I have done something similar in the past with a robotics project but the approach was not thoroughly analyzed. As often happens, I ran out of time so I implemented this as a quick solution. Whether this is useful in the long run we’ll have to see. If nothing else it will show you more about working with C++.
My approach is to create a Program class with a member run() function. The setup for the entire program occurs in the class constructor and the run() function handles all the processing. What would normally be global variables are data members.
Here is the declaration of a skeleton Program class and the implementation of run():
class Program {
public:
	void run();
	static Program& makeProgram() {
		static Program p;
		return p;
	}

private:
	Program() { }
	void checkSerialInput();
};

void Program::run() {
	for (;;) {
		// program code here
		checkSerialInput();
	}
}
We only want one instance of Program to exist so I’ve assured this by making the constructor private and providing the static makeProgram() function to return the static instance created the first time makeProgram() is called. The Program member function checkSerialInput() handles checking for the serial input as discussed above. In checkSerialInput() I introduced an #if block to eliminate the actual code if the program is not using serial input.
Here is how Program is used in main.cpp:
void arduino_init() {
	init();
	initVariant();
}

int main(void) {
	arduino_init();
	Program& p = Program::makeProgram();
	p.run();
	return 0;
}
The function initArduino() is inlined and handles the two initialization routines required to setup the Arduino environment.
One of the techniques for good software development is to hide complexity and provide a descriptive name for what it does. These functions hide not only the code but, in one case, the conditional compilation.
Redbot Line Follower Project
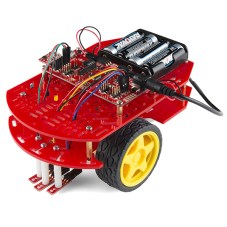 This code experiment uses a Sparkfun Redbot setup for line following. This is a two wheeled robot with 3 optical sensors to detect the line and an I2C accelerometer to sense bumping into objects. The computer is a Sparkfun Redbot Mainboard which is compatible with the Arduino Uno but provides a much different layout and includes a motor driver IC.
This robot is simple enough to make a manageable project but sufficiently complex to serve as a good test, especially when the project gets to the control system software. The basic code for handling these motors and sensors comes from Sparkfun and uses only the basic pin-level Arduino routines. I can’t possibly hack the entire Arduino code but using the Sparkfun code provides a manageable subset for experimenting.
For this article we’ll just look at the controlling the motors. Let’s start with the declaration of the Program class for testing the motor routines:
class Program {
public:
	void run();
	static Program& makeProgram() {
		static Program p;
		return p;
	}

private:
	Program() { }
	static constexpr int delay_time { 2000 };

	rm::Motor l_motor { l_motor_forward, l_motor_reverse, l_motor_pwm };
	rm::Motor r_motor { r_motor_forward, r_motor_reverse, r_motor_pwm };
	rm::Wheels wheels { l_motor, r_motor };

	void checkSerialInput();
};
There is a namespace rm enclosing the classes I’ve defined for the project, hence the rm:: prefacing the class names. On line 11 is something you may not have seen, a constexpr which is new in C++ 11 and expanded in C++14. It declares that delay_time is a true constant used during compilation and will not be allocated storage at run-time. There is a lot more to constexpr and we’ll see it more in the future. One other place I used it for this project is to define what pins to use. Here’s a sample:
constexpr int l_motor_forward = 2;
constexpr int l_motor_reverse = 4;
constexpr int l_motor_pwm = 5;
constexpr int r_motor_pwm = 6;
constexpr int r_motor_forward = 7;
constexpr int r_motor_reverse = 8;
The Motor class controls a motor. It requires two pins to control the direction and one pulse width modulation (PWM) pin to control the speed. The pins are passed via constructor and the names should be self-explanatory. The Wheels class provides coordinated movement of the robot using the Motor instances. The Motor instances are passed as references for the use of Wheels. Here are the two class declarations:
class Motor : public Device {
public:
	Motor(const int forward, const int reverse, const int pwm);

	void coast();
	void drive(const int speed);

	int speed() const {
		return mSpeed;
	}

private:
	void speed(const int speed);

	PinOut mForward;
	PinOut mReverse;
	PinOut mPwm;
	int mSpeed { };
};


class Wheels {
public:
	Wheels(Motor& left, Motor& right) :
			mLeft(left), mRight(right) {
	}

	void move(const int speed) {
		drive(speed, speed);
	}
	void pivot(const int speed) {
		drive(speed, -speed);
	}
	void stop() {
		mLeft.coast();
		mRight.coast();
	}

	void drive(const int left, const int right) {
		mLeft.drive(left);
		mRight.drive(right);
	}

private:
	Motor& mLeft;
	Motor& mRight;
};
The workhorse of Wheels is the function drive() which just calls the Motor drive() functions for each motor. Except for stop(), the other Wheels functions are utilities that use drive() and just make things easier for the developer. The compiler should convert those to a direct call to driver() since they are inline by being inside the class declaration. This is one of the interesting ways of using inline functions to enhance the utility of a class without incurring any cost in code or time.
The run() method in Program tests the motors by pivot()ing first in one direction and then the other at different speeds. A pivot() rotates the robot in place. Once the speed is set it continues until changed so the delay functions simply provide a little time for the robot to turn. Here’s the code:
void Program::run() {
	for (;;) {
		wheels.pivot(50);
		delay (delay_time);

		wheels.pivot(-100);
		delay(delay_time);

		checkSerialInput();
		if (serialEventRun) {
		}
	}
}
Wrap Up
The Redbot project is an interesting vehicle for demonstrating code techniques. The current test of the motor routines demonstrates how to override the existing Arduino main(). Even if you don’t like my approach with Program, the flexibility of using your own main() may come in handy for your own projects. The next article is going to revisit this program using templates.
THE EMBEDDING C++ PROJECT
Over at Hackaday.io, I’ve created an Embedding C++ project. The project will maintain a list of these articles in the project description as a form of Table of Contents. Each article will have a project log entry for additional discussion. Those interested can delve deeper into the topics, raise questions, and share additional findings.
The project also will serve as a place for supplementary material from myself or collaborators. For instance, someone might want to take the code and report the results for other Arduino boards or even other embedded systems. Stop by and see what’s happening.
Filed under:
Arduino Hacks,
Hackaday Columns,
Software Development,
software hacks 


 running a calculus function on an Arduino presents a seemingly impossible scenario. In this article, we’re going to explore the idea of using derivative like techniques with a microcontroller. Let us be reminded that the derivative provides an instantaneous rate of change. Getting an instantaneous rate of change when the function is known is easy. However, when you’re working with a microcontroller and varying analog data without a known function, it’s not so easy. Our goal will be to get an average rate of change of the data. And since a microcontroller is many orders of magnitude faster than the rate of change of the incoming data, we can calculate the average rate of change over very small time intervals. Our work will be based on the fact that the average rate of change and instantaneous rate of change are the same over short time intervals.


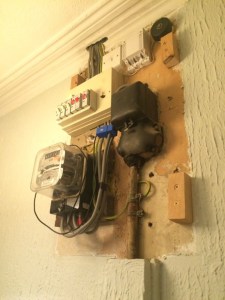 Looking at the “before” pictures on [John]’s blog, we can see why he’d want to invest the effort – not exactly an attractive way to greet guests at the front door. A simple wooden box to replace the previous cover would have sufficed, but why pass up the opportunity to add value? [John] opted for a Nixie tube display to complement the glass of the electric meter. The Nixie modules were a bit on the pricey side, though, so with only a pair of tubes to work with, [John] came up with a clever system to indicate the scale of the display. We doubt he’ll ever see megawatt-level instantaneous power draw, but the meter is also capable of totalling energy use, and as a bonus an ESP-8266 gives lets him stream data to the web.


