What would you get it you mashed up an FPGA and an Arduino? An FPGA development board with far too few output pins? Or a board in the form-factor of Arduino that’s impossible to program?
The Alhambra board itself looks to be Arduino-compatible, with the horrible gap between the rows on the left-hand-side and all, so it will work with your existing shields. But they’ve also doubled them with pinheaders in a more hacker-friendly layout: SVG — signal, voltage, ground. This is great for attaching small, powered sensors using a three-wire cable like the one that you use for servos. (Hackaday.io has two Arduino clones using SVG pinouts: in SMT and DIP formats.)
The iCE40 FPGA has 144 pins, so you’re probably asking yourself where they all end up, and frankly, so are we. There are eight user LEDs on the board, plus the 28 I/O pins that end in pinheaders. That leaves around a hundred potential I/Os unaccounted-for. One of the main attractions of FPGAs in our book is the tremendous availability of fast I/Os. Still, it’s more I/O than you get on a plain-vanilla Arduino, so we’re not complaining too loudly. Sometimes simplicity is a virtue. Everything’s up on GitHub, but not yet ported to KiCad, so you can tweak the hardware if you’ve got a copy of Altium.
We’ve been seeing FPGA projects popping up all over, and with the open-source toolchains making them more accessible, we wonder if they will get mainstreamed; the lure of reconfigurable hardware is just so strong. Putting an FPGA into an Arduino-compatible form-factor and backing it with an open GUI is an interesting idea. This project is clearly in its very early stages, but we can’t wait to see how it shakes out. If anyone gets their hands on these boards, let us know, OK?
This simple WiFi serial port monitor would have saved us a lot of trouble. We can’t count how many times where being hooked into an Arduino with USB just to get the serial out has nearly been more trouble than it’s worth. Times where we sat cross-legged on the floor and could choose comfort or accidentally shifting the set-up and ruining everything, but not both.
[Frenky]’s set-up is simple and clever. The Ardunio’s serial out is hooked to an ESP8266. The Arduino spams serial out to the ESP8266 in its usual way. The ESP8266 then pipes all that out to a simple JavaScript webpage. Connect to the ESP8266’s IP with any device in your house, and get a live stream of all the serial data. Neat.
As simple as this technique is, we can see ourselves making a neat little box with TX, RX, GND, and VCC screw terminals to free us from the nightmare of tethering on concrete floors just for a simple test. Video after the break.
Last Saturday I had a team of teenage hackers over to build Arduino line-following robots from a kit. Everything went well with the mechanical assembly and putting all the wires on the correct pins. The first test was to check that the motors were moving in the proper direction. I’d written an Arduino program to test this. The first boy’s robot worked fine except for swapping one set of motor leads. That was anticipated because you cannot be totally sure ahead of time which way the motors are going to run.
The motor’s on the second robot didn’t turn at all. As I checked the wiring I smelled the dreaded hot electronics smell but I didn’t see any smoke. I quickly pulled the battery jack from the Arduino and – WOW! – the wires were hot. That didn’t bode well. I checked and the batteries were in the right way. A comparison with another pack showed the wires going into the pack were positioned properly. I plugged in another pack but the motors still didn’t run.
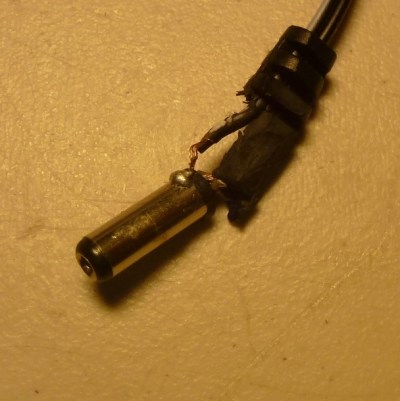
I got my multimeter, checked the voltage on the jack, and it was -5.97 V from center connector to the barrel. The other pack read 6.2 V. I had a spare board and pack so swapped those and the robot worked fine. Clearly the reverse polarity had zapped the motor control ICs. After that everyone had a good time running the robots on a course I’d laid out and went home pleased with their robots.
After they left I used the ohmmeter to check the battery pack and found the wiring was backwards, as you can see in the feature photo. A close inspection showed the wire with a white line, typically indicating positive, indeed went to the positive battery terminal. I shaved the barrel connector down to the wires and the white line wire was connected to the outside of the barrel. FAIL!
This is a particularly bad fail on the part of the battery pack supplier because how hard is it to mess up two wires? You can’t really fault the robot kit vendor because who would expect a battery pack to be bad? The vendor is sending me a new battery pack and board so I’m satisfied. Why did I have an extra board and pack, actually an entire kit? For this exact reason; something was bound to go wrong. Although what I had imagined was for one of the students to break a mechanical part or change wiring and zap something. Instead, we were faced with a self-destructing kit. Prudence paid off.
[Tom Hall], along with many hams around the world, have been hacking the Silicon Labs Si5351 to create VFOs (variable frequency oscillators) to control receivers and transmitters. You can see the results of his work in a video after the break.
[Tom] used a Teensy 3.1 Arduino compatible board, to control the Si5351 mounted on an Adafruit breakout board. An LCD display shows the current frequency and provides a simple interface display for changing the output. A dial encoder allows for direct adjustment of the frequency. The ham frequency band and the frequency increment for each encoder step are controlled by a joystick. When you get into the 10 meter band you definitely want to be able to jump by kHz increments, at least, since the band ranges from 28 mHz to 29.7 mHz.
So what is the Si5351? The data sheets calls it an I2C-Programmable Any-Frequency CMOS Clock Generator + VCXO. Phew! Let’s break that down a bit. The chip can be controlled from a microprocessor over an I2C bus. The purpose of the chip is to generate clock outputs from 8 kHz to 160 kHz. Not quite any frequency but a pretty good range. The VCXO means voltage controlled crystal oscillator. The crystal is 25 mHz and provides a very stable frequency source for the chip. In addition, the Si5351 will generate three separate clock outputs.
[Tom] walks through the code for his VFO and provides it via GitHub. An interesting project with a lot of the details explained for someone who wants to do their own hacks. His work is based on work done by others that we’ve published before, which is what hacking is all about.
There are some standard components that have been so continuously refined as to have become if not perfect then about as good as they’re going to get. Take the Arduino Uno for instance, and compare it with its ancestor from a decade ago. They are ostensibly the same board and they are compatible with each other, yet the Uno and its modern clones have more processing power, memory and storage, a USB interface rather than serial, and a host of small component changes to make them better and cheaper.
You’d think that just another Arduino clone couldn’t bring much to the table then. And you’d be right in a broad sense, just what is there left to improve?
[Clovis Fritzen] has an idea for an Arduino clone that’s worth a second look. It’s not an amazing hardware mod that’ll set the Arduino world on fire, instead it’s a very simple design feature. He’s created an Arduino that mounts vertically on a single row of pins. Why might you find that attractive, you ask? A SIL vertical Arduino takes up a lot less breadboard space than one of the existing DIL Arduinos. A simple idea, yet one that is very useful if you find yourself running out of breadboard.
[Clovis] took the circuit of an Arduino Uno and simplified it by removing the USB interface, so this board has to be programmed through its ICSP header. And he’s made it a through-hole board for easy construction by those wary of SMD soldering. The resulting board files can all be found on GitHub.
Every now and then along comes a hack so simple, obvious, and useful that it makes you wonder just why you didn’t think of it yourself. Many of us will have used a DIL Arduino and probably found ourselves running out of breadboard space. This board probably won’t change the world, but it could at least make life easier in a small way for some of us who tinker with microcontrollers.
This is just the latest of many Arduino clones to find its way onto these pages. In 2013 we asked why the world needed more when featuring one made as a PCB design exercise. There’s even a Hackaday version called the HaDuino developed by [Brian Benchoff]. But while it’s true that Yet Another Vanilla Arduino Clone brings nothing to the table, that should not preclude people from taking the Arduino and hacking it. Every once in a while something useful like this project will come from it, and that can only be a benefit to our community.
Hernando Barragán is the grandfather of Arduino of whom you’ve never heard. And after years now of being basically silent on the issue of attribution, he’s decided to get some of his grudges off his chest and clear the air around Wiring and Arduino. It’s a long read, and at times a little bitter, but if you’ve been following the development of the Arduino vs Arduino debacle, it’s an important piece in the puzzle.
Wiring, in case you don’t know, is where digitalWrite() and company come from. Maybe even more importantly, Wiring basically incubated the idea of building a microcontroller-based hardware controller platform that was simple enough to program that it could be used by artists. Indeed, it was intended to be the physical counterpart to Processing, a visual programming language for art. We’ve always wondered about the relationship between Wiring and Arduino, and it’s good to hear the Wiring side of the story. (We actually interviewed Barragán earlier this year, and he asked that we hold off until he published his side of things on the web.)
The short version is that Arduino was basically a fork of the Wiring software, re-branded and running on a physical platform that borrowed a lot from the Wiring boards. Whether or not this is legal or even moral is not an issue — Wiring was developed fully open-source, both software and hardware, so it was Massimo Banzi’s to copy as much as anyone else’s. But given that Arduino started off as essentially a re-branded Wiring (with code ported to a trivially different microcontroller), you’d be forgiven for thinking that somewhat more acknowledgement than “derives from Wiring” was appropriate.
See what we mean?
The story of Arduino, from Barragán’s perspective, is actually a classic tragedy: student comes up with a really big idea, and one of his professors takes credit for it and runs with it.
This story begins in 2003 as Barragán was a Masters student at the Interaction Design Institute Ivrea (IDII) in Italy. He was advised and heavily influenced by Casey Reas, one of the two authors of Processing.
At the same time, Massimo Banzi is teaching a class in essentially microcontrollers-for-designers at Ivrea using a PIC-based board called the Programma2003 and a curious language that you’ve never heard of, “JAL: Just Another Language“. At the time, there was no GCC support for the PIC, so the choices for open-source development were few. Worse, most of the design students are using Macs, and JAL only compiles on Windows. It wasn’t user friendly.
Barragán’s thesis is a must-read if you want to know where Arduino comes from. The summary is everything you know now: it’d be revolutionary if one could make a hardware / software platform that were easy enough that artists and non-microcontroller-nerds could get into. This is exactly the revolution that was underway in the computer graphics front, powered by Processing. Make it open source and freely available, and you’ll take over the world. So he turned to the Atmel AVR chips, which had the GCC open-source toolchain behind it.
From Wiring to Arduino
So by 2004, Barragán had a few prototypes of Wiring boards out, and he and his fellow students were using them informally for projects. The GUI will look ridiculously familiar if you’ve used Processing or Arduino. Since the students were already familiar with Processing, it made a lot of sense to just clone it — with Casey Reas’ blessing of course. Barragán wrote a little program that maybe you’ve heard of: Blink.
Now Barragán needed a faculty advisor at Ivrea, and his interests clearly aligned best with Massimo Banzi. So with his thesis work well underway and Reas’ backing, Barragán took on Banzi as his advisor. With Banzi and three other faculty members, the Wiring platform got its first real test-run, the “Strangely Familiar” workshop and show (PDF). It was a stunning success — in the space of only four weeks students actually made stuff.
Massimo Banzi teaching class with Wiring
Barragán graduated in 2004 and moved back to Colombia. The success of “Strangely Familiar” lead Massimo Banzi to drop Programma2003 like a hot potato and teach his physical design classes using Wiring.
Work began on the Arduino project, according to Banzi, because he wanted a board that was cheaper to make than the Wiring board. So he replaced the ATmega128 microcontroller for a cheaper, smaller version, and chopped off everything that wasn’t “essential” from the Wiring board, like the power LED. This became the “Wiring Lite” board — and eventually the first Arduino prototype.
Giving Arduino its Due
It is not the case that Arduino doesn’t acknowledge Wiring at all. They do. There are a few sentences in the first paragraph of the Credits section of the website, as mentioned above. That and $4.50 will buy you a Grande, Quad, Nonfat, One-Pump, No-Whip, Mocha, but how much more can one ask for?
The Arduino project has been marketed with extreme savvy, something that cannot be said of Wiring. Banzi hooked up with influential people in the US, eventually friend-of-a-friending himself into contact with Dale Dougherty, who invented not just “Web 2.0” but also the “Maker Movement” and Make Magazine. Arduino and Make was a match made in heaven, and the rest is history.
But as mentioned at the top of the article, this is a classic tale of woe. Banzi had better connections and more marketing drive and skill. He pushed the exact same project — rebranded — a lot harder, better, and further than Barragán did, or probably could. Arduino is a household name simply for that reason. If Massimo Banzi hadn’t been behind the wheel, it’s unlikely that you’d be complaining about how many Wiring-based projects we feature.
And, being open-source software and hardware, Barragán gave away the shop. He probably (naïvely) expected to get more credit from his former advisor, or even get invited along on the ride. He asks why Arduino forked Wiring instead of continuing to work with him, and the answer is absolutely clear — Arduino was taking it for their own. And they could. It’s not nice, but that’s business.
Still, we feel Barragán’s pain. So we’re glad, after a decade of silence, that Barragán is speaking out on behalf of himself and Wiring, because it sets the record straight and because his project really was “Arduino” before there was an Arduino.
The Linux Foundation is a non-profit organization that sponsors the work of Linus Torvalds. Supporting companies include HP, IBM, Intel, and a host of other large corporations. The foundation hosts several Linux-related projects. This month they announced Zephyr, an RTOS aimed at the Internet of Things.
The project stresses modularity, security, and the smallest possible footprint. Initial support includes:
Arduino 101
Arduino Due
Intel Galileo Gen 2
NXP FRDM-K64F Freedom
The project (hosted on its own Website) has downloads for the kernel and documentation. Unlike a “normal” Linux kernel, Zephyr builds the kernel with your code to create a monolithic image that runs in a single shared address space. The build system allows you to select what features you want and exclude those you don’t. You can also customize resource utilization of what you do include, and you define resources at compile time.
By default, there is minimal run-time error checking to keep the executable lean. However, there is an optional error-checking infrastructure you can include for debugging.
The API contains the things you expect from an RTOS like fibers (lightweight non-preemptive threads), tasks (preemptively scheduled), semaphores, mutexes, and plenty of messaging primitives. Also, there are common I/O calls for PWM, UARTs, general I/O, and more. The API is consistent across all platforms.
You can find out more about Zephyr in the video below. We’ve seen RTOS systems before, of course. There’s even some for robots. However, having a Linux-heritage RTOS that can target small boards like an Arduino Due and a Freedom board could be a real game changer for sophisticated projects that need an RTOS.
Hackaday reader [Jan Ostman] has been making microcontroller-based DIY synthesizers for quite a while now. Recently, he’s opened up the source for a lot of them so that you can play along at home. All of these virtual-analog synths and soundmakers can be realized on an Arduino or AVR ATmega328 if you happen to have one lying around.
Extra parts like a keyboard, some pushbuttons, or some potentiometer knobs to twiddle won’t hurt if you’d like to make something more permanent or more obviously playable, like [Jan] does. On the other hand, if you’d just like to get your feet wet, I’ve tweaked his code to be more immediately plug-and-play. The code is straightforward enough that it’s a good learning platform. So let’s take a quick tour through three drum machines and a string synth, each of which you can build on a breadboard in just a few minutes.
To install on an Arduino UNO, fetch the zip file from this GitHub repository, and move each subfolder to your Arduino sketch directory. You’re ready to play along.
Simple Drum Machines
[Jan] has two sample-playback~based drum machines that he’s published the code for: the dsp-D8 with straight-ahead drum samples and the dsp-L8 loaded with Latin percussion. They’re essentially the same code base, but with different samples, so we’ll treat them together.
Working through [Jan]’s code inspired me to write up a longer article on DDS playback, so if you want to brush up on the fundamentals, you can head over there. The short version is that you can change the pitch of playback of a sample by using a counter that’s much larger than the number of data points you’re going to play.
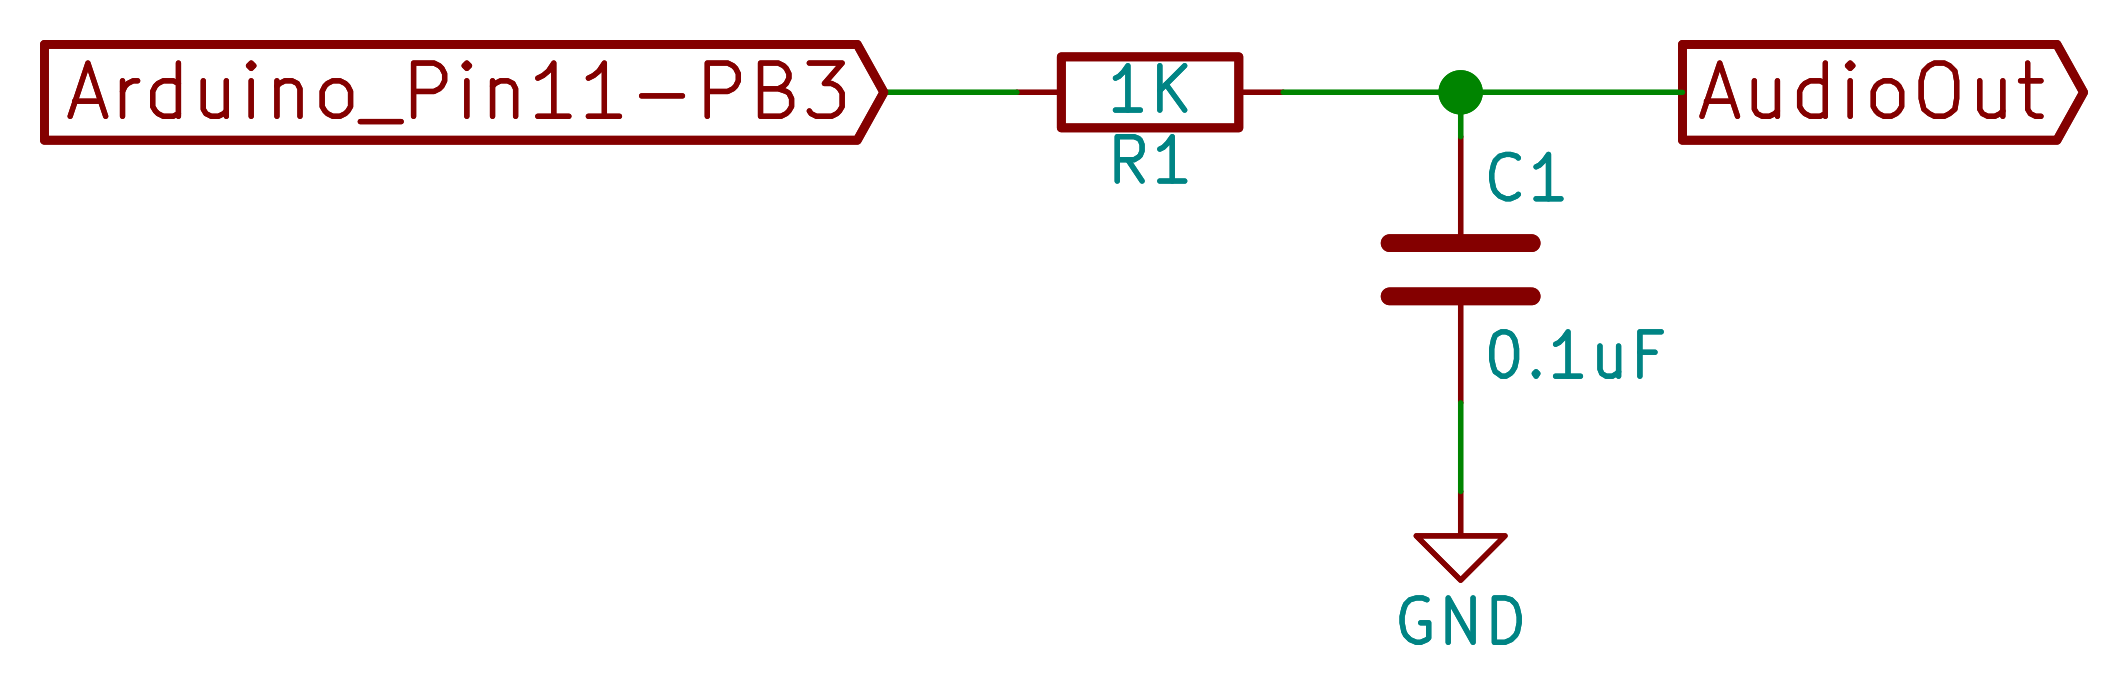
[Jan]’s drum machines all use the AVR’s hardware pulse-width modulation (PWM) peripherals to play the samples back out. You could use something fancier, but this gets the job done with just an optional resistor and capacitor filter on the output, bringing the total parts count to three: Arduino, 1 KOhm resistor, and a decent-sized (0.1 uF?) capacitor. An interrupt service routine (ISR) periodically loads a new sample value into the PWM register, and the AVR’s peripheral hardware takes care of the rest.
One nice touch is the use of a circular buffer that holds the playback sample values until the ISR is ready for them. In the case of the drum machines, there’s not much math for the CPU to do — it just combines the samples from all of the different simultaneous voices — but in his more complicated modules this buffer allows the CPU to occasionally take more time to calculate a sample value than it would otherwise have between updates. It buys [Jan]’s code some breathing room and still allows it to make the sample-playback schedule without glitching.
[Jan] adds individual pitch control for each sample, which is great for live playing or tweaking, and you can watch him use them in his two videos: one for the dsp-D8 and another for the dsp-L8. Wiring up so many knobs is a breadboard-salad, though, so I’ve gone through the code for you with a fine-toothed chainsaw, and hacked off [Jan]’s button-and-knob interface and replaced it with the Arduino’s built-in serial I/O.
To play my version of [Jan]’s drum machines, each sample is mapped to a key in the home row: “asdfjkl;”. If you’ve got a proper serial terminal program that transmits each keystroke in real-time, you’ll be tapping out rhythms at 9600 baud in no time. Note that the Arduino IDE’s built-in terminal only sends the keystroke after you hit “enter” — this makes playing in tempo very difficult. (I use screen /dev/ttyACM0 9600 or the terminal that’s built-in with Python’s pyserial library myself. What do Windows folks use for a real-time terminal?)
If you haven’t already, download this zip file, move each sub-folder to your Arduino sketch directory, and connect an amplified speaker either directly to your Arduino’s pin 11 and ground, or include an RC filter. It’ll only take a second before you’re playing. When you want the full version with all the knobs, head on over to [Jan]’s site.
O2 Minipops
[Jan]’s O2 Minipops machine mimics an old-school rhythm box: the Korg mini pops 7. Whether this primitive drum machine is horribly cheesy or divinely kitschy is in the ear of the beholder, but it’s a classic that has been used all over. [Jan]’s named his after an epic album Oxygene by Jean-Michel Jarre. You’ll hear them starting around 1:40 into the clip. Jarre famously used to press multiple buttons on the Minipops, making more complex drum patterns by playing more than one at a time.
The nice thing about having your own Minipops in firmware is that you can add the features you want to it. Instead of having to mash down multiple plastic buttons live on stage like poor Mr. Jarre, you can just tweak the firmware to suit. Need longer patterns? You’ve got the RAM. Emphasis? Swing? Tap tempo? It’s all just a matter of a few lines of code.
The sound playback code is just like the simpler drum machines above, so we won’t have to cover that again. The only real addition is the sequencer, but that’s where the real magic lies. After all, what’s a drum machine without some beats? Because there are eight possible drum sounds, each beat is a byte and so four bars of 4/4 time is just sixteen bytes stored in memory. I broke the data out into its own header file O2_data.h, so have a look there for the pre-programmed rhythms, and feel free to modify them to suit your own needs.
In order to make the O2 Minipops immediately playable, I stripped out the potentiometer code again (sorry [Jan]!) and passed off control over the serial port. The “user interface” has five controls. Press j and k to switch between patterns and f and d to speed up or slow down. (They’re under your first two fingers in the home row.) The space bar starts and stops the drum machine.
Try switching between the patterns on the fly with j and k — it’s a surprisingly fun way to create your own, slightly less cheesy, patterns. You need to download this code and give it a try. Trust me.
[Jan]’s Solina is a “virtual analog” in the sense that it builds up sawtooth waveforms in the microcontroller’s RAM and then outputs the corresponding voltage through PWM. And that’s a good start for a string synthesizer, because a filtered sawtooth waveform is a good first stab at the sound put out by a violin, for example.
Solina — the clone
The secret to the sound of the string section of an orchestra (and to string synthesizers that mimic it) is that it’s a combination of many different bowed instruments all playing at once. No matter how precise the players, they’re each slightly differently tuned, and none of the strings are resonating exactly in phase. The Solina mimics this by detuning each oscillator, naturally, and by moving them in and out of phase with each other. If you want to dig into the details of how exactly [Jan]’s Solina works, he explains it well in this blog post.
Again, I’ve converted it for direct-serial control, and you can control the envelope, detune, LFO speed, and modulation depth over the serial port. Press the spacebar once to simulate a keypress, and again to let go. Try the Solina with detune and pitch modulation around twenty, and play with the LFO rate and other parameters. That’s a lot of useful noise for just some sawtooth waves.
Keyboards and What’s Next
[Jan]’s builds are much more than what we’re demonstrating here, of course. His blog kicks off (in 2009!) with a project that essentially shoe-horns a PC into a keyboard enclosure, and the Solina and others get their own keys too. We’ve just presented the kernel of any such project — there’s a lot of labor-of-love left in wiring up all of the diodes necessary to do detection on a keyboard matrix, to say nothing of building enclosures, wiring up potentiometers, and making nice-looking front panels. But if you want to start down that path, you’ve at least got a good start.
[Jan]’s current project is the Minimo miniature monophonic synth that takes the Solina a step further and adds a lowpass filter with (digital) resonance to it. The resulting sounds are great, so we’re excited to see where [Jan] takes this one in the future.
Thanks again, [Jan], for opening the code up. And if any of you build something with this, be sure to post in the comments and let us all know. Since I started playing around with these, I’ve got the hankering to modularize the code up a bit and make it into something that’s even easier to adapt and modify. Maybe we’ll have to start up a Hackaday.io project — these little simple synths are just too much fun!
Snow skiing looks easy, right? You just stay standing, and gravity does the work. The reality is that skiing is difficult for beginners to learn. [19mkarpawich] loves to ski, but he was frustrated seeing crying kids on skis along with screaming parents trying to coach them. Inspired by wearable electronics, he took an Arduino, an old jacket, some LEDs, and created Ski Buddy.
The brains in the jacket consist of an Adafruit Flora, accelerometer, and a battery pack. Conductive thread connects to LED sequins. The jacket can help teach linking turns, parallel skiing, hockey stops, and gradual pizza stopping. In addition to the build details and some notes on where not to place sensors (doubtlessly learned the hard way), [19mkarpawich] also does a detailed explanation of the software and how to use the jacket.
You can see a very short video demonstration of Ski Buddy below. We’ve seen more wearables lately, some of them pretty creative. Maybe it is time to learn how to sew if you can’t already.
Want to really understand how something works? Make one yourself. That’s the approach that Reddit user [Oskarbjo] took with this neat electric motor build. He made the whole thing from scratch, using an Arduino, 3D printing, and ample quantities of wire to create a solenoid motor. This transforms the linear force of a solenoid, where a magnet is moved by a magnetic field, into rotary force. It’s rather like an internal combustion engine, but driven by electricity instead of explosions. Hopefully.
[Oskarbjo]’s engine seems to work, including a rather neat mechanism to detect the rotation of the shaft and relay that back to the controller. He hasn’t posted much detail in the build process, unfortunately, but did say that “If you’d want to build something similar I can probably help you out a bit, but half the fun is coming up with your own solutions.” Amen to that. We’ve seen a few neatsolenoidmotor builds, but this one wins points for starting from scratch. There is an Instagram video of the motor running after the break.


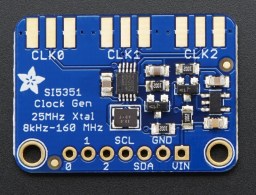 [Tom] used a Teensy 3.1 Arduino compatible board, to control the Si5351