

Morse Code: Paris in the Mint Box
 [Rob Bailey] likes to build things and he likes ham radio. We are guessing he likes mints too since he’s been known to jam things into Altoids tins. He had been thinking about building a code practice oscillator in a Altoids Smalls tin, but wasn’t sure he could squeeze an Arduino Pro Mini in there too. Then he found the TinyLily Mini. The rest is history, as they say, and 1CPO was born.
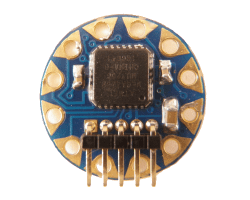
The TinyLily Mini is a circular-shaped Arduino (see right) about the size of a US dime. most of the pads are arranged around the circle and there is a small header that takes a USB programmer. A small rechargeable battery can run the device for a long time.
If you’ve ever written Morse code software, one challenge is to compute the actual sending speed in words per minute (WPM). If you are doing a serial port, for example, the speed is easy because the sent elements are the same length. However, with Morse code, some things are very short (like an E, for example) and some are much longer (like a zero). In fact, the code tries to reflect the frequency certain letters occur. E is the shortest character and the most common in English texts.
You might think [Samuel Morse] was responsible for this, but his original code was only numbers. The idea is you would get numbers and look them up in a code book. Presumably, some of the codes would have been single letters forming an early coding like ASCII, Baudot, or EBCDIC. [Alfred Vail] expanded the system to include letters and other characters and assigned lengths based on the examination of type cases at the local newspaper. That code also used dots, dashes, and long dashes, but it is almost recognizable as the Morse code in use today.
So [Rob] looked for a way to determine the speed and found that the ARRL uses the timing of the word PARIS as an average word. [Rob] wasn’t quite convinced that was the right way to go, so he compiled a list of the 1,000 most common English words, the 100 largest cities in the word, and a few other groups of words and computed the average element length of the words. PARIS has 50 elements total. The average of [Rob’s] list was 49.489. Pretty close.
If you think Morse code is dead, there are still a number of hams who enjoy it. Also, the US Air Force trains 10 Morse code operators every year. Morse has been used to transfer data over cell phones cheaply, and we’ve seen plenty of larger practice devices.
Filed under: Arduino Hacks


 [Bokononestly] decided to


