Posts with «arduino hacks» label

Control the Real World with an Arduino-Enabled Minecraft Mod

Minecraft modding has become almost as popular as the block-based game itself, with tons of editors and tools available to create new kinds of blocks, mobs, and weapons. And now, with this mod framework that can talk to an Arduino, modders can build blocks that break out of the Minecraft world to control the real world.

While turning on a light from Minecraft is not exactly new, the way that MCreator for Arduino goes about it is pretty neat. MCreator is a no-code framework for building Minecraft mods, which allows modders to build new game capabilities with a drag and drop interface. The MCreator Arduino toolkit allows modders to build custom Minecraft blocks that can respond to in-game events and communicate with an Arduino over USB. Whatever an Arduino can do – light an LED, sense a button press – can be brought into the game. It’s all open-source and free for non-commercial use, which is perfect for the upcoming STEM-based summer camp season. We can think of some great projects that would really jazz up young hackers when presented through a Minecraft interface.


Filed under: Arduino Hacks, misc hacks

Morse Code: Paris in the Mint Box

[Rob Bailey] likes to build things and he likes ham radio. We are guessing he likes mints too since he’s been known to jam things into Altoids tins. He had been thinking about building a code practice oscillator in a Altoids Smalls tin, but wasn’t sure he could squeeze an Arduino Pro Mini in there too. Then he found the TinyLily Mini. The rest is history, as they say, and 1CPO was born.

The TinyLily Mini is a circular-shaped Arduino (see right) about the size of a US dime. most of the pads are arranged around the circle and there is a small header that takes a USB programmer. A small rechargeable battery can run the device for a long time.

If you’ve ever written Morse code software, one challenge is to compute the actual sending speed in words per minute (WPM). If you are doing a serial port, for example, the speed is easy because the sent elements are the same length. However, with Morse code, some things are very short (like an E, for example) and some are much longer (like a zero). In fact, the code tries to reflect the frequency certain letters occur. E is the shortest character and the most common in English texts.

You might think [Samuel Morse] was responsible for this, but his original code was only numbers. The idea is you would get numbers and look them up in a code book. Presumably, some of the codes would have been single letters forming an early coding like ASCII, Baudot, or EBCDIC. [Alfred Vail] expanded the system to include letters and other characters and assigned lengths based on the examination of type cases at the local newspaper. That code also used dots, dashes, and long dashes, but it is almost recognizable as the Morse code in use today.

So [Rob] looked for a way to determine the speed and found that the ARRL uses the timing of the word PARIS as an average word. [Rob] wasn’t quite convinced that was the right way to go, so he compiled a list of the 1,000 most common English words, the 100 largest cities in the word, and a few other groups of words and computed the average element length of the words. PARIS has 50 elements total. The average of [Rob’s] list was 49.489. Pretty close.

If you think Morse code is dead, there are still a number of hams who enjoy it. Also, the US Air Force trains 10 Morse code operators every year. Morse has been used to transfer data over cell phones cheaply, and we’ve seen plenty of larger practice devices.


Filed under: Arduino Hacks

Paraffin Oil and Water Dot Matrix Display

In preparation for Makerfaire, [hwhardsoft] needed to throw together some demos. So they dug deep and produced this unique display.

The display uses two synchronized peristaltic pumps to push water and red paraffin through a tube that switches back over itself in a predictable fashion. As visible in the video after the break, the pumps go at it for a few minutes producing a seemingly random pattern. The pattern coalesces at the end into a short string of text. The text is unfortunately fairly hard to read, even on a contrasting background. Perhaps an application of UV dye could help?

Once the message has been displayed, the water and paraffin drop back into the holding tank as the next message is queued up. The oil and water separate just like expected and a pump at the level of each fluid feeds it back into the system.

We were deeply puzzled at what appeared to be an Arduino mounted on a DIN rail for use in industrial settings, but then discovered that this product is what [hwhardsoft] built the demo to sell. We can see some pretty cool variations on this technique for art displays.


Filed under: Arduino Hacks
Hack a Day 03 Jun 03:00

Motorized Music Box Cranks Out Stairway to Heaven

[Bokononestly] found a lil’ music box that plays Stairway to Heaven and decided those were just the kinds of dulcet tones he’d like to wake up to every morning. To each his own; I once woke up to Blind Melon’s “No Rain” every day for about six months. [Bokononestly] is still in the middle of this alarm clock project right now. One day soon, it will use a *duino to keep track of the music box’s revolutions and limit the alarm sound to one cycle of the melody.

[Bokononestly] decided to drive the crank of the music box with a geared DC motor from an electric screwdriver. After making some nice engineering drawings of the dimensions of both and mocking them up in CAD, he designed and printed a base plate to mount them on. A pair of custom pulleys mounted to the motor shaft and the crank arm transfer motion using the exact right rubber band for the job. You can’t discount the need for a hig bag ‘o rubber bands.
In order to count the revolutions, he put a wire in the path of the metal music box crank and used the body of the box as a switch. Check out the build video after the break and watch him prove it with the continuity function of a multimeter. A clever function that should at some point be substituted out for a leaf switch.

We’ve covered a lot of cool clock builds over the years, including one or two that run Linux. And say what you will about Stairway; it’s better than waking up to repeated slaps in the face.

[via r/engineering]


Filed under: 3d Printer hacks, Arduino Hacks

DIY Air Quality Meter And Emissions Tester

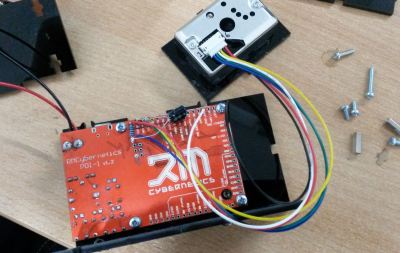
Handheld measuring devices make great DIY projects. One can learn a lot about a sensor or sensor technology by just strapping it onto a spare development board together with an LCD for displaying the sensor output. [Richard’s] DIY air quality meter and emissions tester is such a project, except with the custom laser-cut enclosure and the large graphic LCD, his meter appears already quite professional.

For his build, [Richard] used a Sharp GP2Y1010AU0F dust sensor. This $11 device has a little hole, through which airborne dust particles can pass. On the inside, an infrared LED and a photodiode are arranged in a way that allows no direct light, but only light reflected by the passing by dust particles, to reach the photodiode. An accurately trimmed amplifier within the sensor package translates the diode’s photocurrent into an analog output voltage proportional to the dust density. With a bit of software wizardry, it’s even possible to differentiate between house dust and smoke by analyzing the pulse pattern of the output voltage.

The development board used in this project, a PDI-1 (which stands for Programmable Device Interface) is [Richard’s] own design. Manufactured in the UK, it isn’t the cheapest, but it’s the part that makes this build a breeze. It’s basically an Arduino Nano with a lot of onboard peripherals, including a large graphic LCD, some buttons, a speaker, plenty of H-bridges, and a few more.

After bodge-wiring the dust sensor to the board and taking the enclosure out of the laser cutter, the hardware side of this project was almost done. A little fan was added to ensure airflow through the sensor. Eventually [Richard] wrote a basic firmware to display a graph of sensor readings on the LCD. A first test in the exhaust stream of his car, cycling through idling and revving as shown in the title image, suggests that the meter works as intended. Of course, air quality and emission testing depend on more parameters than just dust density, but if you want to replicate and extend this build, [Richard] provides you with all the Arduino compatible source files.


Filed under: Arduino Hacks, misc hacks

Learn Functional Reactive Programming on Your Arduino

Everyone loves learning a new programming language, right? Well, even if you don’t like it, you should do it anyway, because thinking about problems from different perspectives is great for the imagination.

Juniper is a functional reactive programming language for the Arduino platform. What that means is that you’ll be writing your code using anonymous functions, map/fold operations, recursion, and signals. It’s like taking the event-driven style that you should be programming in one step further; you write a=b+3 and when b changes, the compiler takes care of changing a automatically for you. (That’s the “reactive” part.)

If you’re used to the first-do-this-then-do-that style of Arduino (and most C/C++) programming, this is going to be mind expanding. But we do notice that a lot of microcontroller code looks for changes in the environment, and then acts (more or less asynchronously) on that data. At that level of abstraction, something like Juniper looks like a good fit.

Changing up the programming paradigm for Arduino is an ambitious project, especially considering that it was started by two undergraduates [Caleb Helbling] and [Louis Ades] as a senior design project. It’s also brand new, so there’s not much of a codebase out there yet. Time, and your participation, will tell if it’s useful. But one thing’s for sure, once you’ve programmed in a reactive language, you’re not going to be able to look at a delay loop the same again.

What’s the wierdest language you’ve ever programmed a microcontroller in?

(The XKCD comic’s alt-text reads “Functional programming combines the flexibility and power of abstract mathematics with the intuitive clarity of abstract mathematics”.)


Filed under: Arduino Hacks

Shower Thoughts in Your Car

The subreddit for Shower Thoughts offers wisdom ranging from the profound to the mundane. For example: “Every time you cut a corner you make two more.” Apparently, [Harin] has a bit of an addiction to the subreddit. He’s been sniffing the CAN bus on his 2012 Hyundai Genesis and decided to display the top Shower Thought on his radio screen.

To manage the feat he used both a Raspberry Pi and an Arduino. Both devices had a MCP2515 to interface with two different CAN busses (one for the LCD display and the other for control messages which carries a lot of traffic.

The code is available on GitHub. There’s still work to do to make the message scroll, for example. [Harin] has other posts about sniffing the bus, like this one.

We’ve covered CAN bus quite a bit, including some non-automotive uses. We’ve even seen the CAN bus for model railroading.


Filed under: Arduino Hacks, car hacks, Raspberry Pi

Arduino Motion Detection With A Bit Of Wire

It is likely that many of us will at some time have experimented with motion detectors. Our Arduinos, Raspberry Pis, Beaglebones or whatever will have been hooked up to ultrasonic or PIR boards which will have been queried for their view of what is in front of them.

[Connornishijima] has stumbled on a different way to detect motion with an Arduino, he’s polling an ADC pin with a simple length of twisted pair hooked up to it and earth, and reliably generating readings indicating when he (or his cat) is in its vicinity. He’s calling the effect “Capacitive turbulence”, and he’s open to suggestions as to its mechanism. He can only make it work on the Arduino, other boards with ADCs don’t cut it.

Frequent Hackaday featuree [Mitxela] may have also discovered something similar, and we’ve hesitated to write about it because we didn’t understand it, but now it’s becoming unavoidable.

It’s always dangerous in these situations to confidently state your opinion as “It must be…” without experimental investigation of your own. Those of us who initially scoffed at the idea of the Raspberry Pi 2 being light sensitive and later had to eat their words have particular cause to remember this. But this is an interesting effect that bears understanding. We would guess that the Arduino’s fairly high input impedance might make it sensitive to mains hum, if you did the same thing to an audio amplifier with a phono input you might well hear significant hum in the speaker as your hand approached the wire. It would be interesting to try the experiment at an off-grid cabin in the woods, in the absence of mains hum.

If you’d like to give his experiment a try, he’s posted his sketch on Pastebin. And he’s put up the video below the break demonstrating the effect in action, complete with cats.

We like to see people pushing the boundaries of what is possible with their microcontroller I/O lines, it furthers our collective knowledge as a community. We’ve seen people making  TV transmitters from ESP8266s, and not so long ago a Raspberry Pi ADC port as further examples. Please, keep them coming!


Filed under: Arduino Hacks, hardware

I’m Sorry Dave, I Only Say 28 Phrases

A few years ago, you could buy an IRIS 9000 Bluetooth speaker. Its claim to fame was that it looked like the “eye” from the HAL 9000 computer on 2001: A Space Oddessy. There’s something seductive about the idea of having a HAL eye answer your queries to Google Now or Siri. The problem is, it still sounds like Google or Siri, not like HAL.

[Badjer1] had the same problem so he decided to build his own eye. His goal wasn’t to interface with his smartphone’s virtual assistant, though. He settled on making it just be an extension cord with USB ports. As you can see in the video below, the build has HAL-style memory units, a key, and can speak phrases from the movie (well, 28 of them, at least). The key is like the one Dave used to deactivate HAL in the movie.

Inside the MDF enclosure is an Arduino and a wave shield that handles the audio playback. The memory cards are acrylic and the key is machined brass. The result is a good looking project.

If you really want to be HAL, you can build a costume. We’ve seen a similar build with a Raspberry Pi.


Filed under: Arduino Hacks, home hacks
Hack a Day 23 May 09:01

Find a Drone

Flying a drone usually leads to–sooner or later–crashing a drone. If you are lucky, you’ll see where it crashes and it won’t be out of reach. If you aren’t lucky, you’ll know where it is, but it will be too high to easily reach. The worst case is when it just falls out of the sky and you aren’t entirely sure where. [Just4funmedia] faced this problem and decided to use some piezo buzzers and an Arduino to solve it.

Yeah, yeah, we know. You don’t really need an Arduino to do this, although it does make it easy to add some flexibility. You can pick two tones that are easy to hear and turn on the buzzers with a spare channel or sense a loss of signal or power.

The device has its own battery so it will work even if the drone’s power depletes. Apparently, the 9V battery will run the whole thing for over 20 hours. Pulsing the audio would probably push that number even higher. Of course, the downside is the drone has to carry the extra weight, but if you recover an otherwise lost drone, that might be a small price to pay.

This might be more practical than a calculus-based approach. Maybe like a tightrope walker, you’d rather use a net.


Filed under: Arduino Hacks, drone hacks