[Peterthinks] admits he’s no cabinet maker, so his projects use a lot of hot glue. He also admits he’s no video editor. However, his latest video uses some a MAX7219 to create a 600 character scrolling LED sign. You can see a video of the thing, below. Spoiler alert: not all characters are visible at once.
The heart of the project is a MAX7219 4-in-1 LED display that costs well under $10. The board has four LED arrays resulting in a display of 8×32 LEDs. The MAX7219 takes a 16-bit data word over a 10 MHz serial bus, so programming is pretty easy.
The MAX chip can decode for seven-segment displays or just allow you to light up the outputs directly, which is what the code here does. You can cascade the chips, so it is possible to string more than one of these modules together.
The code is available on Dropbox. The code is extremely simple due to the use of the Parola library and a MAX72XX library. We’ve seen a number of projects based around this chip. Some of the uses are pretty novel.
It is getting harder and harder to tell homemade projects from commercial ones. A good case in point is [Mirko’s] all band radio which you can see in the video below the break. On the outside, it has a good looking case. On the inside, it uses a Si4730 radio which has excellent performance that would be hard to get with discrete components.
The chip contains two RF strips with AGC, built-in converters to go from analog to digital and back and also has a DSP onboard. The chip will do FM 64 to 108 MHz and can demodulate AM signals ranging from 153 kHz to 279 kHz, 520 kHz to 1.71 MHz, and 2.3 MHz to 26.1 MHz. It can even read RDS and RBDS for station information. The output can be digital (in several formats) or analog.
The radio takes serial (I2C) commands, and the Arduino converts the user interface so that you can control it. The chip comes in several flavors, each with slightly different features. For example, the Si4731 and Si4735 have the RDS/RBDS decoder, and the shortwave mode is available on Si4734 and Si4735. Confused? Page 2 of the programming guide should help. According to [Mirko], he used a 4730, but it still did shortwave with the 4735 library.
Breakout boards with the chip are just a few bucks. It appears the chip has the technical capability to receive single sideband, but it requires a poorly documented patch. It is in recent versions of this library, though.
The good thing about computers is they do your work for you, right? If you are a programmer, that doesn’t always seem to be a true statement. [Runtimemicro] has the answer, at least if you are writing PWM code for the Arduino. Their free application lets you set a few parameters, visually see the results, and then generates code for you. You can see a video of the tool in operation, below.
According to their site, the tool works for timers 1 through 5 on an Arduino Nano, Uno, or Mega2560. The app appears to work on Windows, but it doesn’t look like it would have any trouble running under Wine on other platforms.
There are only a few inputs: the clock speed, which timer you want to use, and the mode. You also have to specify the frequency in Hz or the period in milliseconds. You can also select a few options, including if you want interrupt code generated.
Once the timer shows up in the graphical display, you can adjust some sliders to get the exact PWM duty cycle you want. Of course, you can also skip the PWM code and just use the timer interrupts for timing.
It isn’t that the timer code or PWM isn’t workable without a tool. But then again, you don’t really need an assembler or a compiler — it just makes things easier. There are a few nuances, though. If you want to dig through the generated code, you might find [Jack’s] video interesting.
Home automation is a popular project to undertake but its complexity can quickly become daunting, especially if you go further than controlling a few lights (or if you’re a renter). To test the waters you may want to start with something like this home safety monitor, which is an IoT device based on an Arduino. It allows remote monitoring of a home for things such as temperature, toxic gasses, light, and other variables, which is valuable even if you don’t need or want to control anything.
The device is built around an Arduino Nano 33 IOT which has WiFi and Bluetooth capabilities as well as some integrated security features. This build features a number of sensors including pressure/humidity, a gas/smoke detector, and a light sensor. To report all of the information it gathers around the home, an interface with Ubidots is configured to allow easy (and secure) access to the data gathered by the device.
The PCB and code for the project are all provided on the project page, and there are a number of other options available if Ubidots isn’t your preferred method of interfacing with the Internet of Things. You might even give Mozilla’s WebThings a shot if you’re so inclined.
Mechanically the lock consists of a Solarbotics GM3 motor, some Meccano, and a servo arm. A string is tied between two pulleys and looped around the slide of a barrel latch. When the motor moves back and forth it’s enough to slide the lock in and out. Electronically an Arduino and a Bluetooth module provide the electronics. The system runs from a 9V battery, and we’re interested to know whether there were any tricks pulled to make the battery last.
The system’s software is a simple program built in MIT App Inventor. Still, it’s pretty cool that you can get functionally close to a production product with parts that are very much lying around. It also makes us think of maybe keeping our childhood Meccano sets a little closer to the bench!
The Consumer Electronics Show in Las Vegas is traditionally where the big names in tech show off their upcoming products, and the 2020 show was no different. There were new smartphones, TVs, and home automation devices from all the usual suspects. Even a few electric vehicles snuck in there. But mixed in among flashy presentations from the electronics giants was a considerably more restrained announcement from a company near and dear to the readers of Hackaday: Arduino is going pro.
While Arduino has been focused on the DIY and educational market since their inception, the newly unveiled Portenta H7 is designed for professional users who want to rapidly develop robust hardware suitable for industrial applications. With built-in wireless hardware and the ability to run Python and JavaScript out of the box, the powerful dual-core board comes with a similarly professional price tag; currently for preorder at $99 USD a pop, the Portenta is priced well outside of the company’s traditional DIY and educational markets. With increased competition from other low-cost microcontrollers, it seems that Arduino is looking to expand out of its comfort zone and find new revenue streams.
That’s a Lot of Pins
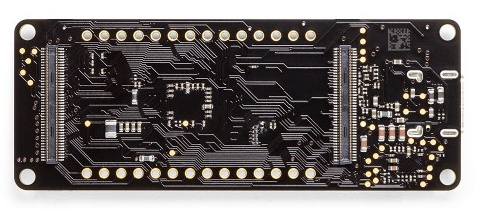
The Portenta H7 is obviously a far cry from the relatively dinky 8-bit Arduinos that we’ve all got filling up our parts drawers. Developed for high performance edge computing applications, the new board is powered by a 32-bit STM32H747XI that utilizes both an ARM Cortex M7 and an M4 running at 480 MHz and 240 MHz respectively. The two cores can work independently, allowing for example one core to run interpreted Python while the other runs code compiled in the Arduino IDE. When they need to work together, the cores can communicate with each other via a Remote Procedure Call (RPC) mechanism.
The new 80-pin connectors on the Portenta
Outwardly, the new board doesn’t look far removed from the modern Arduino form factor we’re used to. The USB connector has been upgraded to a Type-C, but the Portenta still retains the dual rows of pads ready for hand-soldered headers — that’s their more recent pinout that they call the Arduino MKR form factor.
If you look on the back of the board however, you’ll see that they’ve added two 80-pin high density connectors. According to the product page, these are intended to allow the Portenta to simply be plugged into a device as a removable module. The idea being that devices in the field can easily have their Portenta swapped out for an upgraded model. Some digging into the product page documentation section turns up a schematic that lists the connectors as Hirose DF40C-80DP-0.4V(51).
The base model Portenta features 8 MB SDRAM and 16 MB NOR flash, but it can be custom ordered with up to 64 MB of memory and 128 MB of flash should you need it. It’s also possible to delete various interfaces from the board when ordering, so if you don’t want network connectivity or the NXP SE050C2 crypto chip, they can simply be left off. However as of this writing it is unclear as to what minimum order quantity is necessary to unlock this level of customization, or or how much these modifications will change the unit cost.
Year of the Arduino Desktop?
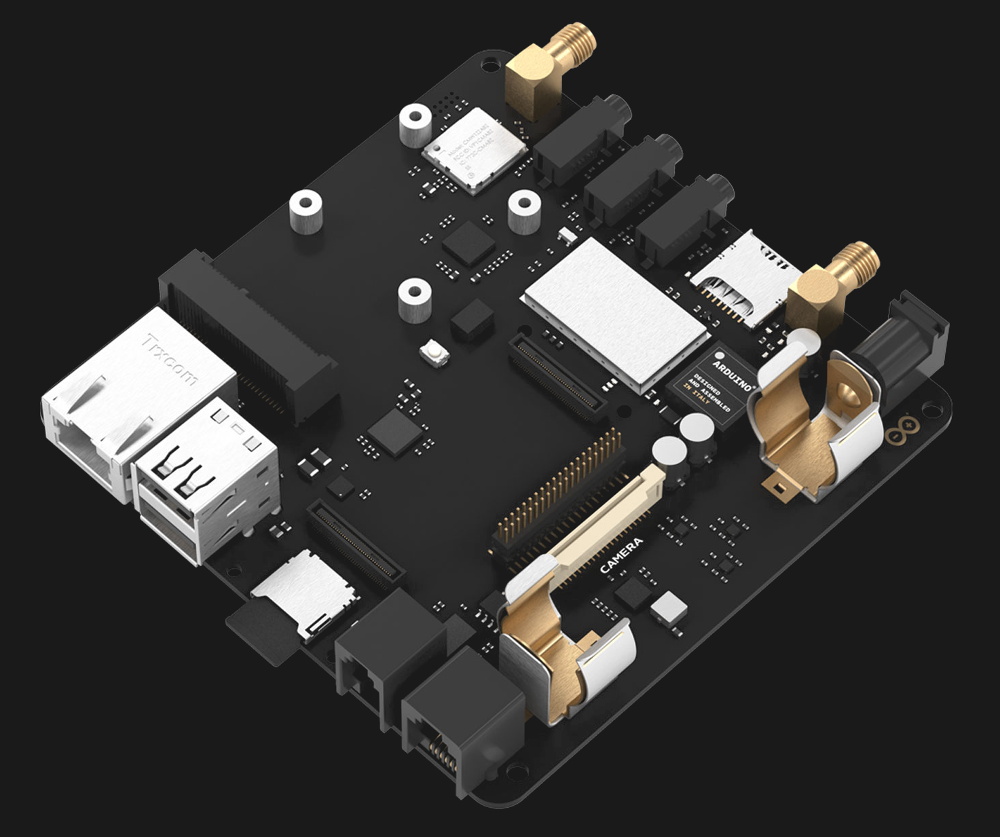
The Portenta Carrier Board
The Portenta H7 is an impressive enough piece of hardware on its own, but when it’s plugged into the optional Carrier Board, things really start to get interesting. The Carrier Board provides full size connectors for all of the onboard peripherals, and according to documentation, turns the Portenta into an eNUC-class embedded computer. There’s even support for DisplayPort to connect a monitor, and miniPCI for expansion cards.
With a fully loaded Portenta H7 slotted into the Carrier Board, it would seem you have the makings of a low-power ARM “desktop” computer. Albeit one that wouldn’t outperform the Raspberry Pi Zero, and which costs several times more.
The Arduino press release and product page doesn’t make any mention of what kind of software or operating system said computer would run, so presumably that’s left as an exercise for the customer. While not particularly well suited to it, the ARM Cortex-M family of processors is capable of running the Linux kernel, so spinning up a “real” OS image for it should be possible. Of course with a maximum of just 64 MB of RAM, you’ll want to keep your performance expectations fairly low.
Where Does Portenta Fit?
We can’t even speculate what a maxed out Portenta would cost, and there’s no pricing or release date for the Carrier Board. But even at $99, the base model Portenta H7 would be a tough sell for hackers and makers who are used to buying dual-core ESP32 boards at 1/10 of the price, or the Teensy 4.0 which has a 600 MHz Cortex-M7 at 1/4 of the price. Which is fine, since this board isn’t intended for the traditional core Arduino audience.
Seeing the carrier board, we can’t help but notice some parallels here with the Raspberry Pi Compute Module. With connections broken out to a SODIMM header, the idea of the Computer Module was to help bridge the gap between the DIY community and the commercial one by offering up a Raspberry Pi in a more rugged form factor that would be easier to integrate into end-user products. But since it wasn’t any cheaper than the stock Pi, there wasn’t a whole lot of incentive to switch over. We haven’t seen consumer products advertising “Raspberry Pi Inside!” so it’s hard to tell if there has been any meaningful adoption from industry.
One has to wonder why any company that has the resources to integrate such an expensive board into their products wouldn’t just come up with their own custom design around the Portenta’s STM32H747XI chip, which even in single quantities, can currently be had for less than $15. The difference may end up coming down to the world-renowned community that surrounds the Arduino brand, and the company’s efforts to modernize their toolchain.
When you’re a kid, remote control cars are totally awesome. Even if you can’t go anywhere by yourself, it’s much easier to imagine a nice getaway from the daily grind of elementary school if you have some wheels. And yeah, R/C cars are still awesome once you’re an adult, but actual car-driving experience will probably make you yearn for more realism.
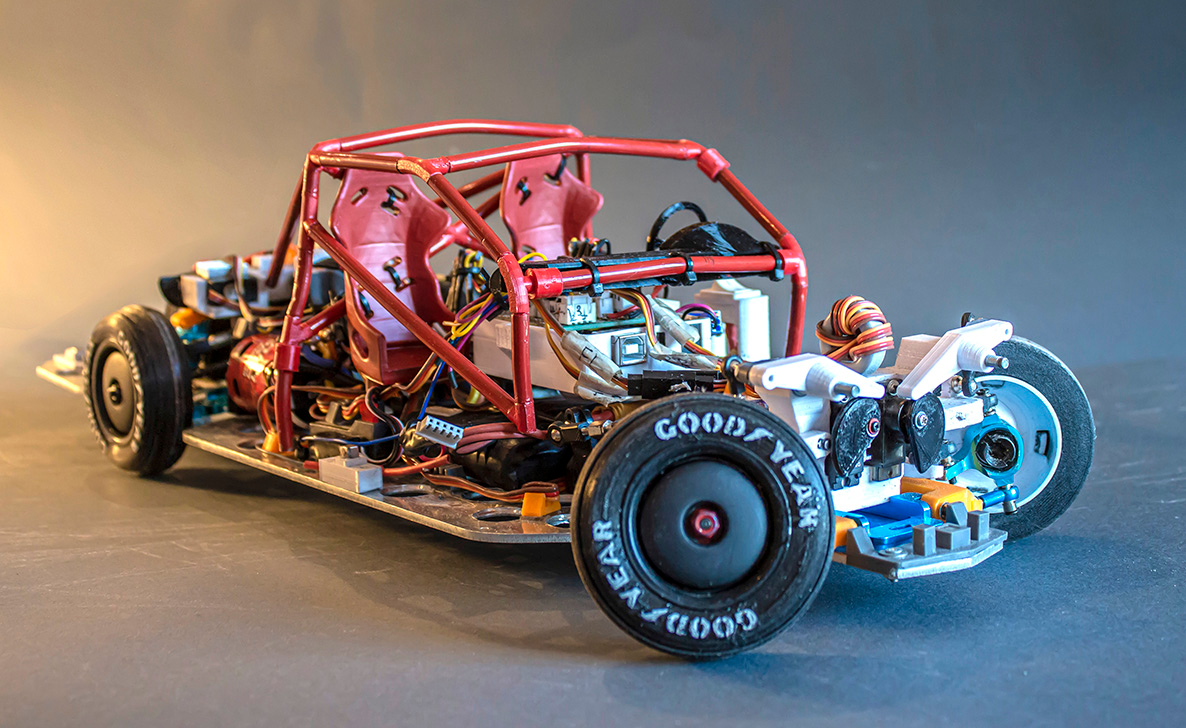
What could be more realistic and fun than an active suspension? Plenty of adults will never get the chance to hit the switches in real car, but after a year of hard work, [snoopybg] is ready to go front and back, side to side, and even drift in this super scale ’63 Oldsmobile Dynamic 88 wagon. We think you’ll agree that [snoopybg] didn’t miss a detail — this thing makes engine noises, and there are LEDs in the dual exhaust pipes to simulate flames.
An Arduino reads data from a triple-axis accelerometer in real time, and adjusts a servo on each wheel accordingly, also in real time, to mimic a real car throwing its weight around on a real suspension system. If that weren’t cool enough, most of the car is printed, including the tires. [snoopybg] started with a drift car chassis, but even that has been hacked and drilled out as needed.
There are a ton of nice pictures on [snoopybg]’s site if you want to see what’s under the hood. We don’t see the code anywhere, but [snoopybg] seems quite open to publishing more details if there is interest out there. Strap yourself in and hold on tight, because we’re gonna take this baby for a spin after the break.
[Gurpreet] fell in love with the peaceful, floaty theme from the Avatar series and bought a kalimba so he could hear it resonate through his fingertips. He soon realized that although it’s nice to play the kalimba, it would be a lot cooler if it played itself. Then he could relax and enjoy the music without wearing out his thumbs.
After doing a bit of experimentation with printing tine-plucking extensions for the servo horns, [Gurpreet] decided to start the design process by mounting the servos on a printed base. The servos are slotted into place by their mounting tabs and secured with hot glue. We think this was a good choice — it’s functional and it looks cool, like a heat sink.
[Gurpreet]’s future plans include more servos to pluck the rest of the tines, and figuring out how feed it MIDI and play it real time. For the demo after the break, [Gurpreet] says he lapel mic’d the kalimba from the back and cut out the servo noise with Audacity, but ultimately wants to figure out how to quiet them directly. He’s going to try lubing the gears and making a sound-dampening enclosure with foam, but if you have any other ideas, let him know down below.
There’s a trend in corporate America that has employees wear a step counter — technically a pedometer — and compete in teams to see who can get the most number of steps. We wonder how many people attach the device to an electric drill and win the competition easily. However if you want to do your own measurements, [Ashish Choudhary] has plans for making a pedometer with an Arduino. The device isn’t tiny, but as you can see in the video below it seems to work.
For the extra size, you do get some features. For one, there is a 16×2 LCD display and an ADXL335 accelerometer, and you can probably imagine some other cool features for such a device.
The Arduino computes the magnitude of the acceleration, and if it exceeds a certain threshold it adds a step to the step count. Honestly, this is a fun project but it cries out for a more compact form factor. An ESP8266 for example could ditch the display and connect via WiFi to your phone. Then again, your phone can probably do the same job, as could not to mention many smartwatches. But those don’t have nearly as much geek cred as this project.
When you read “Arduino wristwatch”, you fall into the trap of envisioning an Arduino UNO clumsily strapped to someone’s wrist. [Marijo Blažević’s] creation is much more polished than that. A round circuit board holds two surface mount ICs and 12 LEDs. The whole thing looks nice fit snugly inside of a watch body. It isn’t a Rolex, but it does have considerable geek cred without being unwearable in polite company.
Once IC is an AVR micro, of course. The other is a DS3231 real time clock with built-in crystal. A CR2032 keeps it all running. The main body, the outer ring, the bottom, and the buttons are 3D printed in PLA. The crystal and the band are the only mechanical parts not printed. The bill of materials shows a 36mm crystal and even provides links for all the parts.
You don’t want to run LEDs all the time because it is bad on the battery. When you press the button once, you get one of the LEDs to light to show the hours. Another press reads the minutes in units of 5 minutes. A third press shows you one of five LEDs to show how many minutes to add. For example, if the time is 9:26 you’d get LED 9 (hours), LED 5 for 25 minutes, and the third press would show LED 1 for 1 extra minute. If either of the minute indicators show 12 o’clock, that indicates zero minutes.
The exciting thing, of course, is that you can program it beyond the code on GitHub. Already it can tell time and display the temperature. You don’t have a lot of I/O, but you ought to be able to get some more options and maybe some flashy LED blinking patterns in if you try.