Posts with «arduino hacks» label

Measuring UV-C For About $5

Looking to sterilize something? Give it a good blast of the old UV-C. Ultraviolet radiation in the shortest wavelength band breaks down DNA and RNA, so it’s a great way to kill off any nasties that are lurking. But how much UV-C are you using? [Akiba] at Hackerfarm has come up with the NukeMeter, a meter that measures the output of their UV-C sterilizer the NukeBox. It is built around a $2.50 sensor and a $3 Arduino.

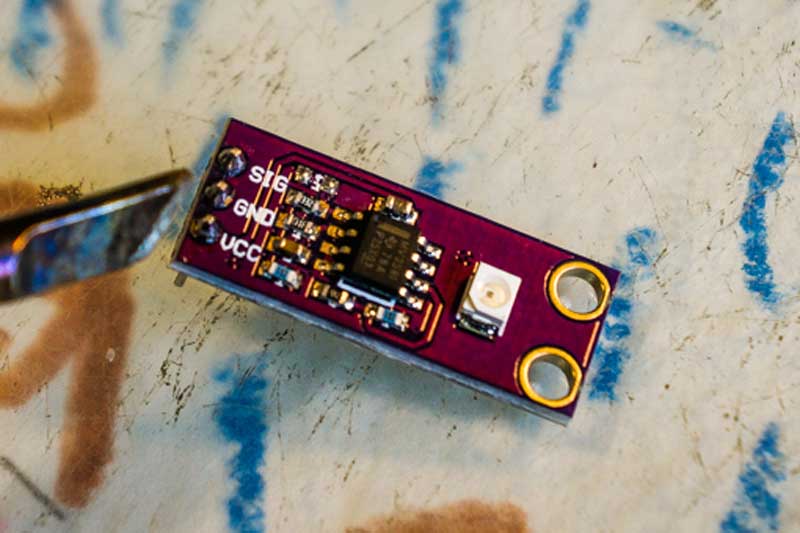
The NukeMeter is built around a GUVA-S12SD UV sensor breakout board. This sensor is really designed for UV-A detection, but a quick look at the spec sheet revealed that it is sensitive to UV across all of the bands. So, it can be used as a UV-C sensor if you know how sensitive it is to this particular frequency band.

However, the sensor is not that sensitive to UV-C light, so [Akiba] had to do a bit of minor surgery on the circuitry that surrounds the sensor to tweak the output. The sensor was designed to measure relatively low levels of UV light (such as sunlight), and now they are blasting it with a shedload of radiation, so they have to effectively disable one of the op-amps that normally scales the output up, which involves replacing a couple of resistors. That’s a bit of a pain to do with surface mount components, but it is doable with a steady hand and a small tip soldering iron.

Next, an Arduino takes the voltage output of the sensor and converts it into a light level. The mathematics of how this works are all well detailed in the post, but it isn’t complicated, and the source code is here.

Using this, [Akiba] was able to measure how the lights performed, how quickly they warmed up and how much the light level varies along the length of the fluorescent tube.

One caveat to bear in mind here: [Akiba] designed this to measure the output of the low-pressure mercury vapor lamps they are using at Hackerfarm, which output a very narrow frequency band, peaking at 250 nM. This design would not work for a more broadband output or for one which mixed UV-C with UV-A and UV-B. For that, you would need a more sophisticated design that would probably cost more than $5.

SAFETY NOTE: Don’t mess with UV-C light sources unless you have a good idea of what you are doing and are sure that the light is contained, e.g. in a sealed box, maybe with interlocks. Remember that you also rely on DNA, and inadvertently zapping your own DNA can cause all sorts of unpleasantness.  

Hack a Day 27 Mar 09:00

Automating Hand Sanitizer — If You Can Find Any

We once saw a Romeo and Juliet production where the two families were modern-day mob families with 3-piece suits and pistols. If they made King Richard III set in this week, the famous line might be: “Hand sanitizer, hand sanitizer, my kingdom for hand sanitizer!” Even if you have a supply stashed in your prepper cache, you have to touch the bottle so you could cross-contaminate with other users. Public places often have automatic dispensers to combat this, and now you can too. [Just Barran] shows the device in a video, you can see below.

Sourcing parts for projects is sometimes a problem, but right now we are betting the hand sanitizer will be the hardest component. Of course, the Internet is ripe with homemade brews that may or may not be effective based on beer, grain alcohol, or a variety of other base materials.

[Barran] has a big junk box. so he snagged an Arduino and an ultrasonic sensor. The part that is a little tricky is pulling down the pump. The basic idea is to use a servo motor to pull some fishing line. To engage the bottle, there is a small bit of plastic from a notebook cover and the fishing line goes to both sides of it. One side of the fishing line is fixed and the other is what the servo pulls.

We might have used a solenoid to push the button, but we like the servo method for its simplicity. In the end, it does look like it works well. Changing the bottle out probably requires a little surgery since there is a screw holding the plastic bracket in and you might have to update the fishing line lengths. That might be an impediment for a commercial project, but for your own use, it doesn’t seem like it would be a problem.

Fishing line is more useful than you might think. We’ve even seen it used as belts in 3D printers.

Eavesdropping Assistant Disturbs The Sound Of Silence

Unless you happen to be from Finland, this is just an all too familiar situation: you’re stuck in an inescapable situation with this one person who is really more of an acquaintance than a friend, and neither of you knows who should say something in hopes of keeping a conversation going. Awkward silence is inevitable, and the longer it lasts, the more excruciating the thought of opening your mouth becomes. Well, consider those days over, thanks to [Jasper Choi] and his friends, who blessed us with the System for Awkward Silence Solution and Interaction Enhancer, or SASSIE.

Built as a laser-cut rotating cylinder, and equipped with a pair of microphones, SASSIE detects and counts the duration of any ongoing silence in the room. Once a pre-defined time limit is reached, it rotates itself to a random direction, symbolically pointing a finger to one of the people present in the room to indicate its their turn to speak now. To break the silence right off the bat, the finger pointing is accompanied by some pre-recorded messages. Unfortunately the audio files exceeded the storage of the Arduino Uno used here, so the responsibilities had to be divided between two Arduinos, arranged with the help of some simple serial communication.

While this is obviously a tongue-in-cheek project, it might just be a welcoming relieve for people with social anxiety, and there is definitely potential to take the idea further. Maybe with some inspiration from this happy robot fellow, a future version might ease the conversation even further by suggesting a topic along the way.

Seven-Segment Shelves Do Double Duty

[Lewis] of [DIY Machines] was always on the lookout for that perfect something to hang above the couch. After spending a lot of time fruitlessly searching, he designed and built this awesome shelving unit with recessed lighting that doubles as a huge 7-segment clock.

The clock part works as you probably expect — an Elegoo Nano fetches the time from a real-time clock module and displays it on the WS2812B LED strips arranged in 7-segment formations. There’s a photocell module to detect the ambient light level in the room, so the display is never brighter than it needs to be.

Don’t have a 3D printer yet? Then you may need to pass on this one. Aside from the wood back plane and the electronics, the rest of this build is done with printed plastic, starting with 31 carefully-designed supports for the shelves. There are also the LED strip holders, and the sleeve pieces that hide all the wires and give this project its beautifully finished look.

You may have noticed that the far left digit isn’t a full seven segments. If you’re committed to 24-hour time, you’d have to adjust everything to allow for that, but you’d end up with two more shelves. Given the fantastic build video after the break, it probably wouldn’t take too long to figure all that out.

We like big clocks and we cannot lie. If you have room for it, build something like this blinkenlit beauty.

AvoRipe Takes A Firm Grip On The Ultimate First World Food Problem

You don’t have to be an extinct mammal or a Millennial to enjoy the smooth, buttery taste of an avocado. Being psychic on the other hand is definitely an advantage to catch that small, perfect window between raw and rotten of this divaesque fruit. But don’t worry, as modern problems require modern solutions, [Eden Bar-Tov], [Elan Goldberg], and [Mizpe Ramon] built the AvoRipe, a device to notify you when your next avocado has reached that window.

Taking both the firmness and color of an avocado as indicators of its ripeness into account, the team built a dome holding a TCS3200 color sensor as stand for the avocado itself, and 3D printed a servo-controlled gripper with a force sensor attached to it. Closing the gripper’s arms step by step and reading the force sensor’s value will determine the softness the avocado has reached. Using an ESP8266 as centerpiece, the AvoRipe is turned into a full-blown IoT device, reporting the sensor readings to a smartphone app, and collecting the avocado’s data history on an Adafruit.IO dashboard.

There is unfortunately one big drawback: to calibrate the sensors, a set of nicely, ripe avocados are required, turning the device into somewhat of a chicken and egg situation. Nevertheless, it’s a nice showcase of tying together different platforms available for widescale hobbyist projects. Sure, it doesn’t hurt to know how to do each part from scratch on your own, but on the other hand, why not use the shortcuts that are at our disposal to remove some obstacles — which sometimes might include programming itself.

This Barometer Looks Mighty Fine, Rain or Shine

Mythological legend has it that Tempestas, the Roman goddess of storms and sudden weather, saved the consul Scipio when his fleet of ships got caught in a storm off of Corsica. In return, she demanded that a temple be dedicated to her.

[SephenDeVos]’ beautiful barometer, dubbed Tempestas II,  demands nothing of the viewer, but will likely command attention anyway because it looks so cool. If the weather is anything but clear and sunny, the appropriate sun-obscuring weather actor, be it clouds, more clouds, rain, or lightning will swing into place, blocking out the blue sky in layers, just like real life.

There’s a total of five weather-serving servos, and they’re all controlled by an Arduino Nano through a 16-channel PWM driver. The Nano gets the news from a BMP280 barometric pressure/temperature sensor and drives the servos accordingly.

Nine layers of nicely-decorated Plexiglas® hide the clouds and things in the wings while it’s nice outside. We totally love the way this looks —  it’s even pretty on the back, where the sun don’t shine. This one is new and ongoing, so it seems likely that [Sephen] will post the code before the sun sets on this project. In the meantime, check out the demo after the break.

We don’t see too many barometers builds around here — maybe there’s too much pressure. This one tells you to lay off the coffee when the pressure’s too low.

Slippy Slapper Uselessly Uses All the Arduinos

Want to take that annoyingly productive coworker down a notch? Yeah, us too. How dare they get so much done and be so happy about it? How is it possible that they can bang on that keyboard all day when you struggle to string together an email?

The Slippy Slapper is a useless machine that turns people into useless machines using tactics like endless distraction and mild physical violence. It presses your buttons by asking them to press buttons for no reason other than killing their productivity. When they try to walk away, guess what? That’s another slappin’. Slippy Slapper would enrage us by proxy if he weren’t so dang cute.

You’re right, you don’t need an Arduino for this. For peak inefficiency and power consumption, you actually need four of them. One acts as the master, and bases its commands to the other three on the feedback it gets from Slippy’s ultrasonic nostrils. The other three control the slappin’ servos, the speakers, and reading WAV files off of the SD card. Slap your way past the break to see Slippy Slapper’s slapstick demo.

Need to annoy a group of coworkers all at once? Slip a big bank of useless machines into the conference room while it’s being set up.

Vocal Effects On The Arduino Uno

When one thinks of audio processing, the mind doesn’t usually leap to an 8-bit micro. Despite this, if you’re looking for some glitchy fun, it’s more than possible, as [Amanda Ghassaei] demonstrates with the Arduino Uno in this 2012 throwback project.

The build is designed for vocal effects, based on the idea of granular synthesis. This is where audio samples are chopped up into small chunks, called “grains”, and manipulated in various ways to make fun sounds. Controls on the box allow the nature of the sound created to be modified by the user.

[Amanda]’s project serves as a great example of what it takes to run audio processing on the Arduino Uno. There’s a guide to using the on-board ADC as a microphone input, as well as the construction of a resistor ladder DAC for output. As a neccessity, this also requires discussion of how to write directly to the ATMEGA’s IO ports, rather than using the slower digitalWrite() function typically used in Arduino projects. There’s plenty of value here for anyone learning to do audio on a microcontroller platform.

Overall, it’s a fun project that serves as a good primer for those keen to dive into digital sound processing. Of course, those looking to kick things up a gear would do well to check out the Teensy Audio Library, too. Video after the break.

Custom Tibia Keyboard For a Leg Up In the Game

[Elite Worm] wrote in to tell us about a cool little keyboard designed to make playing a certain game a whole lot easier. One of the ways you can move your character is with the numpad in directional mode plus Control and Shift, but those are too far apart to drive blindly with one hand. This is all the motivation [Elite Worm] needed to build a custom keyboard with only the essentials.

The keyboard is controlled by an Arduino Pro Micro, which is fairly standard for this type of build — it’s usually that or a Teensy. [Elite Worm] used Cherry MX browns for a nice tactile feel, and added LEDs for a purple-white under-glow. We love the way the printed keycaps turned out, and are impressed because tolerances are notoriously tight for those fruity switch stems.

Starting to think of a few uses for a small custom keypad? This thing is wide open, and [Elite Worm] will even send you the PCB files if you ask nicely. See if you can get past the break without your mouse, and check out the build video while you wait.

Want more flexibility? Just use more switches!

Robot Fights Fire With IR

Fighting fire with robots may take jobs away from humans, but it can also save lives. [Mell Bell Electronics] has built a (supervised) kid-friendly version of a firefighting robot that extinguishes flames by chasing them down and blowing them out.

This hyper-vigilant robot is always on the lookout for fire, and doesn’t waste movement on anything else. As soon as it detects the presence of a flame, it centers itself on the source and speeds over to snuff it out with a fan made from a propeller and a DC motor.

Here comes the science: fire emits infrared light, and hobbyist flame sensors use IR to, well, detect fire. This fire bot has three of these flame sensors across the front that output digital data to what has got to be the world’s smallest Arduino – the ATmega32U4-based PICO board that [Mell Bell] just so happens to sell. Cover your mouth and nose and crawl along the floor toward the break to see how responsive this thing is.

Firefighters aren’t the only brave humans involved in the process of keeping the forests standing, or who feel the rising pressure of automation. Hackaday’s own [Tom Nardi] wrote a piece on a dying breed called fire lookouts that will no doubt ignite your interest.