It is pretty well-known that I’m not a big fan of the Arduino infrastructure. Granted, these days you have more options with the pro IDE and Platform IO, for example. But the original IDE always gives me heartburn. I realized just how much heartburn the other day when I wanted to something very simple: increase the receive buffer on an ATmega32 serial port. The solution I arrived at might help you do some other things, so even if you don’t need that exact feature, you still might find it useful to see what I did.
 Following this experience I am genuinely torn. On the one hand, I despise the lackluster editor for hiding too much detail from me and providing little in the way of useful tools. On the other hand, I was impressed with how extensible it was if you can dig out the details of how it works internally.
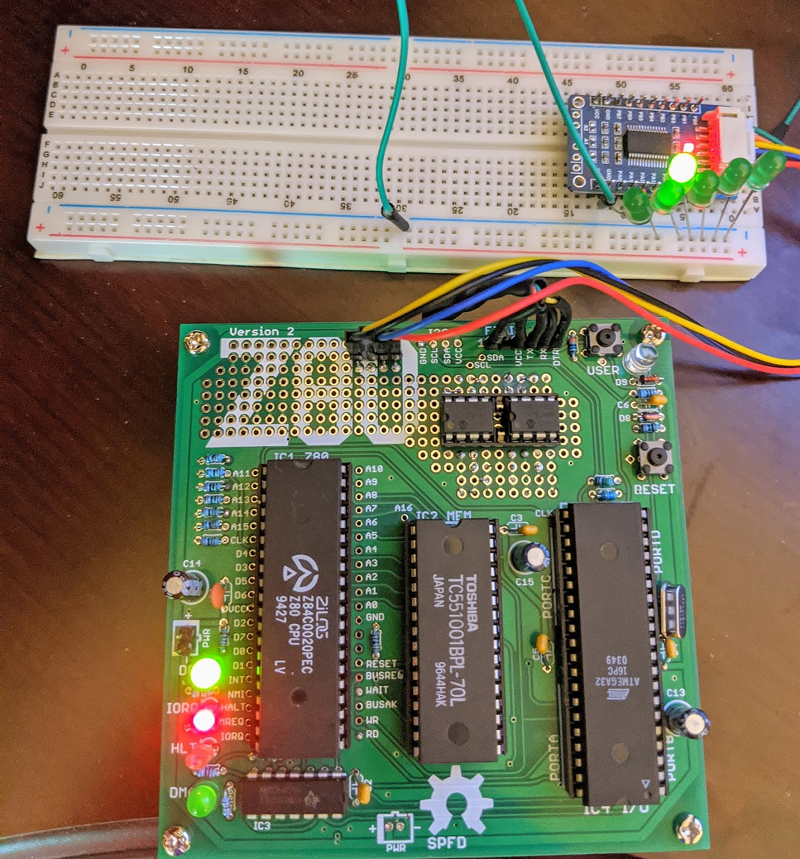
First, you might wonder why I use the IDE. The short answer is I don’t. But when you produce things for other people to use, you almost can’t ignore it. No matter how you craft your personal environment, the minute your code hits the Internet, someone will try to use it in the IDE. A while back I’d written about the $4 Z80 computer by [Just4Fun]. I rarely have time to build things I write about, but I really wanted to try this little computer. The parts sat partially assembled for a while and then a PCB came out for it. I got the PCB and — you guessed it — it sat some more, partially assembled. But I finally found time to finish it and had CP/M booted up.
The only problem was there were not many good options for transferring data back and forth to the PC. It looked like the best bet was to do Intel hex files and transfer them copy and paste across the terminal. I wanted better, and that sent me down a Saturday morning rabbit hole. What I ended up with is a way to make your own menus in the Arduino IDE to set compiler options based on the target hardware for the project. It’s a trick worth knowing as it will come in handy beyond this single problem.
The Issue: Arduino Serial Buffer Size Limit
I won’t bore you with the details about getting the board to work since you will only care if you have one. Details are available in a discussion on Hackaday.io, if you really want to follow it. But the upshot was that for XModem transfers, [Just4Fun] felt like the default Arduino serial buffer wasn’t big enough to be reliable. It did seem to work with the default 64-byte buffer, but XModem sends more data than that and it would be easy to imagine it getting overrun.
How hard can it be to update the buffer? In one way, it is trivial. In another way, it is very difficult because the tools want to help you so badly.
Tool Chain
The little computer project uses a real Z80 chip and uses an ATMega32A for almost all the support functions. It generates the clock, acts like a serial port, acts like a disk drive, and so on. However, the ATMega32 doesn’t directly have Arduino IDE support so you have to install a toolchain for it. The project called for MightyCore so that’s what I used.
The libraries for hardware serial were all set up using #define statements to allow you to adjust the buffer sizes. By default, if you haven’t set up anything, you get a default based on the amount of RAM your processor provides:
#if !defined(SERIAL_TX_BUFFER_SIZE)
#if ((RAMEND - RAMSTART) < 1023)
#define SERIAL_TX_BUFFER_SIZE 16
#else
#define SERIAL_TX_BUFFER_SIZE 64
#endif
#endif
#if !defined(SERIAL_RX_BUFFER_SIZE)
#if ((RAMEND - RAMSTART) < 1023)
#define SERIAL_RX_BUFFER_SIZE 16
#else
#define SERIAL_RX_BUFFER_SIZE 64
#endif
#endif
Making the Change
So this is easy, right? Just define those symbols before HardwareSerial.h loads. Uh oh. That file is loaded by Arduino.h. The IDE wants to add that to your program and it forces it to be first. There seems to be some IDE versions that check if you already included it so they don’t include it twice, but version 1.8.5 didn’t seem to do that. Maybe I can add some options in the preferences to pass to the compiler. Nope. Not via the IDE, anyway.
Not that I didn’t try a lot of things. It was tempting, of course, to simply change the core libraries. But that’s bad. You might want the defaults later. If you update the tool chain, you’ll lose your updates. I wanted to avoid that. Some people on the Internet suggested making a copy of the platform files and modifying those. Still not ideal.
Test Your Assumptions With Custom Error Reporting
I could tell things I tried were not working because I would put #if statements and #error statements temporarily in HardwareSerial.cpp. For example:
#if SERIAL_RX_BUFFER_SIZE==256
#error 256
#endif
Now if a compile causes an error 256, I know I was able to set the size. If not, then the system was resisting my changes.
Compromise: Adding Menu Options At the Board Level
I really wanted a way to make a change just in my project and set the serial buffer sizes. I failed at that. What I did do was make a modification to the boards.txt provided by Mighty Core. Yes, I will have to watch for upgrades overwriting my changes, but they are simple and it will be obvious that it is missing.
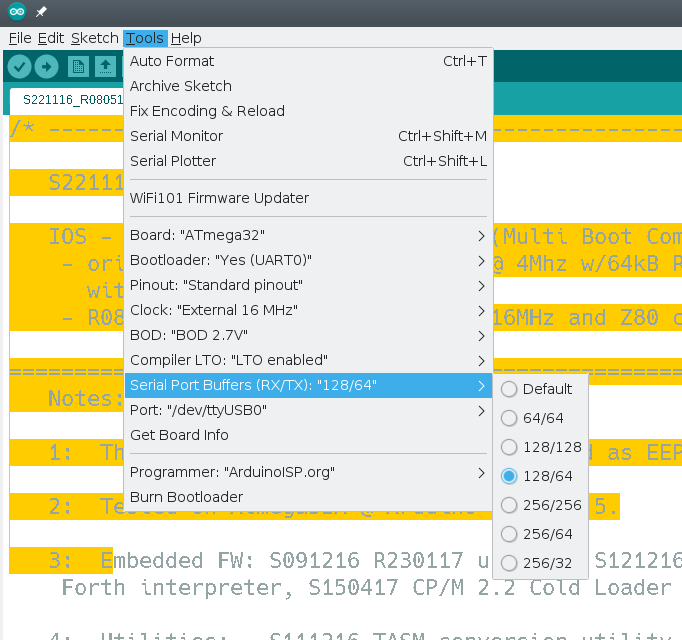
The reason it will be obvious is that I created a menu for the IDE that only appears when using ATMega32 for Mighty Core. This menu lets you select a few preset buffer sizes.
There were three parts to making this work:
- You have to tell the IDE you have a menu item and what it looks like.
- The new item needs to set some compiler options.
- Because the existing system also sets some compiler options, you have to make sure not to clobber them.
The first part is easy. The boards.txt file was (for me) in ~/.arduino15/packages/MightyCore/hardware/avr/2.0.5/boards.txt. Near the top there’s a list of menu keys and I added mine to the end:
# Menu options
menu.clock=Clock
menu.BOD=BOD
menu.LTO=Compiler LTO
menu.variant=Variant
menu.pinout=Pinout
menu.bootloader=Bootloader
menu.SerialBuf=Serial Port Buffers (RX/TX)
Next, I moved down the file and added my menu before the existing LTO menu option for the ATMega32:
32.menu.SerialBuf.disabled=Default
32.menu.SerialBuf.disabled.compilerSB.c.extra_flags=
32.menu.SerialBuf.disabled.compilerSB.cpp.extra_flags=

32.menu.SerialBuf.SB64=64/64
32.menu.SerialBuf.SB64.compilerSB.c.extra_flags=-DSERIAL_RX_BUFFER_SIZE=64 -DSERIAL_TX_BUFFER_SIZE=64
32.menu.SerialBuf.SB64.compilerSB.cpp.extra_flags=-DSERIAL_RX_BUFFER_SIZE=64 -DSERIAL_TX_BUFFER_SIZE=64

32.menu.SerialBuf.SB128=128/128
32.menu.SerialBuf.SB128.compilerSB.c.extra_flags=-DSERIAL_RX_BUFFER_SIZE=128 -DSERIAL_TX_BUFFER_SIZE=128
32.menu.SerialBuf.SB128.compilerSB.cpp.extra_flags=-DSERIAL_RX_BUFFER_SIZE=128 -DSERIAL_TX_BUFFER_SIZE=128

32.menu.SerialBuf.SB12864=128/64
32.menu.SerialBuf.SB12864.compilerSB.c.extra_flags=-DSERIAL_RX_BUFFER_SIZE=128 -DSERIAL_TX_BUFFER_SIZE=64
32.menu.SerialBuf.SB12864.compilerSB.cpp.extra_flags=-DSERIAL_RX_BUFFER_SIZE=128 -DSERIAL_TX_BUFFER_SIZE=64

32.menu.SerialBuf.SB256=256/256
32.menu.SerialBuf.SB256.compilerSB.c.extra_flags=-DSERIAL_RX_BUFFER_SIZE=256 -DSERIAL_TX_BUFFER_SIZE=256
32.menu.SerialBuf.SB256.compilerSB.cpp.extra_flags=-DSERIAL_RX_BUFFER_SIZE=256 -DSERIAL_TX_BUFFER_SIZE=256

32.menu.SerialBuf.SB25664=256/64
32.menu.SerialBuf.SB25664.compilerSB.c.extra_flags=-DSERIAL_RX_BUFFER_SIZE=256 -DSERIAL_TX_BUFFER_SIZE=64
32.menu.SerialBuf.SB25664.compilerSB.cpp.extra_flags=-DSERIAL_RX_BUFFER_SIZE=256 -DSERIAL_TX_BUFFER_SIZE=64

32.menu.SerialBuf.SB25632=256/32
32.menu.SerialBuf.SB25632.compilerSB.c.extra_flags=-DSERIAL_RX_BUFFER_SIZE=256 -DSERIAL_TX_BUFFER_SIZE=32
32.menu.SerialBuf.SB25632.compilerSB.cpp.extra_flags=-DSERIAL_RX_BUFFER_SIZE=256 -DSERIAL_TX_BUFFER_SIZE=32
Menu Structure
You can see that the 32.menu object groups all the items together for this processor. The next part is our menu key (SerialBuf). After that is a unique key for each memory item. It is important that you don’t reuse these. So, for example, if you have two SB64 keys only one is going to work.
If you stop at that key and put an equal sign you can assign the menu item the text you want to display. For example “Default” or “64/64.” You can also extend the key with a property and that property will be set if the option is active.
So, for example, if you select 256/256 then the compilerSB.c.extra_flags property will get set. I made that name up, by the way, and you’ll see why in a minute.
Peaceful Coexistence
There is no property called compilerSB.c.extra_flags. The correct property is compiler.c.extra_flags. However, the Mighty Core LTO option uses the same key. That’s why it was important that the new menu appears first and also that it sets a fake property. Then the LTO code needs a slight modification:
# Compiler link time optimization
32.menu.LTO.Os=LTO disabled
32.menu.LTO.Os.compiler.c.extra_flags={compilerSB.c.extra_flags}
32.menu.LTO.Os.compiler.c.elf.extra_flags=
32.menu.LTO.Os.compiler.cpp.extra_flags={compilerSB.cpp.extra_flags}
32.menu.LTO.Os.ltoarcmd=avr-ar

32.menu.LTO.Os_flto=LTO enabled
32.menu.LTO.Os_flto.compiler.c.extra_flags={compilerSB.c.extra_flags} -Wextra -flto -g
32.menu.LTO.Os_flto.compiler.c.elf.extra_flags=-w -flto -g
32.menu.LTO.Os_flto.compiler.cpp.extra_flags={compilerSB.cpp.extra_flags} -Wextra -flto -g
32.menu.LTO.Os_flto.ltoarcmd=avr-gcc-ar
The big change is that each set of flags adds to whatever the new menu set in its custom property. This way, all the flags get put into the correct property, compiler.c.extra_flags.
I set up error traps to catch all the cases to make sure they were being set right. In addition, after removing those traps, I could see my memory usage go up accordingly.
Customize
Of course, you can modify the parameters if you want something different. You could also use this trick to set other parameters before the Arduino.h file takes over. There’s some documentation about how to set up the platform definitions, including boards.txt.
It would have probably been better for me to make a custom boards.txt file with the same information in it but then I’d need to take the rest of Mighty Core with me. Instead, I just keep a copy of the file called boards.txt.custom and if my menu disappears, I just have to compare that file with the boards.txt file to see what changed.
Of course, if you don’t have to support people using the IDE, maybe just give it up. The Pro IDE is better, even if it does have some shortcomings. Plus there’s always Platform.io.


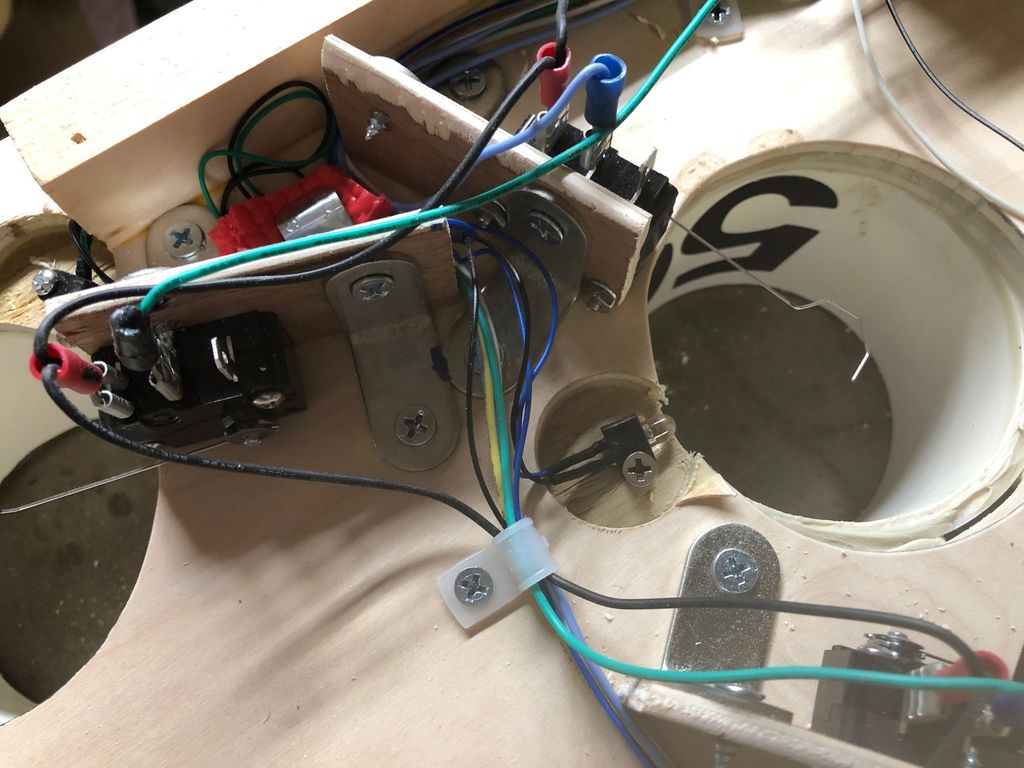 At the bottom of each cylinder is an arcade machine coin door switch with a long wire actuator. These had to be mounted so they’re close enough to the hole, but out of the way of the balls.