Automatic Sanitizer for Your Cupholder
Why is it so hard to remember to use hand sanitizer between going into the store and driving back home? We tried hanging a bottle off the windshield wiper stalk, but it gets in the way and is hard to use and share with passengers. The ideal thing would be to have a hands-free pump in the car that reminds you to use it.
You don’t have to wire this to the ignition or anything — all you have to do is power it with the cigarette lighter (or straight-up outlet, if you’re lucky). Every time you turn the key, this pump powers up and performs a little song to remind you to use it. Electronically speaking, it couldn’t be simpler — an Arduino UNO reads your hand from the distance sensor and activates a servo that dispenses three short pumps of isopropyl alcohol. Check it out in action after the break.
Want a hands-free solution for the house? Just build something you can step on.
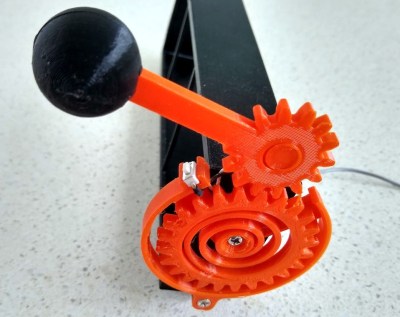 In this case, you’ll be losing all of your nickels to an Arduino Pro Mini. The handle is an upgrade to an earlier slot machine project that uses three 8×8 matrices and a custom driver board. When the spring-loaded handle is pulled, it strikes a micro switch to spins the reels and then snaps back into place. Between each pull, the current score is displayed across the matrix. There’s even a piezo buzzer for victory squawks. We only wish the button under the handle were of the clickier variety, just for the feels. Check out the short demo video after the break.