The language C++ is big. There is no doubting that. One reason C++ is big is to allow flexibility in the technique used to solve a problem. If you have a really small system you can stick to procedural code encapsulated by classes. A project with a number of similar but slightly different entities might be best addressed through inheritance and polymorphism.
A third technique is using generics, which are implemented in C++ using templates. Templates have some similarities with #define macros but they are a great deal safer. The compiler does not see the code inserted by a macro until after it has been inserted into the source. If the code is bad the error messages can be very confusing since all the developer sees is the macro name. A template is checked for basic syntax errors by the compiler when it is first seen, and again later when the code is instantiated. That first step eliminates a lot of confusion since error messages appear at the location of the problem.
Templates are also a lot more powerful. They actually are a Turing complete language. Entire non-trivial programs have been written using templates. All the resulting executable does is report the results with all the computation done by the compiler. Don’t worry, we aren’t going there in this article.
Template Basics
You can use templates to create both functions and classes. The way this is done is quite similar for both so let’s start with a template function example:
template<typename T, int EXP = 2>
T power(const T value, int exp = EXP) {
	T res { value };
	for (; exp > 1; --exp) {
		res *= value;
	}
	return res;
}
This is a template function for raising value by the integer exponent, exp. The keyword template is followed in angle brackets by parameters. A parameter is specified using either typename or class followed by a name, or by an integer data type followed by a name. You can also use a function or class as a template parameter but we won’t look at that usage.
The name of a parameter is used within the body of the class or function just as you would use any other type, or value. Here we use T as the type name for the input and return values of the function. The integer EXP is used to set a default value of 2 for the exponent, i.e. making power calculate the square.
When the compiler instantiates a template function or class, it creates code that is the same as a handwritten version. The data types and values are inserted as text substitutions. This creates a new version typed by the actual arguments to the parameters. Each different set of arguments creates a new function or type. For example, an instance of power() for integers is not the same as power() for floats. Similarly, as we’ll see in a moment, a class Triple for integers is not the same as one for float. Each are distinct types with separate code.
Since power() is a template function it will work directly for any numeric data type, integer or floating point. But what if you want to use it with a more complex type like the Triple class from the last article? Let’s see.
Using Templates
Here’s the declaration of Triple reduced to only what is needed for this article:
class Triple {
public:
	Triple(const int x, const int y, const int z);
	Triple& operator *=(const Triple& rhs);

	int x() const;
	int y() const;
	int z() const;

private:
	int mX { 0 };	// c++11 member initialization
	int mY { 0 };
	int mZ { 0 };
};
I switched the plus equal operator to the multiple equal operator since it is needed by the power() function.
Here is how the power() function is used for integer, float, and our Triple data types:
int p = power(2, 3);
float f = power(4.1, 2);

Triple t(2, 3, 4);
Triple res = power(t, 3);
The only requirement for using a user defined data type (UDT) like Triple with power() is the UDT must define an operator=*() member function.
Template Classes
Assume you’ve been using Triple in a project for awhile with integer values. Now a project requirement needs it for floating point values. The Triple class code is all debugged and working, and more complex than what we’ve seen here. It’s not a pleasant thought to create a new class for float. There are also hints that a long or double version might be needed.
With not much work Triple can be converted to a generic version as a template class. It’s actually fairly straightforward. Begin with the template declaration just as with the function power() and replace all the declarations of int with T. Also check member function arguments for passing parameters by value. They may need to be changed to references to more efficiently handle larger data types or UDTs. I changed the constructor parameters to references for this reason.
Here is Triple as a template class:
template<typename T>
class Triple {
public:
	Triple(const T& x, const T& y, const T& z);
	Triple& operator *=(const Triple& rhs);

	T x() const;
	T y() const;
	T z() const;

private:
	T mX { 0 };	// c++11 member initialization
	T mY { 0 };
	T mZ { 0 };
};
Not a lot of difference. Here’s how it could be used:
Triple<int> ires = power(Triple { 2, 3, 4 }, 3);
Triple fres = power(Triple(1.2F, 2.2, 3.3)); // calc square
Triple dres = power(Triple(1.2, 2.2, 3.3));// calc square
Triple lres = power(Triple(1, 2, 3.3), 2);
Unfortunately, the new flexibility comes at the cost of telling the template the data type to use for Triple. That is done by putting the data type inside brackets following the class name. If that is a hassle you can always use typedef or the new using to create an alias:
using TripleInt = Triple;
TripleInt ires = power(Triple { 2, 3, 4 }, 3);
Creating a template class like this saves debugging and maintenance costs overall. Once the code is working, it works for all related data types. If a bug is found and fixed, it’s fixed for all versions.
Template Timing and Code Size
The code generated by a template is exactly the same code as a handwritten version of the same function or class. All that changes between versions is the data type used in the instantiation. Since the code is the same as the handwritten version, the timing is going to be the same. Therefore there is no need to actually test timing. Phew!
Templates are Inline Code
Templates are inherently inline code. That means every time you use a template function or a template class member function the code is duplicated inline. Each instance with a different data type creates its own set of code, but that will be no more than if you’d written a class for each data type. There can be savings using template classes since member functions are not instantiated if they are not used. For example, if the Triple class getter functions – x(), y(), z() – are never used, their code is not instantiated. They would be for a regular class, although a smart linker might drop them from the executable.
Consider the following use of power() and Triple:
int i1 = power(2, 3);
int i2 = power(3, 3);
Triple t1 = power(Triple(1, 2, 3), 2);
This creates two inline integer versions of power even though both are instantiated for the same data type. Another instance is created for the Triple version. A single copy of the Triple class is created because the data type is always int.
Here we’re relying on implicit instantiation. That means we’re letting the compiler determine when and where the code is generated. There is also explicit instantiation that allows the developer to specify where the code is produced. This takes a little effort and knowledge of which data types are used for the templates.
Generally, implicit instantiation means inline function code with the possibility of duplication of code. Whether that matters depends on the function. When a function, not an inline function, is called there is overhead in invocation. The parameters to the function are pushed onto the stack along with the housekeeping information. When the function returns those operations are reversed. For a small function the invocation may take more code than the function’s body. In that case, inlining the function is most effective.
The power() function used here is interesting because the function’s code and the code to invoke it on an Uno are similar in size. Of course, both vary depending on the data type since large data types require more stack manipulation. On a Arduino Uno, calling power() with an int takes more code than the function. For float, the call is slightly larger. For Triple, the code to invoke is a good piece larger. On other processors the calling power() could be different. Keep in mind that power() is a really small function. Larger functions, especially member functions, are typically going to outweigh the cost to call them.
Specifying where the compiler generates the code is an explicit instantiation. This will force an out-of-line call with the associated overhead. In a source file you tell the compiler which specializations you need. For the test scenario we want them for int and Triple:
template int power(int, int);
template Triple<int> power(Triple<int>, int);
The compiler will create these in the source file. Then, as with any other function, you need to create an extern declaration. This tells the compiler to not instantiate them as inline. These declarations are just the same as above, only with extern added:
extern template int power(int, int);
extern template Triple power(Triple, int);
Scenario for Testing Code Size
It took me a bit to create a test scenario for demonstrating the code size differences between these two instantiations. The problem is the result from the power() function must be used later in the code or the compiler optimizes the call away. Adding code to use the function changes the overall code size in ways that are not relevant to the type of instantiation. That makes comparisons difficult to understand.
I finally settled on creating a class, Application, with data members initialized using the power() function. Adding data members of the same or different types causes minimal overall size changes so the total application code size closely reflects the changes only due to the type of instantiation.
Here is the declaration of Application:
struct Application {
public:
	Application(const int value, const int exp);

	static void loop() {
	}

	int i1;
	int i2;
	int i3;
	Triple t1;
	Triple t2;
	Triple t3;
};
and the implementation of the constructor:
Application::Application(int value, const int exp) :
		i1 { power(value++, exp) }, //
				i2 { power<int, 3="">(value++) }, // calcs cube
				i3 { power(value++, exp) }, //

				t1 { power(Triple(value++, 2, 3)) }, // calcs square
				t2 { power(Triple(value++, 4, 5), exp) }, //
				t3 { power(TripleInt(value++, 2, 3), exp) } //
{
}
The minimum application for an Arduino has just an empty setup and loop() functions which takes 450 bytes on a Uno. The loop() used for this test is a little more than minimum but it only creates an instance of Application and calls its loop() member function:
void loop() {
	rm::Application app(2, 3);
	rm::Application::loop();	// does nothing
}
Code Size Results
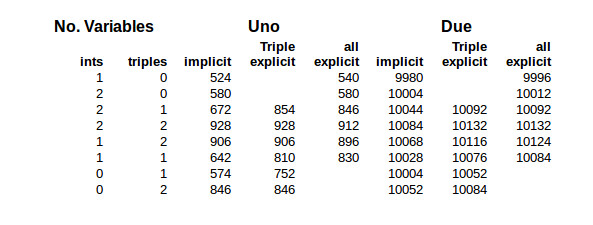
Here are the results for various combinations of implicit and explicit instantiation with different numbers of class member variables:

The first columns specify how many variables were included in the Application class. The columns under Uno and Due are the code size for those processors. They show the size for implicit instantiation, explicit instantiation of power() for just the Triple class, and explicit instantiation for both int and Triple data types.
The code sizes are dependent on a number of factors so can only provide a general idea of the changes when switching from implicit to explicit template instantiation. Actual results depend on the tool chains compiler and linker. Some of that occurs here using the Arduino’s GCC tool chain.
In all the cases with the Uno where one variable is used, the code size increases with explicit instantiation. In this case the function’s code plus the code for calling the function is, as expected, greater than the inline function’s code.
Now look at the Uno side of the table where there are 2 integers and 2 Triples, i.e. the fourth line. The first two code sizes remain the same at 928 bytes. The compiler optimized the code for the two Triples() by creating power() out-of-line without being told to do it explicitly. In the third column there is a decrease in code size when the integer version of power() is explicitly instantiated. It did the same a couple of lines below that when there are only the 2 Triples. These were verified by examing the assembly code running objdump on the ELF file.
In general, the Due’s code size did not improve with explicit instantiation. The larger word size of the Due requires less code to call a function. It would take a function larger than power() to make explicit instantiation effective in this scenario.
As I mentioned, don’t draw too many conclusions for these code sizes. I repeatedly needed to check the content of the ELF file using objdump to verify my conclusions. As a case in point, look at the Due side, with 2 integers and a Triple, with the two code sizes of 10092. They’re just coincidence. In one the integer version of power() is inlined and in the other, explicitly out-of-lined. The same occurs on the first line under Uno where there are just two integers and no Triples.
You can find other factors influencing code size. When three Triples are involved the compiler lifts the multiplication code from power(), but not the entire function. This isn’t because power() is a template function but just a general optimization, i.e. lifting code from inside a loop.
Wrap Up
Templates are a fascinating part of C++ with extremely powerful capabilities. As mentioned above, you can write an entire program in templates so the compiler actually does the computation. The reality is you probably are not going to be creating templates in every day programming. They are better suited for developing libraries and general utilities. Both power() and Triple fall into, or are close to, that category. This is why the C++ libraries consist of so many template classes. Creating a library requires attention to details beyond regular coding.
It’s important to understand templates even if you don’t write them. We’ve discussed some of the implications of usage and techniques for making optimal use of templates because they are an inherent part of the language. With them being such a huge part of C++ we’ll come back to them again to address places where they can be used.
The Embedding C++ Project
Over at Hackaday.io, I’ve created an Embedding C++project. The project will maintain a list of these articles in the project description as a form of Table of Contents. Each article will have a project log entry for additional discussion. Those interested can delve deeper into the topics, raise questions, and share additional findings.
The project also will serve as a place for supplementary material from myself or collaborators. For instance, someone might want to take the code and report the results for other Arduino boards or even other embedded systems. Stop by and see what’s happening.
Filed under:
Arduino Hacks,
Hackaday Columns,
Software Development 


 We’re well past the time when Halloween costume submissions stop hitting the tip line, but like ever year we’re expecting a few to trickle in until at least Thanksgiving. Remember, kids: documentation is the worst part of any project.


