The apparent lull on the Arduino front the last few weeks was just the calm before the storm that is the Bay Area Maker Faire (BAMF). Both companies claiming the Arduino name were there over the weekend, with news and new products in tow. Ironically, you could see from one booth straight over to the other. Small world.
Perhaps the biggest news from Arduino LLC is that hacker-friendly Adafruit is now going to be making officially-licensed boards in the US. Competing with this news, Arduino SRL brought its new boards, including the Yun Mini and ARM-powered Arduino M0. And [Massimo Banzi] and Arduino LLC seem to be taking an end-run around the Arduino SRL trademark by announcing the “Genuino” brand for European production. For all the details, read on!
The Adafruit Connection
As announced by [Massimo] in his “State of the Arduino” keynote speech at the BAMF, Arduino is licensing Adafruit to produce a range of the “most-requested” Arduino boards at their factory in New York. So those of you looking to support Arduino LLC with your purchases also get to help line [Ladyada]’s pockets at the same time. That’s a big win in our book.
Photo: Atmel
It’s not a complete surprise that Adafruit should get tapped as a US fab for Arduino.cc. They’ve been selling the boards and producing copious Arduino-related tutorials since their beginnings in 2005. More recently, Adafruit partnered with Arduino LLC to create the Gemma board, which is basically an ATTiny85-based Arduino-a-like in a tiny round, wearable-friendly board. (If you’re familiar with the Adafruit lineup, it’s essentially a Trinket in the round format of a LilyPad Arduino.)
Indeed, after the deal is done and the dust has settled, it’s a bit surprising to us that this hasn’t happened earlier, what with both Adafruit and Sparkfun producing licensed boards and Arduino LLC looking for new manufacturers. Anyway, good job Adafruit and Arduino (LLC)!
(New) Hardware from Arduino SRL
Arduino SRL had its Yun Mini, which is essentially a smaller version of the Yun — a mashup of an Arduino Leonardo with an OpenWRT-capable router chipset. We’ve reported on these previously but it’s fun to see them in the flesh.
The M0 is interesting. Before the troubles began, Arduino designed an ARM-M0+ based board with Atmel. Now Arduino LLC has it listed on their website as the Arduino Zero, but still hasn’t got any for sale yet. Arduino SRL has the boards on their website as the Arduino Zero Pro, with a different name, but is now touting this version as the “M0 Pro”. What’s in a name? Not much. The circuit layouts and parts appear identical.
The Portal Battle
Both of the Arduino companies are working on getting your Arduino development into “the cloud”. (Conscience compels us to note that “the cloud” is actually just other people’s computers.) Anyway, this essentially means new web-based and browser-based versions of the IDE that tie into web services. Interestingly enough, the two companies have different takes on what that entails.
According to their Maker Faire press release, Arduino SRL will be launching a web portal for makers to “promote and distribute their products” and share code and ideas. Located at my.arduino.org (which currently seems to be password-access only), the idea seems to be to create a mini-Tindie for Arduino-based products. This couples with their “Arduino IDE-alpha”, a JavaScript-based IDE that will run in the browser.
Meanwhile, Arduino LLC displayed previously announced their alternative development platform, Arduino Create. Arduino Create lets you write, compile and upload sketches “directly from the browser with the Arduino Web Editor”, and store your code in the “Arduino Cloud”. Arduino Create looks slick: certainly a lot better than the homely Java IDE that we’re all used to. It’s too early to tell what this “cloud” is all about, but it looks like it will include code sharing, schematic and wiring hookup storage, and easy sharing among users.
We already use blogs, Hackaday.io (shameless plug!), Github, and other “cloud” services to store our projects and code, so we’re not entirely sure what either of these portal offerings will bring to the table. It’s 2015, is anyone still hurting for project hosting space on the web?
Cynically, we note that both of these companies are in a battle to “own” the Arduino community and that getting people to host code and projects on their servers is an obvious strategy, and providing a web-based IDE to facilitate this capture is the tactic.
And before we leave “the cloud”, we should note that both Arduinos are late to the game. codebender has been around and programming Arduinos on the web since 2012.
New Names
Photo: Making Society
Finally, as if it weren’t bad enough with Arduino LLC and Arduino SRL, [Massimo Banzi] also announced that licensed boards for the European market will be sold under the new “Genuino”.
Actually, this is a pretty cagey maneuver, because it side-steps the European trademark issues (which [Massimo] referred to as “the bullsh*t” in his talk) and is a cute name to boot. “Genuine”, get it?
Our take? As [Massimo] almost said in this video interview with Make, “a rose by any name would smell as sweet.” If Arduino LLC loses the trademark lawsuit in Italy, they’ll not be allowed to sell boards using the “Arduino” name. The best way to limit the damage in the future is to make the switch now, while everyone is watching, and give the market time to adapt.
Have you ever come across an Internet meme and just thought to yourself, “I have to bring this into the physical world!” Well [0xb3nn] and [Knit Knit] did. They decided to take the classic nyan cat meme and bring it to life.
The frame is 24″ x 36″. Many hours went into the knitting process, but the result obviously turned out very well. The stars include 24 LED sequins to add a sparkling animation effect. These were sewn onto the back of the work using conductive thread. They are bright enough to shine through to the front where needed. These connect back to an Arduino Pro Mini 5V board.
The Arduino is also connected to a capacitive touch sensor. This allows the user to simply place their hand over the nyan cat image to start the animation. No need for physical buttons or switches to take away from the visual design. An Adafruit AudioFX sound board was used to play back a saved nyan cat theme song over a couple of speakers. The source code for this project is available on github. Be sure to watch the demo video below.
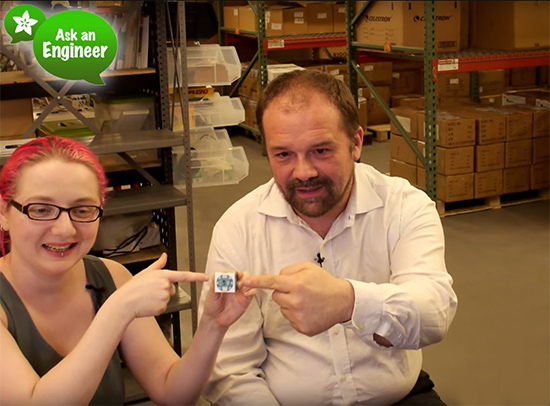
Last night Massimo Banzi was in New York City and met LadyAda and Phil Torrone for an exclusive interview during Ask an Engineer session.
They talked about many cool things starting from the history of Arduino to the forthcoming availability of Arduino Gemma, the Microsoft/Arduino partnership on opensource projects and the #TeamArduinoCC campaign!
A little board that adds WiFi to any project for a few hundreds of pennies has been all the rage for at least half a year. I am referring to the ESP8266 and this product is a marrige of one of those WiFi modules with the support hardware required to get it running. This week I’m reviewing the HUZZAH ESP8266 Breakout by Adafruit Industries.
If you saw the article [cnlohr] woite for us about direct programming this board you will know that a good chunk of that post covered what you need to do just to get the module into programming mode. This required adding a regulated 3.3V source, and a way to pull one of the pins to ground when resetting the power rail. Not only does the HUZZAH take care of that for you, it turns the non-breadboard friendly module into a DIP form factor while breaking out way more pins than the most common module offers. All of this and the price tag is just $9.95. Join me after the break for the complete run-down.
The Hardware
This board is about 1.5 inches by 1 inch… like two postage stamps side-by-side. It hosts the FCC and CE approved module which we first heard about in December. These modules need a 3.3v supply and there is a regultor on board which can supply up to 500mA (the module can consume as much as 250mA) and can be fed by a battery, USB power, or any other 5V supply. As I mentioned earlier you need to pull a pin low during reset to put the module in programming mode. There are two switches on the board that facilitate this, hold the user button down and press reset and you’re ready to flash.
On a breadboard you’ll have two rows not covered by the board on one side, and one row on the other. The board doesn’t have a USB-to-UART bridge but we’re fine with that. On one end of the board you’ll find the common pinout for a USB-to-serial programming cable. Above you can see the programming cable Adafruit sent me with these samples. To the right I tried out my 5V Sparkfun FTDI board and as advertised, the HUZZAH can be programmed with either 3.3v or 5V logic levels.
The one thing I noticed is that the two buttons are a bit tricky to get at with the programmers connected, especially the FTDI board. For the second module I may supply my own right-angle header to get around that. Of course doing so would cover part of the breadboard so this is probably six of one, half dozen of the other.
I love it that they supply the pin headers but don’t solder them. Sometimes I prefer pin sockets or unpopulated pads, and this makes it easy for me to make that choice like the right-angle one I mentioned above. It’s something small but I also appreciate that the pinheaders in the package were not the minimum number necessary for this board — there were a few extra pins. You need to break them off and sometimes they can break one pin over from where you expected. If it were the minimum number you would either start over or solder a single pin at the end of the row (not ideal). If you screw up snapping these you could conceivably use a set of three pins and the rest as one unit to fix your mistake. Maybe I’m weird but it’s the small things in life!
Programming Options: NodeMCU and Lua
The board ships with this firmware on it. I was up and running with the Lua interpreter within three minutes of the package arriving at my door. Seriously, it took me longer to figure out if the USB-to-serial was green or white for TX/RX than it did to connect to my local WiFi Access point. Adafuit’s ‘Hello World’ walkthrough gets you going if you haven’t given this a try before.
Programming Options: Arduino IDE
Adafruit has a Board Manager for Arduino IDE. Perhaps this is common knowledge but I don’t often work with this IDE and it’s the first time I’ve run into it. What can I say, it kicks ass!
I hate setting up tool chains for new chips. With this you add a web address and port number, restart the IDE, and use the board manager to add support for this board. Sweet!
That turns this into an Arduino compatible board which solves something that has long bothered me. I’ve seen a ton of really simple Arduino projects that use the ESP8266 externally. Last month’s porting of the Arduino framework for these chips, coupled with this ready-to-go hardware does away with that nonsense. Seriously, the vast majority of those projects need little to no computing power and will work like a dream when directly programmed onto this chip.
To prove my point, I knocked out this quick binary counter that uses five LEDs as outputs. I’m not leveraging any of the WiFi features on this, but the compiled binary is 174,358 bytes and the Arduino IDE reports this board has a max capacity of 524,288 bytes. It five I/O used for LEDs there are still four more digital pins, the two UART pins, and an ADC input.
Programming Options: esptool
Arduino will overwrite NodeMCU but that’s easy to reflash. I followed [cnlohr’s] direct programming guide to write the binary using esptool. Both this method and the Arduino method are directly programming the EEPROM on the module. This is exactly the same method you’d use if you wanted to develop natively using the Espressif or the Open Source SDKs. Here’s the commands I used to reflash the NodeMCU firmware:
“Buy as many of these as [Phil] will make for us.” That’s what I’ve asked [Julian], the Hackaday Store manager to do. You should be able to get the Hackaday black version of this in a few weeks. Adafruit is currently sold out but I’m sure they’re racing to remedy this.
These are amazing little boards. The price of $9.95 is crazy considering what you get for it. I’m talking about the entire ecosystem which gives you multiple flavors of programming environments. Adafruit has done a lot to contribute to the code and knowledge base here, but a mammoth portion of this is community developed and I think coming in low on the price is one more way Adafruit has chosen to be a good guy in this ecosystem. The board has a ton of I/O for what it is, and if that’s not enough just, implement I2C, SPI, or UART to couple a beefy uC to the connectivity this one brings to the party. I see zero downside on this board. It’s as close to perfect as you can get.
Altoids – they’ve been around since King George III was on the throne. These curiously strong mints have had a storied history, a copy of which is included in every tin. They taste pretty good, but most hackers and makers are more interested in the pocket-sized tin than the mints themselves. It may have been the ham radio operators who first used Altoids tins to hold their sensitive transmitter and receiver circuits. The metal case makes a perfect electromagnetic field shield. It wasn’t long before the tins found their way into thousands of projects. This week’s Hacklet features some of the best projects with Altoids (and other mint) tins on Hackaday.io!
We start with [Chad Lawson] and the Networking Group Timing Light. [Chad] has a networking meeting where each member has two minutes to introduce themselves. As is the case with most meetings, people tend to be a bit long-winded, running well beyond their allotted two minutes. The timing light contains an RGB LED which changes from green to yellow to red as a speaker’s time ticks away. The timer is reset by simply tilting the mint tin. [Chad] is hoping that the timer will serve as a gentle reminder to keep everyone on track time-wise.
Next up is [Rjpope42] and his AM/FM Transmitter Pair. [Rjpope42] loves vintage tube radios, and wants to send his own signals to his amber glowing projects. Wiring an external audio input to a tube radio is pretty easy, but nothing beats a simple AM transmitter for convenience. Small FM transmitters are commonly available to add an MP3 player input to cars without an AUX audio in, but their AM counterparts have become rare. [Rjpope42] has built AM and FM transmitters, each of which will fit in a Mint Tin case. The AM transmitter can run on 9V or 12V, and even includes a USB power output for charging an MP3 player or phone!
[John Hamann] entered Distance Analyzer 3000 in the Trinket EDC contest. While he didn’t win, it was still a great project, especially since this is [John’s] first serious Arduino project. The idea is to use a rotary encoder with a wheel to measure distances. Think of it like a mini version of a surveyor’s walking wheel. The Pro Trinket counts the pulses from the rotary encoder, then converts this to a distance in feet. We’d love to see [John] continue on the project. An ultrasonic distance sensor would be a great addition for multi-sensor distance reads!
Finally, we have [colonwq] with TTTOTP, a pro trinket Time based One Time Password (TOTP) generator. [colonwq] used the trinket to implement the well-known time based one time password algorithm. To implement a project like this, you need a stable time source. The ATmega328 isn’t very good at this, so [colonwq] used a Dallas DS1307 clock chip to keep track of things. The actual code is displayed on a 4 digit 7 segment display. When the button is pressed, the first half of the code is displayed. Once the button is released, the second half of the code is displayed for several seconds.
Hackaday.io has a few new features, including @username and #projectID. If you mention someone’s username with an @ in front of it, that user will get a notification in their stack. The same goes with mentioning a project ID with a # up front. To celebrate this, we’re giving away a pair of special edition MeArms. All you have to do is leave a comment using the features on this project log. Huge thanks to [Jasmine] for setting all this up, and to [Ben] for letting us hijack his project for the week!
That’s it for this Hacklet, As always, see you next week. Same hack time, same hack channel, bringing you the best of Hackaday.io!
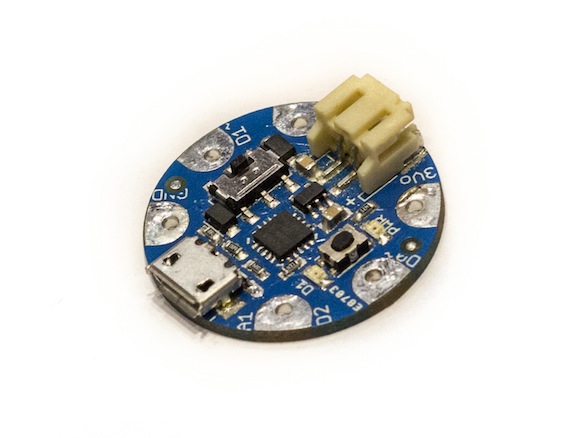
Arduino Gemma preview – Final board coming late autumn
During his saturday morning presentation at Maker Faire Rome, Massimo Banzi gave a preview of a new collaboration and a new board: Adafruit Gemma becomes officially Arduino Gemma, a tiny but powerful wearable microcontroller board in a 27mm diameter package.
Powered by an Attiny85 and programmable with the Arduino IDE over USB, anyone will be able to easily create wearable projects with all the advantages of being part of the Arduino family. The board will be default-supported in the Arduino IDE, equipped with an on/off switch and a microUSB connector.
The Attiny85 is a great processor because despite being so small, it has 8K of flash and 5 I/O pins, including analog inputs and PWM ‘analog’ outputs. It was designed with a USB bootloader so you can plug it into any computer and reprogram it over a USB port (it uses 2 of the 5 I/O pins, leaving you with 3). Ideal for small & simple projects sewn with conductive thread, the Arduino Gemma fits the needs of most of entry-level wearable creations including reading sensors and driving addressable LED pixels.
After the fruitful joint effort developing Arduino Micro, once more the Arduino Gemma has been developed in collaboration with Adafruit Industries, one of the main leaders of the Maker movement. Arduino Gemma will be available for purchase on the Arduino Store and Adafruit Industries starting late autumn 2014.
Technical specifications: Microcontroller: ATtiny85 Operating Voltage: 3.3V Input Voltage (recommended): 4-16V via battery port Input Voltage (limits): 3-18V Digital I/O Pins: 3 PWM Channels: 2 Analog Input Channels: 1 DC Current per I/O Pin: 40 mA DC Current for 3.3V Pin: 150 mA Flash Memory: 8 KB (ATtiny85) of which 2.5 KB used by bootloader SRAM: 0.5 KB (ATtiny85) EEPROM: 0.5 KB (ATtiny85) Clock Speed: 8 MHz MicroUSB for USB Bootloader JST 2-PH for external battery
My idea of an ideal vacation includes time with my family – exploring and learning about some new part of the world, with a little time to play with new Maker toys. Last year, I took our Fireball HD pinball electronics to the beach along with a bunch of new connectors. […]
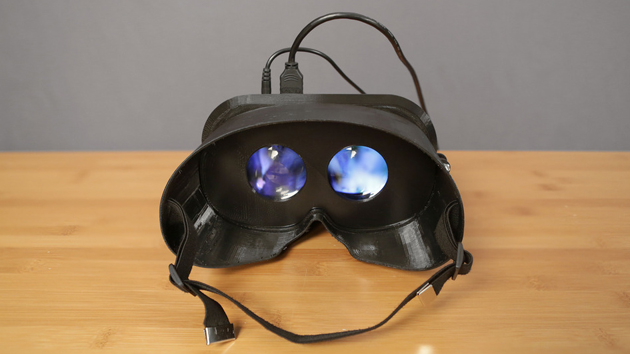
So you couldn't get your hands on a nice virtual reality headset like the Oculus Rift, but you'd still like something a little fancier than a cardboard display. Are you out of luck? Not if Noe Ruiz has anything to say about it. He has posted instructions at Adafruit for do-it-yourself 3D-printed goggles that can be used for either VR or as a simple wearable screen. The design mates an Arduino Micro mini computer with a display, a motion sensor and lenses; the 3D printing both adds a level of polish and lets you tailor the fit to your cranium. This definitely isn't the cheapest project (about $231 in parts) or the easiest, but it will give you head-tracking VR without having to wait for Oculus, Samsung or Sony to put out finished devices of their own. If you're up to the challenge, you'll find everything you need at the source link.


 Over the Memorial Day weekend the first Arduinos were to be made in the USA were hand built by Limor in the Adafruit offices in New York.


 This board is about 1.5 inches by 1 inch… like two postage stamps side-by-side. It hosts the FCC and CE approved module which
 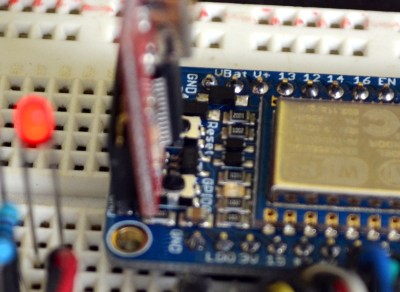 To the right I tried out my 5V Sparkfun FTDI board and as advertised, the HUZZAH can be programmed with either 3.3v or 5V logic levels.
 Adafruit has a Board Manager for Arduino IDE. Perhaps this is common knowledge but I don’t often work with this IDE and it’s the first time I’ve run into it. What can I say, it kicks ass!
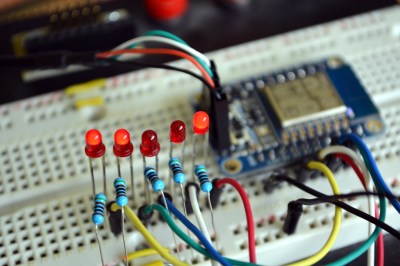 To prove my point, I knocked out this quick binary counter that uses five LEDs as outputs. I’m not leveraging any of the WiFi features on this, but the compiled binary is 174,358 bytes and the Arduino IDE reports this board has a max capacity of 524,288 bytes. It five I/O used for LEDs there are still four more digital pins, the two UART pins, and an ADC input.