Posts with «adafruit» label

Arduino-Neopixel Traffic Map

This project displays live traffic conditions between two locations on a physical map, using an Adafruit Feather Huzzah that gathers data from the Google Maps API and then sets the color of a string of NeoPixels

Read more on MAKE

The post Arduino-Neopixel Traffic Map appeared first on Make: DIY Projects and Ideas for Makers.

From the New Issue of Make: Our 8 Standout Dev Boards

These eight boards stand out for their advanced specs, built-in offerings, and, in some cases, their innovative interface options.

Read more on MAKE

The post From the New Issue of Make: Our 8 Standout Dev Boards appeared first on Make: DIY Projects and Ideas for Makers.

Who on Earth Needs a Ninja Timer?

John Edgar Park builds a giant 7-segment display timer for a Ninja obstacle course.

Read more on MAKE

The post Who on Earth Needs a Ninja Timer? appeared first on Make: DIY Projects and Ideas for Makers.

Payphone Boombox Straight Out of the 1990’s.

Due largely to the overwhelming dominance of mobile phones, payphones are a sometimes overlooked relic from the 90’s and earlier eras. While seldom seen out in the wild these days, they can however still be acquired for a moderate fee — how many of you knew that? Setting out to prove the lasting usefulness of the payphone, Instructables user [Fuzzy-Wobble] has dialed the retro spirit way past eleven to his ’90 from the ’90s’ payphone boombox.

Conspicuously mounted in the corner of his office, a rangefinder sets the phone to ringing when somebody walks by — a fantastic trap for luring the curious into a nostalgia trip. Anyone who picks up will be prompted to punch in a code from the attached mini-phone book and those who do will be treated to one of ninety hits from — well —  the 1990’s. All of the songs have been specifically downgraded to 128kbps for that authentic 90’s sound — complete with audio artifacts. There’s even a little easter egg wherein hitting the coin-return lever triggers the payphone to shout “Get a job!”

[Fuzzy-Wobble] notes that a payphone bracket is indispensable as most all payphones are made of cast iron, and nobody likes holes ripped out of their walls due to improper mounting. They’ve also provided their code as well as links to other tutorials for aspects of the build — such as the Adafruit music maker — throughout. Now you’ll have to excuse us as we groove while lost in a reverie.

Kick it back an extra decade and you get an 80’s boombox bluetooth speaker.

[Thanks for the submission, Alex S!!]


Filed under: phone hacks
Hack a Day 02 Dec 03:00

Cheap Dual Mirror Laser Projector

[Stanley] wanted to make a laser projector but all he could find online were one’s using expensive galvanometer scanners. So instead he came up with his own solution that is to be admired for its simplicity and its adaptation of what he could find.

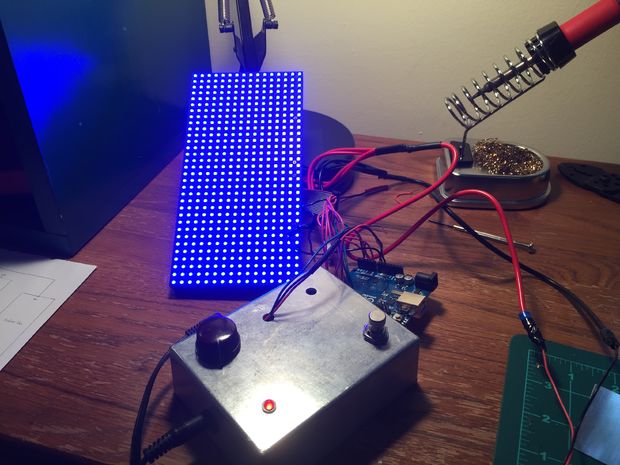
At its heart is an Arduino Uno and an Adafruit Motor Shield v2. The green laser is turned on and off by the Arduino through a transistor. But the part that makes this really a fun machine to watch at work are the two stepper motors and two mirrors that reflect the laser in the X and Y directions. The mirrors are rectangles cut from a hard disk platter, which if you’ve ever seen one, is very reflective. The servos tilt the mirrors at high speed, fast enough to make the resulting projection on the wall appear almost a solid shape, depending on the image.

He’s even written a Windows application (in C#) for remotely controlling the projector through bluetooth. From its interface you can select from around sixteen predefined shapes, including a what looks like a cat head, a heart, a person and various geometric objects and line configurations.

There is a sort of curving of the lines wherever the image consists of two lines forming an angle, as if the steppers are having trouble with momentum, but that’s probably to be expected given that they’re steppers controlling relatively large mirrors. Or maybe it’s due to twist in the connection between motor shaft and mirror? Check out the video after the break and let us know what you think.

The video’s in three parts: looking at the laser beams in action as you’d see them on a dance floor, then watching the projected images while looking at an insert of the Windows application, and then watching the steppers and mirror doing their rapid movements.

As for the expensive galvanometer scanners we mentioned above, check out this impressive laser projector that uses them. Another method is to use a spinning wheel with mirrors set to different angles, like this one that draws a marquee using a pill box as the wheel. And how about one with no mirrors at all, instead attaching the laser directly to servo motors, though that one does take longer to draw.


Filed under: laser hacks

Control an LED display with your electric guitar!

Have you ever wanted to have a light show that reacts to what you play through you’re favorite electric instrument? Georgia Tech grad student Wil Roberts has, and so he created a guitar-controlled LED display–an impressive project that combines both his Maker and musical chops.

To accomplish this, Roberts used an Arduino Uno along with an Adafruit 16×32 RGB LED matrix panel that responds to the guitar’s signal. The bottom rows are always blue, while the top ones progress from green to red the louder he shreds. The top rows remain red depending on the length of the note being played.

Want one of your own? Roberts has made all of the display’s circuitry and code available on Instructables. In the meantime, be sure to see it in action below!

Beware Of Tall Grass: Pokemon Go on the Gameboy Pocket

[Pepijn de Vos] was excited to interact with the world’s most popular augmented reality pedometer, Pokemon Go, and was extremely disappointed to find that his Blackberry couldn’t run it. Still, as far as he could tell from behind his wall of obsolete technology, Pokemon Go is all about walking distractedly, being suspicious, and occasionally catching a Pokemon. That should be possible.

Not a stranger to hacking Pokemon on the Gameboy, [Pepijn] put together a plan. Using his TCPoke module, he took it a step further. Rather than just emulating the original gameboy trade signals over the internet, he hacked a Pokemon Red ROM with some custom Z80 assembly to add some features to the Cable Club in the game.

After some waiting for the delivery man to bring a flashable cartridge and along with some Arduino code, he could now translate the steps he took in the game to his steps in the real world. Well, mostly. He could pick the location where he would like to catch a Pokemon. The character stands there. Somewhere around 100m the game will trigger a random pokemon battle.

[Pepijn] is now no longer a social outcast, as you can see in the video after the break. On a simple trip to the grocery store he caught two Pokemon!


Filed under: handhelds hacks, nintendo gameboy hacks

Get the party started with these coke bottle lights

With school just about out for the summer, Brian Fitzgerald’s son was throwing a party to celebrate the end of exam week. Like any cool Maker dad would, he decided to build awesome lights made out of a few old soda bottles, the “gooey innards” of glow sticks, and some other supplies he had lying around the basement.

Fitzgerald used a wooden plate for the base and a playground post bracket for the mount, along with an Arduino Leonardo (though any Arduino would do) and three NeoPixel rings for the colorful effects.

Fill the Coke bottles with water. Alternatively, you can add a drop of milk to get a cloudy effect — it makes the liquid translucent and gives the impression of solid light, but you loose the little bubble and scratch effects that clear water highlights, which we thought was cooler. We put a black Sugru cap on the bottles to avoid a drunken accident involving water and electronics. And filled the countersunk bolt holes with Sugru to hide the bolt heads as well.

I attached the plastic Arduino casing with double-sided velcro to the base unit for easy removal. It’d look nicer if I’d put the whole unit inside the base, but as we’re planning to pull the board out and modify for music sensitivity, I opted for convenience over beauty. If anybody has any cool Arduino code that gets an Adafruit auto-gain mic and NeoPixels jamming via FFT, I’d love to see it. There are some great color organ projects out there, but I can’t seem to find this particular combo. So we may have to write it ourselves!

Plug the 9v wall wart into the Arduino and BOOM. You got yourself a classic party light that’s mesmerizing to look at, throws patterns on the ceiling that look like Hubble images of distant nebulae, a fine conversation piece, and a bunch of cast off junk transformed into a thing of beauty.

Intrigued? You can check out the entire project on Instructables, as well as see it in action below.


Colorful Fan and LED Controller for 3D Printer

[Dave] just couldn’t take the ambient noise from his Lulzbot Mini anymore, so he built a fancy fan controller for it.

He measured some points on the printer’s Rambo controller board to see what actually got hot during a print. The hottest components were the motor drivers, so he taped a thermistor to them. He also placed one in the printer’s power supply. He replaced the main fan with a low noise model from Noctua (which have the most insanely fancy packaging you could imagine for a computer fan). The software on an Arduino Nano now idles the fan at an inaudible 650RPM, if an unacceptable temperature increase is detected, it increases the fan speed for a period, keeping everything nice and quietly cool.

The graphics display was added because, “why not?” A classic reason. The graphics runs on a hacked version of Adafruit’s library. It took him quite a while to get the graphics coded, but they add that extra bit of high-tech flair to keep the cool factor of the 3d printer up before they become as ubiquitous as toasters in the home. The code, fritzing board layout, 3D models, and a full build log is available at his site.


Filed under: 3d Printer hacks

Build an Arduino-Powered Candy Vending Machine

With some simple programming and a few basic parts, you can rig up a candy vending machine that slides sweets toward you at the push of a button.

Read more on MAKE

The post Build an Arduino-Powered Candy Vending Machine appeared first on Make: DIY Projects, How-Tos, Electronics, Crafts and Ideas for Makers.