Posts with «3d printing» label

5 Projects Fit for a Pokemon Go Master

Do you want to be the very best? Do you want to become a Pokemon Go master? Then here are 5 projects to help you level up and catch 'em all.

Read more on MAKE

The post 5 Projects Fit for a Pokemon Go Master appeared first on Make: DIY Projects and Ideas for Makers.

Star Track is an Arduino-powered star pointer and tracker

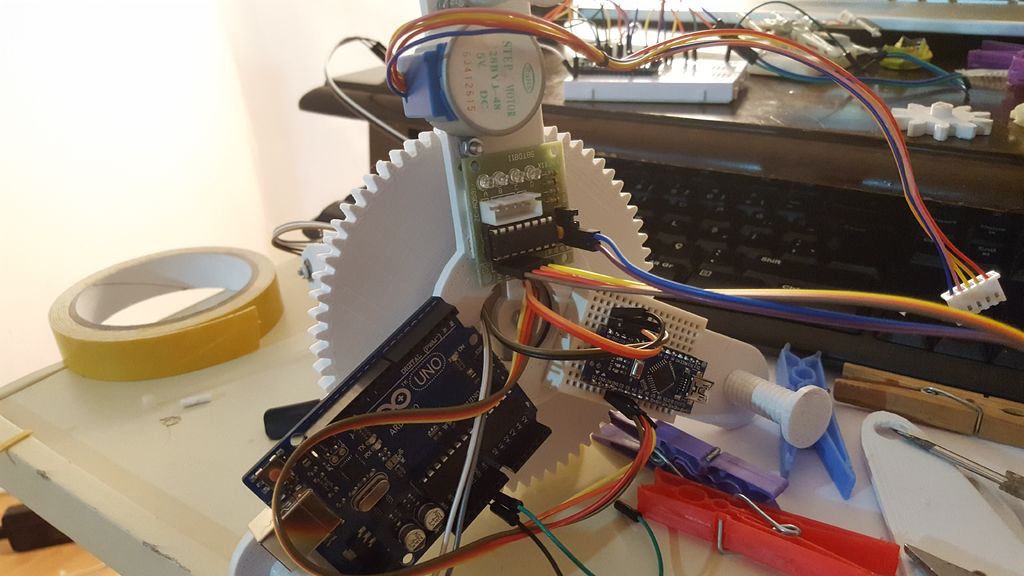
Maker and astronomy enthusiast Görkem Bozkurt has built a GoTo telescope mount-inspired system that points and tracks any object in the sky using its celestial coordinates. The aptly named Star Track sports a 3D-printed structure along with a pair of Arduinos (an Uno and Nano), a gyroscope, an RTC module, two low-cost 5V stepper motors, and a laser pointer.

Many computerized telescopes have a type of telescope mount and related software which can automatically point a telescope to astronomical objects that the user selects. Called GoTo mounts. Like a standard equatorial mount, equatorial GoTo mounts can track the night sky by driving the right-ascension axis. Since laser pointers are a perfect way to point stars, I thought a laser pointer with a GoTo mount would be a perfect tool for locating stars and to track them.

First I had to design a two-axis mount.

1. 360-degree rotating axis for RA
2. A up-down axis for DEC

After aligning the RA axis with the North Celestial Pole, an Arduino connected with an RTC should be able to calculate and track RA with sidereal time. And you can adjust the two axes to the user input from a computer via serial.

But first I had to find a way to precisely point the mount to given degrees. The main idea was to use step motors and give them a specific step to take. But after a few tests that was not totally accurate.

Instead, I used a gyroscope placed on the laser pointer to track the degrees on the two axes, this way I was able to send a command to the step motor to start and stop the movement if necessary.

Intrigued? Bozkurt provides a basic overview of positional astronomy on his project page, along with all of Star Track’s 3D files, code and assembly instructions.

Our Journey in Building a Glove-Controlled Robotic Gripper

Graham and Sam worked together to create a robotic gripper controlled with a glove and strong enough to hold household items.

Read more on MAKE

The post Our Journey in Building a Glove-Controlled Robotic Gripper appeared first on Make: DIY Projects and Ideas for Makers.

Grab things with an Arduino robotic gripper

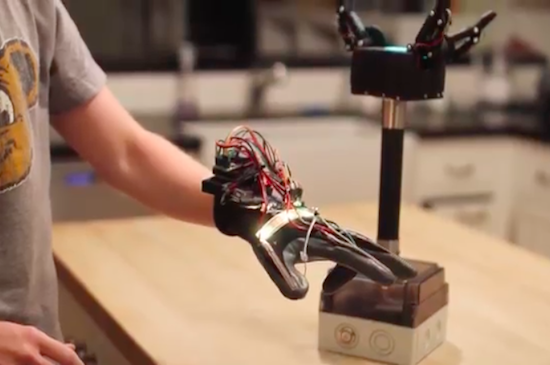
Sam Baumgarten and his friend have developed a pretty rad robotic gripper with the help of Arduino and 3D printing. The gripper itself consists of three large hobby servos joined to the fingers with a linkage. The underactuated fingers have a force sensor under each contact point, while the control glove is equipped with tiny vibrating motors at the fingertips. This, of course, provides haptic feedback to ensure that the user doesn’t crush anything–the greater the pressure, the stronger the motors vibrate.

The gripper is mounted to a handle with abrasive tape–the same kind found on staircases and skateboards. The tape is also used on each finger for optimal gripping. A box at the base of the pole houses all of the electronics, which include an Arduino Pro Mini for controlling the addressable LEDs on top, another Arduino for handling the communication and fingers, and a battery for power.

Aside from the vibration motors, the glove features flexible resistors on the back of the fingers, an LED strip for visualization, a breakout board for measuring the resistance from the flex sensors, a battery, an Arduino Uno for processing, and an XBee module for transmitting the signals to the Arduino in the gripper.

If you think this sounds awesome, wait until you see it in action. Baumgartnen has shared a demo of the project, along with a detailed breakdown of his build. Kudos to Hackaday for finding this incredible piece of work!

Kniterate is a 3D printer for clothes

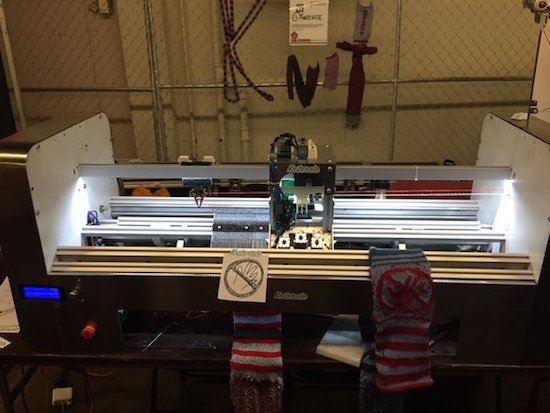
Why head to the store when you could simply create your outfits right at home with the touch of a button? That’s the idea behind London-based startup Kniterate, who has developed what they’re calling “the 3D printer for knitwear.”

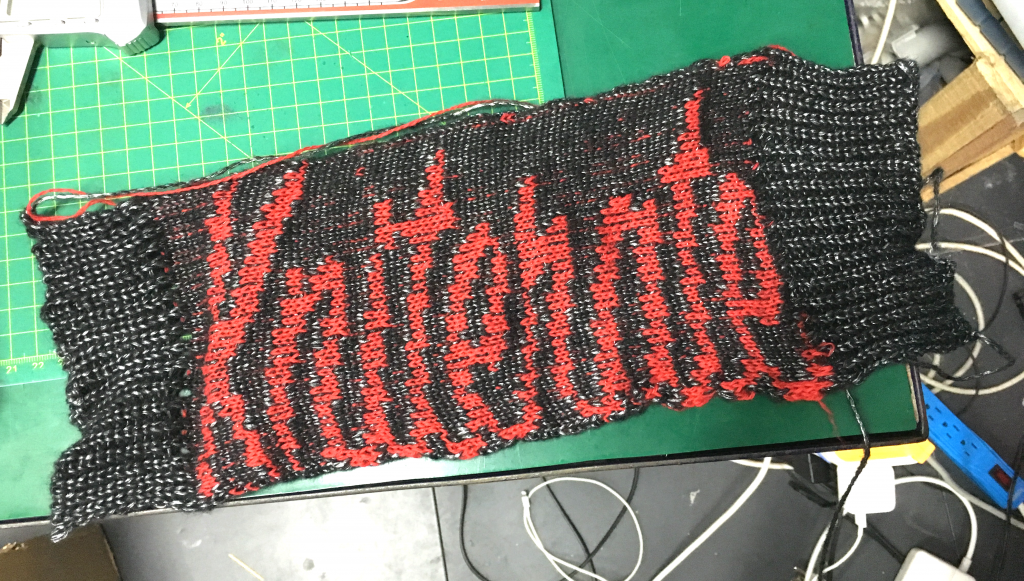
The system features Photoshop-like software that enables Makers to easily design patterns using various templates, which are then imported over to the Arduino Mega-driven machine to knit socks, scarves, sweaters, ties, beanies, and other garments. According to the team, they are in the process of developing an online platform that’ll allow you to sketch and share your wardrobe with an entire community.

Kniterate, which was recently introduced at HAX’s demo day, is an evolution of founder Gerard Rubio’s Arduino-controlled OpenKnit project. His vision is to one day democratize textile manufacturing, and will take the next step in that journey when he launches the new age machine on Kickstarter in September. Until then, head over to its website here or watch Tested’s Maker Faire video below!


Draw images and words in falling water

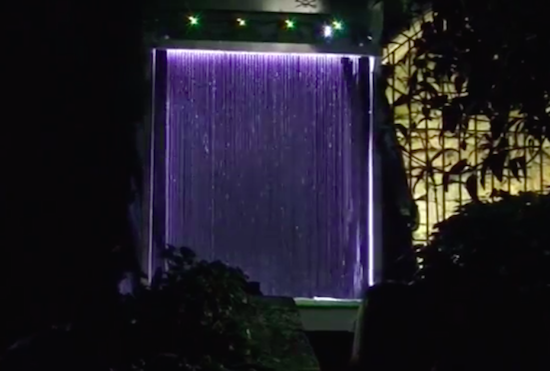
The Base42 team, which is part of the hacking community Tecnoateneu Vilablareixhas created a stunning water curtain with the help of 3D printing and Arduino. The installation, currently on display at the Temps de Flors flower show in Girona, uses 128 3D-printed nozzles and 64 3D-printed valves to dispense water in floral patterns.

The water curtain employs four Arduino Nanos to control the valves, which work in pairs to draw the flowers, words or other images. Meanwhile, an Arduino Mega provides a Wi-Fi connection to issue commands.

In terms of its mechanics, a tank at the base holds 500 liters of water, while a pump pushes that water to the top of the system at a rate of 80 liters per minute. From there, the water passes down through the 3D-printed nozzles, forming what appears as a 3m x 2m fluid screen. To create different patterns in the curtain, the nozzles can quickly adjust the direction of the water to one of two nozzles in a pair.

Sci-fi masks glow to reflect Twitter sustainability trends

Twitter is not only a convenient way to consume daily news and converse with friends online, it has become an excellent platform for gaining insight on what’s important at any particular moment in time. With this in mind, Maker Chadwick John Friedman has decided to harness the social network’s data into web-connected physical representations with the help of Arduino and Temboo.

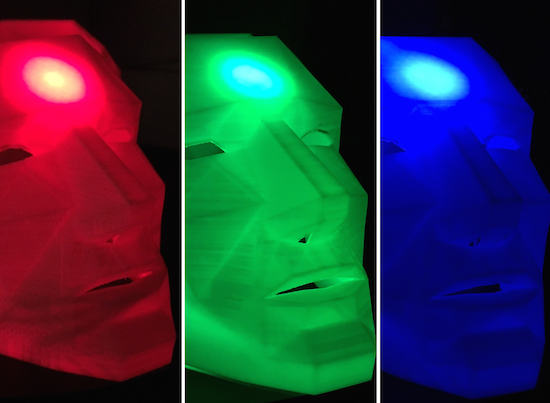
PrecogNation uses three 3D-printed geometric masks as real-time sci-fi future forecasters, which illuminate and change colors to reflect sustainability trends throughout the world.

The three geometric 3D-printed masks are wirelessly connected to the Internet via an Arduino Yún. The masks were printed using a Zortrax 3D printer and white Z-ABS filament. The masks are a remixed version of Stephen Kongsle’s “Low Poly Mask.” Each mask took approximately 16 hours to print. The masks are constantly scraping data from Twitter in real-time via Temboo Choreos. Temboo assigns special API keys for Arduino devices that allow the user grab real-time data from Twitter that would otherwise be difficult to gather. That live data is then fed to the Arduino Yún, which illuminates a specific 10mm super bright LED, connected to the masks.

One of the largest challenges in representing this overload of data physically was finding the correct terms and/or keywords that activate a specific color/thought in the Precog’s faces. The three colors present in the faces are scraping the Twitterverse for terms relating to sustainability, environmental threats, and political involvement. PrecogNation has its very own Twitter account, which allows the masks to scan through data specifically submitted by sustainability related users, corporations, and initiatives.

As seen in the video below, progress in sustainable development (green) is represented by keywords such as renewable energy, clean coal, water treatment and wind turbines. Threats to sustainability (red) include deforestation, global warming, record heat, extinction, pollution, pandemics and so on. Meanwhile, blue denotes an overload of data and contradicting results.

The overload of data in the color blue works like this… say the word ‘polar’ is found, but then the words ‘melting-polar’ are found, followed by the words ‘polar bear.’ This is an unreadable thread of information – it’s not really giving us threats or progress related to sustainability so the face reflects the color blue to signify that confusion. Coming up with the correct terms to represent the overload of information was especially tricky, and writing the code to reflect that confusion was equally as challenging. I eventually found a series of keywords and demands that elicited the response I was hoping for in this category.

It is important to highlight the fact that although the colors red and blue may be perceived as negative (and usually appear more than the color green), they also mean that there are discussions about those negative sustainability issues happening every time those colors are activated. This is, in fact, a positive outcome, as one of the main goals of this project is to highlight the importance maintaining a dialogue – even if that dialogue surrounds daunting threats to sustainability. It is important that the masks provoke a highlighted continuation of focus surrounding social and political sustainability issues.

You can read all about the project on PrecogNation’s page.

Retrofit your old appliances with new controls

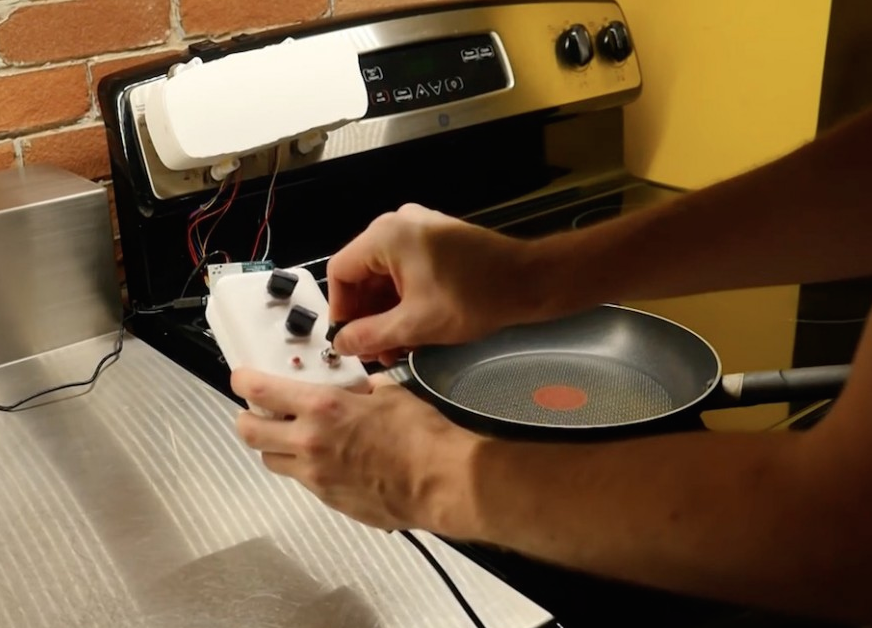
Unfortunately, home appliances aren’t a one-size-fits-all sort of thing. What works for some may not always work so well for others. With this in mind, Raf Ramakers and the Autodesk Research team have developed a system that will enable you to retrofit your everyday devices with new controls that better suit your needs. RetroFab provides even the most non-tech-savvy users with a design and fabrication environment through which they can easily repurpose their existing physical interfaces with the help of 3D scanning, printing and basic electronics.

We present RetroFab, an end-to-end design and fabrication environment that allows non-experts to retrofit physical interfaces. Our approach allows for changing the layout and behavior of physical interfaces. Unlike customizing software interfaces, physical interfaces are often challenging to adapt because of their rigidity. With RetroFab, a new physical interface is designed that serves as a proxy interface for the legacy controls that are now operated using actuators. RetroFab makes this concept of retrofitting devices available to non-experts by automatically generating an enclosure structure from an annotated 3D scan. This enclosure structure holds together actuators, sensors as well as components for the redesigned interface. To allow retrofitting a wide variety of legacy devices, the RetroFab design tool comes with a toolkit of 12 components.

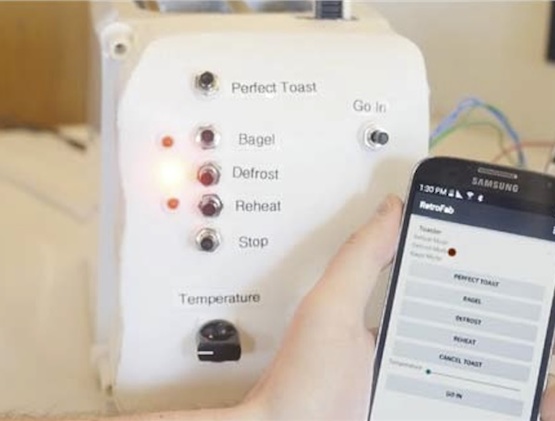
After loading the 3D scan, you can highlight and select the device’s controls on the model. The system then creates a 3D-printable rendering and offers redesign suggestions. From there, RetroFab automatically generates a housing that fits over the original interface and holds a series of actuators, motors, LEDs and other components, which are all connected to an Arduino.

The individual Arduino microcontrollers that control the enclosure structures run a generic firmware that handles the GPIO pins as well as the wireless communication. Even for retrofitted devices that do not intercommunicate, user input and sensor data from the retrofitted interface is first transmitted from the Arduino microcontroller to the central PC. This module then decides to turn on specific RetroFab actuators and sensors, controlled by the same or a different Arduino microcontroller. This approach makes it possible to change the behavior and interconnect retrofitted devices even after the design and fabrication is completed.

Using its accompanying mobile app, RetroFab also lets you easily interconnect and remotely control your gadgets — whether it’s setting the time on a retrofitted alarm clock or turning off a light switch right from your phone. You can read all about the project in its paper here, or watch the video below.

Can Your Really 3D Print a Working Robotic Lawnmower?

Need the lawn mowed? Print out a robotic lawnmower. Have a big yard? Print two?

Read more on MAKE

The post Can Your Really 3D Print a Working Robotic Lawnmower? appeared first on Make: DIY Projects and Ideas for Makers.

15 Fantastic Project Enclosures

Fight the drab tyranny of the beige box with these inspiring ideas for project enclosures

Read more on MAKE

The post 15 Fantastic Project Enclosures appeared first on Make: DIY Projects and Ideas for Makers.