

Experimenting with MAX6955
MAX6955 is an interesting LED driver chip. It is the primordial charlieplexing device, being the materialization of a technique invented by Charlie Allen of Maxim Integrated. Without understanding how charelieplexing works, it is actually counter-intuitive to wire multiple (up to 8) 16-segment displays to such a driver chip. Fortunately, Maxim has great documentation on how to do it.
My experimenting actually started with MAX6954. After many failed tries due to SPI issues (Maxim uses a special interpretation of the protocol, I read), I switched to MAX6955.
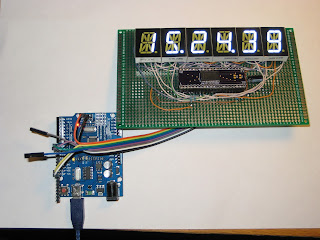
MAX6955 is the I2C sibling of MAX6954 (which uses SPI). They both have identical LED driving abilities, only the microcontroller interface part of the chips differ. Once, both chips were available in DIP-40 package. Now, MAX6955 only comes in SSOP-36 (MAX6954 is still available in DIP-40). Luckily, the pin configurations for the two chips are compatible, which allows for easy swap. For this reason, I designed a breakout board (shared at oshpark), so I can use the same setup I built for MAX6954.

Beside Maxim's, there isn't much documentation on how to control these chips. One of the reasons they are rarely used by hobbyists is probably their price (about $20 at digikey), although in the same range as the wildly popular MAX72xx LED driver (available at around $10 from digikey). In "reality", for some reason, MAX72xx could be had for $1 or less on ebay, unlike MAX6954/6955. Therefore, a hobby kit designed around MAX6955 would be "extremely" expensive compared with others using different LED driving chips (e.g. MAX72xx).
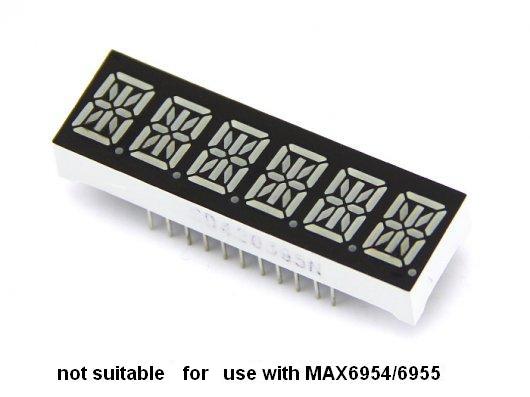
MAX6954/6955 was designed to drive common cathode LED displays, like MAX72xx. But unlike MAX72xx, it cannot be used for displays with common segments (which require multiplexing), like the ones below (and used here). MAX6954/6955 requires the 14/16-segment displays to be single digit/character, because not all segments will be wired together.

Below is the Arduino sketch I wrote that works very well with MAX6955. Although it uses a minimal set of commands, it is capable of displaying a character at a given position, light up the dot, and even scroll a long message.
#include "Wire.h"
#define ID_MAX6955 B1100000
#define NUM_DISPLAYS 6
#define max6955_reg_decodeMode 0x01
#define max6955_reg_globalIntensity 0x02
#define max6955_reg_scanLimit 0x03
#define max6955_reg_configuration 0x04
#define max6955_reg_displayTest 0x07
#define max6955_reg_digitType 0x0C
int writeMAX6955(char command, char data)
{
Wire.beginTransmission(ID_MAX6955);
Wire.write(command);
Wire.write(data);
Wire.endTransmission();
}
void initMAX6955()
{
Wire.begin();
// ascii decoding for all digits;
writeMAX6955(max6955_reg_decodeMode, 0xFF);
// brightness: 0x00 = 1/16 (min on) 2.5 mA/seg;
// 0x0F = 15/16 (max on) 37.5 mA/segment
writeMAX6955(max6955_reg_globalIntensity, 0x07);
// active displays: 0x07 -> all;
writeMAX6955(max6955_reg_scanLimit, 0x07);
// set normal operation;
writeMAX6955(max6955_reg_configuration, 0x01);
// segments/display: 0xFF=14-seg; 0=16 or 7-seg;
writeMAX6955(max6955_reg_digitType, 0x00);
// display test off;
writeMAX6955(max6955_reg_displayTest, 0x00);
}
void setup()
{
// set D8 and D9 to GND (for I2C address);
pinMode(8, OUTPUT);
pinMode(9, OUTPUT);
digitalWrite(8, LOW);
digitalWrite(9, LOW);
initMAX6955();
delay(100);
clear();
// writeDisplay("HI");
// writeChar(0, 'A', true);
// scrollDisplay(" HELLO WORLD", 300);
writeTime(15, 24, 39);
}
void loop()
{
}
void writeDisplay(char* msg)
{
for (byte i=0; i < NUM_DISPLAYS; i++)
{
if (i < strlen(msg))
writeMAX6955(0x25-i, msg[i]);
else
writeMAX6955(0x25-i, ' ');
}
}
void writeChar(byte pos, char letter, boolean dotLit)
{
writeMAX6955(0x25-pos, (dotLit? 0x80 : 0) | letter);
}
void clear()
{
for (byte i=0; i < NUM_DISPLAYS; i++)
writeMAX6955(0x25-i, ' ');
}
void scrollDisplay(char* msg, int delayMs)
{
for (int i=0; i<=strlen(msg); i++)
{
writeDisplay(msg+i);
delay(delayMs);
}
}
void writeTime(int hours, int minutes, int seconds)
{
char h1 = (hours/10)? '0' + hours/10 : ' ';
writeChar(0, h1, false);
char h2 = '0' + (hours%10);
writeChar(1, h2, true);
char m1 = '0' + (minutes/10);
writeChar(2, m1, false);
char m2 = '0' + (minutes%10);
writeChar(3, m2, true);
char s1 = '0' + (seconds/10);
writeChar(4, s1, false);
char s2 = '0' + (seconds%10);
writeChar(5, s2, false);
}
The I2C address of B1100000 was set by grounding AD0 and AD1 (see table 5 in the datasheet on how to change that address). In my setup, these 2 pins are connected to D8 and D9. Don't forget to pull-up SDA and SCL with 4k7-10k resistors.
The left-most digit is at position 0, accessible at address 0x25. "Digit 1" is the second from left, accessible at address 0x24, and so on. This is determined by the wiring. In my case, "CC0" (in the table 1 of this application note) represents the right-most display, and it is accessible at address 0x20.


My experimenting actually started with MAX6954. After many failed tries due to SPI issues (Maxim uses a special interpretation of the protocol, I read), I switched to MAX6955.
MAX6955 is the I2C sibling of MAX6954 (which uses SPI). They both have identical LED driving abilities, only the microcontroller interface part of the chips differ. Once, both chips were available in DIP-40 package. Now, MAX6955 only comes in SSOP-36 (MAX6954 is still available in DIP-40). Luckily, the pin configurations for the two chips are compatible, which allows for easy swap. For this reason, I designed a breakout board (shared at oshpark), so I can use the same setup I built for MAX6954.

Beside Maxim's, there isn't much documentation on how to control these chips. One of the reasons they are rarely used by hobbyists is probably their price (about $20 at digikey), although in the same range as the wildly popular MAX72xx LED driver (available at around $10 from digikey). In "reality", for some reason, MAX72xx could be had for $1 or less on ebay, unlike MAX6954/6955. Therefore, a hobby kit designed around MAX6955 would be "extremely" expensive compared with others using different LED driving chips (e.g. MAX72xx).
MAX6954/6955 was designed to drive common cathode LED displays, like MAX72xx. But unlike MAX72xx, it cannot be used for displays with common segments (which require multiplexing), like the ones below (and used here). MAX6954/6955 requires the 14/16-segment displays to be single digit/character, because not all segments will be wired together.
Below is the Arduino sketch I wrote that works very well with MAX6955. Although it uses a minimal set of commands, it is capable of displaying a character at a given position, light up the dot, and even scroll a long message.
#include "Wire.h"
#define ID_MAX6955 B1100000
#define NUM_DISPLAYS 6
#define max6955_reg_decodeMode 0x01
#define max6955_reg_globalIntensity 0x02
#define max6955_reg_scanLimit 0x03
#define max6955_reg_configuration 0x04
#define max6955_reg_displayTest 0x07
#define max6955_reg_digitType 0x0C
int writeMAX6955(char command, char data)
{
Wire.beginTransmission(ID_MAX6955);
Wire.write(command);
Wire.write(data);
Wire.endTransmission();
}
void initMAX6955()
{
Wire.begin();
// ascii decoding for all digits;
writeMAX6955(max6955_reg_decodeMode, 0xFF);
// brightness: 0x00 = 1/16 (min on) 2.5 mA/seg;
// 0x0F = 15/16 (max on) 37.5 mA/segment
writeMAX6955(max6955_reg_globalIntensity, 0x07);
// active displays: 0x07 -> all;
writeMAX6955(max6955_reg_scanLimit, 0x07);
// set normal operation;
writeMAX6955(max6955_reg_configuration, 0x01);
// segments/display: 0xFF=14-seg; 0=16 or 7-seg;
writeMAX6955(max6955_reg_digitType, 0x00);
// display test off;
writeMAX6955(max6955_reg_displayTest, 0x00);
}
void setup()
{
// set D8 and D9 to GND (for I2C address);
pinMode(8, OUTPUT);
pinMode(9, OUTPUT);
digitalWrite(8, LOW);
digitalWrite(9, LOW);
initMAX6955();
delay(100);
clear();
// writeDisplay("HI");
// writeChar(0, 'A', true);
// scrollDisplay(" HELLO WORLD", 300);
writeTime(15, 24, 39);
}
void loop()
{
}
void writeDisplay(char* msg)
{
for (byte i=0; i < NUM_DISPLAYS; i++)
{
if (i < strlen(msg))
writeMAX6955(0x25-i, msg[i]);
else
writeMAX6955(0x25-i, ' ');
}
}
void writeChar(byte pos, char letter, boolean dotLit)
{
writeMAX6955(0x25-pos, (dotLit? 0x80 : 0) | letter);
}
void clear()
{
for (byte i=0; i < NUM_DISPLAYS; i++)
writeMAX6955(0x25-i, ' ');
}
void scrollDisplay(char* msg, int delayMs)
{
for (int i=0; i<=strlen(msg); i++)
{
writeDisplay(msg+i);
delay(delayMs);
}
}
void writeTime(int hours, int minutes, int seconds)
{
char h1 = (hours/10)? '0' + hours/10 : ' ';
writeChar(0, h1, false);
char h2 = '0' + (hours%10);
writeChar(1, h2, true);
char m1 = '0' + (minutes/10);
writeChar(2, m1, false);
char m2 = '0' + (minutes%10);
writeChar(3, m2, true);
char s1 = '0' + (seconds/10);
writeChar(4, s1, false);
char s2 = '0' + (seconds%10);
writeChar(5, s2, false);
}
The I2C address of B1100000 was set by grounding AD0 and AD1 (see table 5 in the datasheet on how to change that address). In my setup, these 2 pins are connected to D8 and D9. Don't forget to pull-up SDA and SCL with 4k7-10k resistors.
The left-most digit is at position 0, accessible at address 0x25. "Digit 1" is the second from left, accessible at address 0x24, and so on. This is determined by the wiring. In my case, "CC0" (in the table 1 of this application note) represents the right-most display, and it is accessible at address 0x20.
[original story: Wise time with Arduino]