

Embed with Elliot: I2C Bus Scanning
A lot of great ICs use I2C to communicate, but debugging a non-working I2C setup can be opaque, especially if you’re just getting started with the protocol/bus. An I2C bus scanner can be a helpful first step in debugging an I2C system. Are all the devices that I think should be present actually there and responding? Do they all work at the bus speed that I’m trying to run? If you’ve got an Arduino or Bus Pirate sitting around, you’re only seconds away from scanning your I2C bus, and answering these questions.
The Lowdown: I2C in Brief
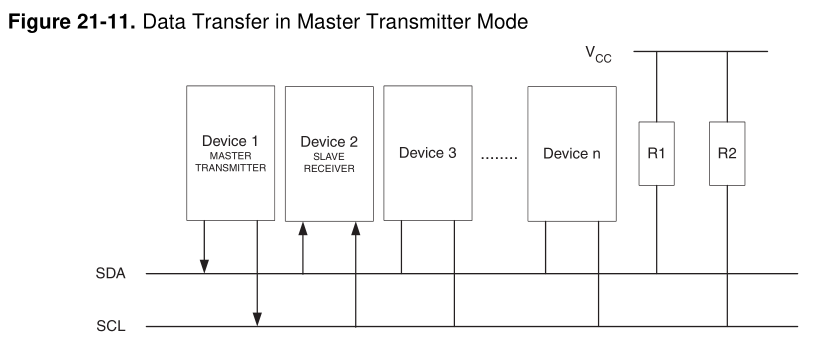
I2C is a two-wire (plus ground) communications bus and protocol. The physical layer is just two signal wires: a clock line (SCL) that’s controlled by the master, and a data line (SDA) that can be controlled by either the master or the addressed slave unit. Data is always read on the SDA line when the clock is high, and a new value is established while the clock is low. The two exceptions to this rule are the stop and start signals, where the master is allowed to raise and drop the data line while the clock is still high. Because this change shouldn’t ever happen during data transfer, the stop and start signals are easy to detect.

All data is sent in eight-bit packets and each packet is acknowledged by the recipient, whether master or slave. To start up a conversation, the master sends the start signal and then the seven-bit address of the slave device that it wants to speak to. The eighth bit in the master’s first packet tells the slave whether the master is going to transmit more data (a “write” command, a zero) or whether the master is requesting data back from the slave (a “read” value, a one).
After the eight bits are sent, the slave is required to acknowledge receipt by pulling the data line low. This acknowledge signal is exactly what the I2C bus scanning software will need to look for in order to detect a chip with the given address on the bus.
There are, of course, a lot more complicating details to I2C. For instance, there are a whole range of permissible clock speeds at which the transmissions can take place: ranging from the default 100kHz data rate, through 400kHz “fast mode”, 1MHz “fast mode plus”, and up as far as 5MHz “ultra-fast mode”. (We await the 10MHz “super-duper, really-really-fast mode” with baited breath.) And since the bus is clocked by the SCL line, almost any slower data rate up to the maximum allowed will work just fine.
 The physical lines are pulled up to a logic-high voltage level by pullup resistors, and the devices signal low by pulling the line down. This means that the voltage transitions can be a little blurry, especially on long runs or other situations where the line itself capacitively couples to the circuit. These physical factors will play a role in determining how fast you can send signals on the I2C bus, and you may need to fine-tune the pullup resistors in your particular system.
There are a surprisingly large number of other ways that things can go wrong on an I2C bus, so it’s great to be able to start debugging at the very beginning — is the slave even getting my first (address) packet at the speed I’m sending? Hence the utility of an I2C scanner.
A Scanner
A first cut at an I2C bus scanner, then, can be made by just cycling through all 127 possible slave device addresses, and checking whether or not they acknowledge. Next, you might want to re-run the same test at a bunch of different bus speeds, if you thought that you might be having troubles with signal rise- and fall-times. Finally, and we’ve never seen this implemented, it might be cool to have a database of common I2C slave device addresses so that the scanner itself can report back which particular chips it’s found.
For t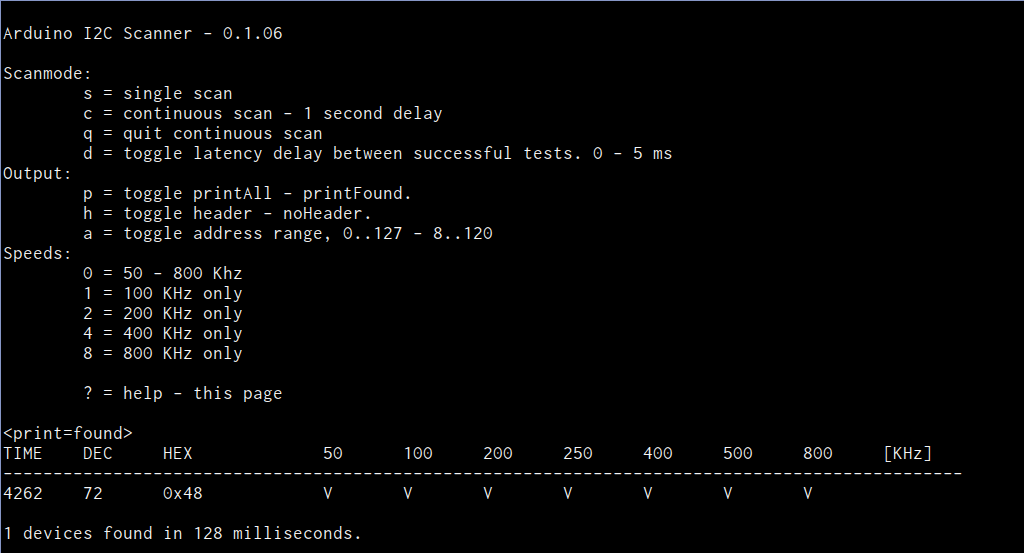 he Arduino, the most featureful scanner we’ve seen is posted on the Arduino forums, with the code hosted on Github, in the “sketches/MultiSpeedI2CScanner” folder. It actually does everything that we’d want in a simple scanner: scans the entire bus at different speeds and plots the results out nicely over the serial port for perusal on your computer. It’s configured to do a full scan on reboot. Type “ps” to print only the found devices and start a scan. Bam!
 The one caveat with the Arduino scanner is that if you’ve neglected to connect pullup resistors on the SDA and SCL lines (we would never!) the scanner seems to hang somewhere when running at 800kHz. We suspect it’s waiting to become bus master and just gets stuck; we wonder why there’s not a timeout in the twi_writeTo() function in the Arduino “twi.c” library. (Anyone have a good guess?) Other speed modes worked just fine, and everything was peachy again after adding a 10k pullup resistor to SDA.
Naturally, the Bus Pirate (the swiss-army knife of serial communications) will do an I2C scan. It only runs one frequency at a time, but it’s quick enough that you can step through them all in short order. It’s got a quirk, or maybe a feature; it treats the read/write bit as part of the address, so it will test each chip in both directions. Enter the I2C mode, set the desired speed and pullup/power options, and finally type “(1)” for option 1: 7-bit address search. You should see all the devices that responded on the bus listed out for you.
Writing your own code to do a scan is surprisingly simple as well, if you know the chips you’re working with. Most microcontrollers’ dedicated hardware I2C interfaces will report error codes in a specific register. If you can figure out how to test for the “didn’t acknowledge after sending the address and data-direction packet” error, the code pretty much writes itself.
Going Further
Once you’ve got the basics verified — the slave responds when addressed at the desired speed — and your I2C setup still isn’t working, you’re on to debugging the harder problems. There are other tests you might like to do, but unfortunately they all run quickly into the slave-device specific command sets. For instance, many devices will receive a command to reply with a known device ID, or the contents of a default register, or similar. These are useful to make certain that you’ve got multi-byte commands working as expected.
If you suspect that you’re having problems with the signals not rising or falling fast enough, perhaps because you’ve seen chips respond at low speeds but not at higher ones during the scan above, you’re going to need an oscilloscope to actually probe out the analog voltages on the lines. Or try lower-value pullup resistors to speed up the rising edges and test again.
Harder to catch or infrequently occurring glitches on a multi-master I2C bus get really hard to track down really fast. But getting the simple stuff verified working first — all parts are on the addresses that you think they are — can get you set on the right path.
Good luck with your I2C projects! And if you’ve got any other useful I2C debugging tools or strategies up your sleeves, feel free to discuss in the comments.
Filed under: Hackaday Columns, Microcontrollers, peripherals hacks


[original story: Hack a Day]