Posts with «wireless» label

Why Have Only One Radio, When You Can Have Two?

There are a multitude of radio shields for the Arduino and similar platforms, but they so often only support one protocol, manufacturer, or frequency band. [Jan Gromeš] was vexed by this in a project he saw, so decided to create a shield capable of supporting multiple different types. And because more is so often better, he also gave it space for not one, but two different radio modules. He calls the resulting Swiss Army Knife of Arduino radio shields the Kite, and he’s shared everything needed for one on a hackaday.io page and a GitHub repository.

Supported so far are ESP8266 modules, HC-05 Bluetooth modules, RFM69 FSK/OOK modules, SX127x series LoRa modules including SX1272, SX1276 and SX1278, XBee modules (S2B), and he claims that more are in development. Since some of those operate in very similar frequency bands it would be interesting to note whether any adverse effects come from their use in close proximity. We suspect there won’t be because the protocols involved are designed to be resilient, but there is nothing like a real-world example to prove it.

This project is unique, so we’re struggling to find previous Hackaday features of analogous ones. We have however looked at an overview of choosing the right wireless tech.

Hack a Day 28 Jul 09:00

SPINES Design Makes for Modular Energy Harvesting

The SPINES (Self-Powered IoT Node for Environmental Sensing) Mote is a wireless IoT environmental sensor, but don’t let the neatly packed single PCB fool you into thinking it’s not hackable. [Macro Yau] specifically designed SPINES to be highly modular in order to make designing an energy harvesting sensor node an easier task. The way [Macro] sees it, there are two big hurdles to development: one is the energy harvesting itself, and the other is the software required to manage the use of every precious joule of that harvested energy.

[Macro] designed the single board SPINES Mote in a way that the energy harvesting portion can be used independently, and easily integrated into other designs. In addition, an Arduino library is being developed to make it easy for the power management to be done behind the scenes, allowing a developer to concentrate on the application itself. A solar-powered wireless sensor node is one thing, but helping people get their ideas up and running faster in the process is wonderful to see.

High-Effort Streaming Remote for Low-Effort Bingeing

There’s no limit to the amount of work some people will put into avoiding work. For instance, why bother to get up from your YouTube-induced vegetative state to adjust the volume when you can design and build a remote to do it for you?

Loath to interrupt his PC streaming binge sessions, [miroslavus] decided to take matters into his own hands. When a commercially available wireless keyboard proved simultaneously overkill for the job and comically non-ergonomic, he decided to build a custom streaming remote. His recent microswitch encoder is prominently featured and provides scrolling control for volume and menu functions, and dedicated buttons are provided for play controls. The device reconfigures at the click of a switch to support Netflix, which like YouTube is controlled by sending keystrokes to the PC through a matching receiver. It’s a really thoughtful design, and we’re sure the effort [miroslavus] put into this will be well worth the dozens of calories it’ll save in the coming years.

A 3D-printed DIY remote is neat, but don’t forget that printing can also save a dog-chewed remote and win the Repairs You Can Print contest.

Zigbee-Based Wireless Arduinos, Demystified

Hackday regular [Akiba] is working on a series of video tutorials guiding newbies into the world of the 802.15.4 wireless protocol stack — also known as ZigBee. So far, his tutorials include a “getting started with chibiArduino”, his own Arduino-based wireless library, as well as a more basic tutorial on how radio works.

[Akiba] already made a name for himself though a large number of wireless projects, including his Saboten sensor boards, which are ruggedized for long-term environmental monitoring. The Saboten boards use the same wireless stack as his Arduino-compatible wireless development boards, his Freakduino products. The latest version features an ATmega 1284P with 8x the RAM and 4x the flash of the older, 328P-based Freakduinos. It comes in both 900 MHz and 2.4 GHz and there’s also a special 900 Mhz “Long Range” variant. The boards include some great power-saving features, including switchable status LEDs and on-board battery regulation circuity allowing one to run a full year on two AA cells while in sleep mode. They also have a USB stick configuration that is great for Raspberry Pi projects and for running straight from the PC.

For more [Akiba] goodness, check out our colleague [Sophi]’s SuperCon interview with him as well as our coverage of his Puerto Rico lantern project.


Filed under: Wireless Hacks

Arduino Widens Wireless Offerings With Two New Boards

Today at World Maker Faire New York, Massimo Banzi took stage to unveil two new Arduino boards, the long-range radio (LoRa)-equipped MKR WAN 1300 and the cellular-capable MKR GSM 1400. 

Read more on MAKE

The post Arduino Widens Wireless Offerings With Two New Boards appeared first on Make: DIY Projects and Ideas for Makers.

Robot Hand Goes Wireless

We can’t decide if [MertArduino’s] robotic hand project is more art or demonstration project. The construction using springs, fishing line, and servo motors isn’t going to give you a practical hand that could grip or manipulate anything significant. However, the project shows off a lot of interesting construction techniques and is a fun demonstration for using nRF24L01 wireless in a project. You can see a video of the contraption, below.

A glove uses homemade flex sensors to send wireless commands to the hand. Another Arduino drives an array of servo motors that make the fingers flex. You don’t get fine control, nor any real grip strength, but the hand more or less will duplicate your movements. We noticed one finger seemed poorly controlled, but we suspect that was one of the homemade flex sensors going rouge.

The flex sensors are ingenious, but probably not very reliable. They consist of a short flexible tube, an LED and a light-dependent resistor. We’re guessing a lot of factors could change the amount of light that goes around a bent tube, and that may be what’s wrong with the one finger in the video.

We’d love to try this project using some conductive bag flex sensors. Although this hand doesn’t look like a gripper, we wondered if it could be used for sign language projects.


Filed under: wireless hacks

Cricket Scoreboard is a Big Win for Novice Hackers

The game of cricket boggles most Americans in the same way our football perplexes the rest of the world. We won’t even pretend to understand what a “wicket” or an “over” is, but apparently it’s important enough to keep track of that so an English cricket club decided to build their own electronic scoreboard for their – pitch? Field? Help us out here.

This scoreboard build was undertaken by what team member [Ian] refers to as some “middle-aged blokes from Gloucestershire” with no previous electronics experience. That’s tough enough to deal with, but add to it virtually no budget, a huge physical size for the board, exposure to the elements, and a publicly visible project where failure would be embarrassingly obvious, and this was indeed an intimidating project to even consider. Yet despite the handicaps, they came up with a great rig, with a laser-cut acrylic cover for a professional look. A Raspberry Pi runs the LED segments and allows WiFi connections from a laptop or phone in the stands. They’ve even recently upgraded to solar power for the system.

And we’ll toot our own horn here, since this build was inspired at least in part by a Hackaday post. The builders have a long list of other links that inspired or instructed them, and we think that says something powerful about the hacker community that we’ve all been building – a group with no previous experience manages a major build with the guidance of seasoned hackers. That’s something to feel good about.


Filed under: misc hacks, Raspberry Pi
Hack a Day 24 Jan 12:01

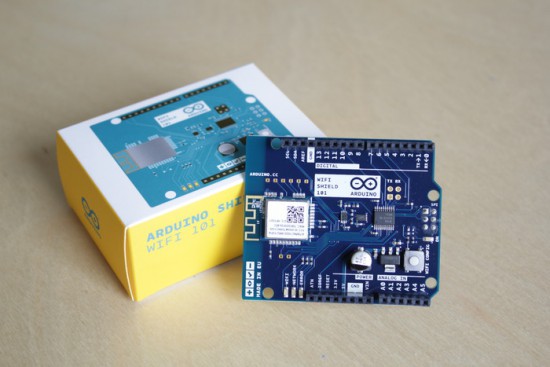
Arduino WiFi Shield 101 is now available in the US store!

We are excited to announce Arduino Wifi Shield 101 developed with Atmel is now available for purchase on the Arduino Store US (49.90$).

Arduino WiFi Shield 101 is a powerful IoT shield with crypto-authentication that connects your Arduino or Genuino board to the internet wirelessly. Connecting it to a WiFi network is simple, no further configuration in addition to the SSID and the password are required. The WiFI library allows you to write sketches which connect to the internet using the shield.

The shield is based on the Atmel SmartConnect-WINC1500 module, compliant with the IEEE 802.11 b/g/n standard. The WINC1500 module provided is a network controller capable of both TCP and UDP protocols.  The main feature is an hardware encryption/decryption security protocol provided by the ATECC508A CryptoAuthentication chip that is an ultra secure method to provide key agreement for encryption/decryption, specifically designed for the IoT market.

Last year, Massimo Banzi introduced the shield:

“In this increasingly connected world, the Arduino Wi-Fi Shield 101 will help drive more inventions in the IoT market. Expanding our portfolio of Arduino extensions, this new shield can flawlessly connect to any modern Arduino board giving our community more options for connectivity, along with added security elements to their creative projects.”

The WiFi Shield 101 is the first Arduino product fully supporting SSL and all the communication between your board and our secured server. With the power of the Arduino Zero and the WiFi Shield 101 it is possible to make secure IoT applications simply and just using the Arduino Language.

A working example and instructions on how to get started are available on Arduino Cloud, a work-in-progress project that gives you access to a pre-configured MQTT server for your IoT sketches using only your Arduino account. More examples and features will be available in the next months.

Feel like knowing more about the shield? Explore the  Getting Started guide.

Build a Sensor Network Around a Weather Station

[Yveaux] had a problem. The transmitter on his outdoor weather station had broken, rendering the inside display useless. He didn’t want to buy a new one, so, like the freelance embedded software designer that he is, he decided to reverse engineer the protocol that the transmitter uses and build his own. He didn’t just replace the transmitter module, though, he decided to create an entire system that integrated the weather system into a sensor network controlled by a Raspberry Pi. That’s a far more substantial project, but it gave him the ability to customize the display and add more features, such as synching the timer in the display with a network clock and storing the data in an online database.

Fortunately for [Yveaux], the transmitter itself was fairly easy to replace. The weather station he had, like most, transmitted on the 868MHz frequency, which is a license-free ISM (Industrial, Scientific and Monitoring) spot on the spectrum. After some poking around, he was able to figure out the protocol and teach the Pi to speak it. He then added a Moteino and an nRF2401+ transmitter to the weather station, so it can send data to the Pi, which then sends it to the display. It is a more complicated setup, but it is also much more flexible. He’s had it running for a couple of years now and has collected more than a million sensor readings.


Filed under: Arduino Hacks, wireless hacks

Hand Controlled Robot uses Accelerometer

What do orchestra conductors, wizards, and Leap controller users have in common? They all control things by just waving their hands. [Saddam] must have wanted the same effect, so he created a robot that he controls over wireless using hand gestures.

An accelerometer reads hand motions and sends them via an RF module to an Arduino. This is a bit of a trick, because the device produces an analog value and [Saddam] uses some comparators to digitize the signal for the RF transmitter. There is no Arduino or other CPU on the transmit side (other than whatever is in the RF module).

From the video, it looks like a natural way to control a robot as long as you don’t mind duct taping the transmitter to your hand. Of course, if you are a real hacking geek, you might even consider that an advantage as you can pretend you are working on becoming a cyborg.

[Saddam] spends some time talking about how the accelerometer works internally, and we’ve covered that before if you are curious. It turns out the devices aren’t as much electronic as we usually think of them, but mechanical.


Filed under: Android Hacks, robots hacks