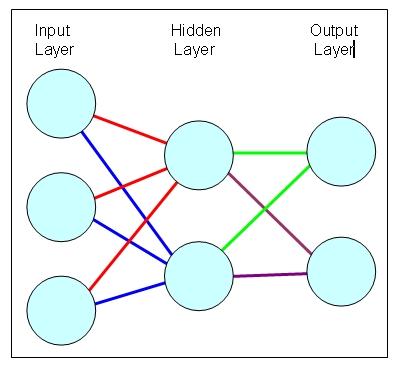
Neural Network (Part 2) : The Neuron
The Neuron


When you create a new Neuron, you have the option to create the basic neuron shell with the Neuron() constructor, however, you are more likely to call the 2nd constructor, which allows you to set the number of input connections attached to this neuron.
Up next: Neural Network (Part 3) : The Layer
The main purpose of the Neuron is to store the values that flow through the neural network. They also do a bit of processing through the use of an Activation function. The activation function is quite an important feature of the neural network. It essentially enables the neuron to make decisions (yes/no and greyzone) based on the values provided to them. The other feature of activation functions is the ability to map values of infinite size to a range of 0 to 1. We will be using the Sigmoid function.
The neuron accumulates signals from one or more connections, adds a bias value, and then sends this value through the activation function to produce a neuron output. Each neuron output will be within the range of 0 to 1 (due to the activation function).
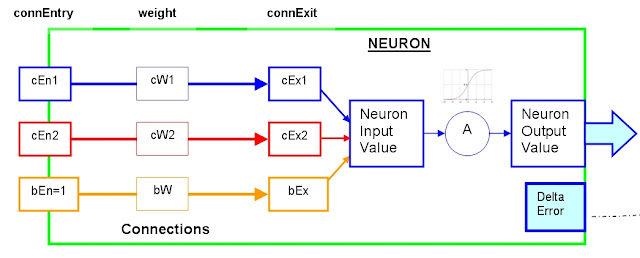
So lets take a look at a single neuron with 2 connections (+ bias) feeding into it.
As seen below.

connEntry weight
Neuron.Connection1.connEntry = cEn1 Neuron.Connection1.weight = cW1
Neuron.Connection2.connEntry = cEn2 Neuron.Connection2.weight = cW2
Neuron.Bias.connEntry = bEn = 1 (always) Neuron.Bias.weight = bW
connExit
Neuron.Connection1.connExit = cEx1
Neuron.Connection2.connExit = cEx2
Neuron.Bias.connExit = bEx
You need to multiply the connEntry value by the weight to get the connExit value.
Connection #1:
cEx1 = cW1 x cEn1
Connection # 2:
cEx2 = cW2 x cEn2
Bias:
bEx = bW x 1
As you can see from the Bias calculation, the Bias.connEntry (bEn) value is always 1, which means that the Bias.connExit (bEx) value is always equal to the Bias.weight (bW) value.
The Neuron Input Value is equal to the sum of all the connExit values (cEx1 and cEx2 in this case) plus the bias (bEx), and can be represented by the following formula.
Neuron Input Value:
Neuron Input Value = cEx1 + cEx2 + bEx
or
Neuron Input Value = [cW1 x cEn1] + [cW2 x cEn2] + [bW x 1]
Now that we have the Neuron Input Value, we can put this through the Activation Function to get the Neuron Output Value. This can be represented by the following formula.
Neuron Output Value:
Neuron Output Value = 1 / (1 + EXP(-1 x Neuron Input Value))
We will use this Neuron Output value as an input to the next layer, therefore it automatically becomes a connEntry for one of the neuron connections in the next layer.
Now that we know what a neuron does, let us create a neuron class. See the code below.
processing code Neuron Class
01
02
03
04
05
06
07
08
09
10
11
12
13
14
15
16
17
18
19
20
21
22
23
24
25
26
27
28
29
30
31
32
33
34
35
36
37
38
39
40
41
42
43
44
45
46
47
48
49
50
51
52
53
54
55
56
57
58
59
60
61
62
63
64
65
66
67
68
69
70
71
72
73
74
75
76
77
78
02
03
04
05
06
07
08
09
10
11
12
13
14
15
16
17
18
19
20
21
22
23
24
25
26
27
28
29
30
31
32
33
34
35
36
37
38
39
40
41
42
43
44
45
46
47
48
49
50
51
52
53
54
55
56
57
58
59
60
61
62
63
64
65
66
67
68
69
70
71
72
73
74
75
76
77
78
/* ------------------------------------------------------------------------

   A neuron does all the calculations to convert an input to an output

-------------------------------------------------------------------------  */


class Neuron{

  Connection[] connections={};

  float bias;

  float neuronInputValue;

  float neuronOutputValue;

  float deltaError;


  //The default constructor for a Neuron

  Neuron(){

  }


  //The typical constructor of a Neuron - with random Bias and Connection weights

  Neuron(int numOfConnections){

    randomiseBias();

    for(int i=0; i<numOfConnections; i++){

      Connection conn = new Connection();

      addConnection(conn);

    }

  }


  //Function to add a Connection to this neuron

  void addConnection(Connection conn){

      connections = (Connection[]) append(connections, conn);

  }


  //Function to return the number of connections associated with this neuron.

  int getConnectionCount(){

      return connections.length;

  }


  //Function to set the bias of this Neuron

  void setBias(float tempBias){

    bias = tempBias;

  }


  //Function to randomise the bias of this Neuron

  void randomiseBias(){

    setBias(random(1));

  }


  //Function to convert the neuronInputValue to an neuronOutputValue

  //Make sure that the number of connEntryValues matches the number of connections


  float getNeuronOutput(float[] connEntryValues){

    if(connEntryValues.length!=getConnectionCount()){

      println("Neuron Error: getNeuronOutput() : Wrong number of connEntryValues");

      exit();

    }


    neuronInputValue=0;


    //First SUM all of the weighted connection values (connExit) attached to this neuron.

    for(int i=0; i<getConnectionCount(); i++){

      neuronInputValue+=connections[i].calcConnExit(connEntryValues[i]);

    }


    //Add the bias to the Neuron's inputValue

    neuronInputValue+=bias;


    //Send the inputValue through the activation function to produce the Neuron's outputValue

    neuronOutputValue=Activation(neuronInputValue);


    //Return the outputValue

    return neuronOutputValue;

  }


  //Sigmoid Activation function

  float Activation(float x){

    float activatedValue = 1 / (1 + exp(-1 * x));

    return activatedValue;

  }


}
When you create a new Neuron, you have the option to create the basic neuron shell with the Neuron() constructor, however, you are more likely to call the 2nd constructor, which allows you to set the number of input connections attached to this neuron.
For example, if I create a neuron using New Neuron(4), then this will automatically
- attach and associate four connections with this neuron
- randomise the weight of each connection
- randomise the bias of this neuron
These are the functions within the Neuron Class:
- addConnection(): adds a new connection to this neuron
- getConnectionCount(): returns the number of connections associated with this neuron
- setBias(): sets the Bias of the neuron to a specific value.
- randomiseBias() : randomises the Bias of this neuron
- getNeuronOutput() : values are fed through the neuron's connections to create the neuronInputValue, which is then sent through the Sigmoid Activation function to create the neuronOutputValue.
- Activation() : is the function used by the getNeuronOutput() function to generate the neuronOutputValue.
To go back to the table of contents click here