Posts with «transportation hacks» label

Quick Arduino Hack Lets Tach-less Car Display Shift Points

A tachometer used to be an accessory added to the dash of only the sportiest of cars, but now they’re pretty much standard equipment on everything from sleek coupes to the family truckster. If your daily driver was born without a tach, fear not – a simple Arduino tachometer is well within your reach.

The tach-less vehicle in question is [deepsyx]’s Opel Astra, which from the video below seems to have the pep and manual transmission that would make a tach especially useful. Eschewing the traditional analog meter display or even a digital readout, [deepsyx] opted to indicate shift points with four LEDs mounted to a scrap of old credit card. The first LED lights at 4000 RPM, with subsequent LEDs coming on at each 500 RPM increase beyond that. At 5800 RPM, all the LEDs blink as a redline warning.  [Deepsyx] even provides a serial output of the smoothed RPM value, so logging of RPM data is a possible future enhancement.

The project is sensing engine speed using the coil trigger signal – a signal sent from the Engine Control Unit (ECU) which tells one of the ignition coilpacks to fire. The high voltage signal from the coilpack passes on to the spark plug, which ignites the air-fuel mixture in that cylinder. This is a good way to determine engine RPM without mechanical modifications to the car. Just make sure you modify the code for the correct number of cylinders in your vehicle.

Simple, cheap, effective – even if it is more of a shift point indicator than true tachometer, it gets the job done. But if you’re looking for a more traditional display and have a more recent vintage car, this sweeping LED tachometer might suit you more.

[via r/Arduino]


Filed under: Arduino Hacks, transportation hacks

Alternator Becomes Motor for This Electric Go-kart

Growing up in the 70s and 80s, a go-kart was a quick ticket to coolness, second maybe to a mini-bike. In both cases, a welded steel tube frame and a cast-off lawnmower engine were all that stood between you and neighborhood glory. Looks like a couple of engineering students caught the retro juvenile delinquent bug and built this electric go-kart for their final project.

While the frame for [Adrian Georgescu] and [Masoud Johnson]’s build was a second-hand find, the powertrain is all custom. They targeted a power output of 3 kW but found no affordable motors in that range. So, in true hacker fashion, they rolled their own motor from a used Subaru alternator. The three-phase motor controller came from an electric scooter, three LiPo packs provide the juice, and a pair of Arduinos takes care of throttle control, speed sensing, and sending data to the virtual dashboard on an Android phone. Some lights and a snappy red and black paint job finished off the build. While the video below shows that the acceleration isn’t exactly neck-snapping in the Tesla style, the e-kart can build up to a good speed – 53 km/h. Not too shabby, and no deafening engine right behind your head.

If you’ve got the e-kart bug, best check out some of our previous posts, like this kart built from off-the-shelf components, or this four-wheel-drive mini-kart. Any way you build it, you’ll rule the cul-de-sac.


Filed under: transportation hacks

RFID Lock Keeps Your Bike Safe

What do you do with an RFID chip implanted in your body? If you are [gmendez3], you build a bike lock that responds to your chip. The prototype uses MDF to create a rear wheel immobilizer. However, [gmendez3] plans on building a version using aluminum.

For the electronics, of course, there’s an Arduino. There’s also an RC522 RFID reader. We couldn’t help but think of the Keyduino for this application. When the system is locked, the Arduino drives a servo to engage the immobilizer. To free your rear wheel, simply read your implanted chip. The Arduino then commands the servo to disengage the immobilizer. You can see the system in operation in the video below.

We’ve talked about RFID implants before. Using them as keys for your preferred transportation isn’t a unique idea, of course. Is this is the killer application that makes you want to get chipped? We doubt it, but we admit it is a matter of personal preference.


Filed under: news, security hacks, transportation hacks

You’re Never Too Young to Be a Rocket Scientist

We’ve been keeping tabs on the progress SpaceX has made toward landing a rocket so that it can be reused for future orbital launches. As you would imagine, this is incredibly difficult despite having some of the world’s greatest minds working on the task. To become one of those minds you have to start somewhere. It turns out, high school students can also build guided rockets, as [ArsenioDev] demonstrates in his project on hackaday.io.

[Arsenio]’s design targets amateur rockets with a fuselage diameter of four inches or so. The main control module is just a cylinder with four servos mounted along the perimeter and some fancy 3D printed fins bolted onto the servo. These are controlled by an Arduino and a 6DOF IMU that’s able to keep the rocket pointing straight up. Staaaay on target.

We saw this project back at the Hackaday DC meetup a month ago, and [Arsenio] was kind enough to give a short lightning talk to the hundred or so people who turned up. You can catch a video of that below, along with one of the videos of his build.


Filed under: Microcontrollers, transportation hacks

Hackaday Prize Entry: Project Dekoboko 凸凹 Maps Bumpy Roads On A Bike

If you live in New England (like me) you know that the roads take a pounding in the winter. Combine this with haphazard maintenance and you get a recipe for biking disaster: bumpy, potholed roads that can send you flying over the handlebars. Project Dekoboko 凸凹 aims to help a little with this, by helping you map and avoid the bumpiest roads and could be a godsend in this area.

The 2015 Hackaday Prize entry from [Benjamin Shih], [Daniel Rojas], and [Maxim Lapis] is a device that clips onto your bike and maps how bumpy the ride is as you pedal around. It does this by measuring the vibration of the bike frame with an accelerometer. Combine this with a GPS log and you get a map of the quality of the roads that helps you plan a smooth ride, or which could help the city figure out which roads need fixing the most.

The project is currently on its  third version, built around an Arduino, Adafruit Ultimate GPS Logger shield, and a protoboard that holds the accelerometer (an Analog ADXL345). The team has also set up a first version of their web site, which contains live data from a few trips around Berlin. This does show one of the issues they will need to figure out, though: the GPS data has them widely veering off the road, which means that the data was slightly off, or they were cycling through buildings on the Prinzenstrasse, including a house music club. I’ll assume that it was the GPS being inaccurate and not them stopping for a rave, but they will need to figure out ways to tie this data down to a specific street before they can start really analyzing it. Google Maps does offer a way to do this, but it is not always accurate, especially on city streets. Still, the project has made good progress and could be useful for those who are looking for a smooth ride around town.

The 2015 Hackaday Prize is sponsored by:


Filed under: The Hackaday Prize, transportation hacks

Castrol Virtual Drift: Hacking Code at 80MPH with a Driver in a VR Helmet

Driving a brand new 670 horsepower Roucsh stage 3 Mustang while wearing virtual reality goggles. Sounds nuts right? That’s exactly what Castrol Oil’s advertising agency came up with though. They didn’t want to just make a commercial though – they wanted to do the real thing. Enter [Adam and Glenn], the engineers who were tasked with getting data from the car into a high end gaming PC. The computer was running a custom simulation under the Unreal Engine. El Toro field provided a vast expanse of empty tarmac to drive the car without worry of hitting any real world obstacles.

The Oculus Rift was never designed to be operated inside a moving vehicle, so it presented a unique challenge for [Adam and Glenn]. Every time the car turned or spun, the Oculus’ on-board Inertial Measurement Unit (IMU) would think driver [Matt Powers] was turning his head. At one point [Matt] was trying to drive while the game engine had him sitting in the passenger seat turned sideways. The solution was to install a 9 degree of freedom IMU in the car, then subtract the movements of that IMU from the one in the Rift.

GPS data came from a Real Time Kinematic (RTK) GPS unit. Unfortunately, the GPS had a 5Hz update rate – not nearly fast enough for a car moving close to 100 MPH. The GPS was relegated to aligning the virtual and real worlds at the start of the simulation. The rest of the data came from the IMUs and the car’s own CAN bus. [Adam and Glenn] used an Arduino with a Microchip mcp2515 can bus interface  to read values such as steering angle, throttle position, brake pressure, and wheel spin. The data was then passed on to the Unreal engine. The Arduino code is up on Github, though the team had to sanitize some of Ford’s proprietary CAN message data to avoid a lawsuit. It’s worth noting that [Adam and Glenn] didn’t have any support from Ford on this, they just sniffed the CAN network to determine each message ID.

The final video has the Hollywood treatment. “In game” footage has been replaced with pre-rendered sequences, which look so good we’d think the whole thing was fake, that is if we didn’t know better.

Click past the break for the final commercial and some behind the scenes footage.


Filed under: transportation hacks
Hack a Day 21 Jun 03:01

Know Your Speed on Rollerblades

[Anurag] is a computer engineering student with a knack for rollerblading. Rollerblades are not a transportation device that are often fitted with speedometers, so [Anurag] took that more as a challenge and designed this Arduino-powered computer to give him more information on his rollerblade rides.

The device uses an Arduino as the brain, and counts wheel revolutions (along with doing a little bit of math) in order to calculate the speed of the rider. The only problem with using this method is that the wheels aren’t on the ground at all times, and slow down slightly when the rider’s foot is off the ground. To make sure he gets accurate data, the Arduino uses an ultrasonic rangefinder to determine the distance to the ground and deduce when it should be taking speed measurements.

In addition to speed, the device can also calculate humidity and temperature, and could be configured to measure any number of things. It outputs its results to a small screen, but it could easily be upgraded with Bluetooth for easy data logging. If speed is truly your goal, you might want to have a look at these motorized rollerblades too.


Filed under: transportation hacks

Amateur Builds Super Deep Super Cheap Ocean Vehicle

During the summers [Doug] has been building a 75 foot sailing junk to be launched from America’s most inland port. When Oklahoma’s winter hits he heads indoors to work on an ROV that will prowl 3,000 feet below the surface. Originally building a piloted submarine, he grew bored and decided to use the sailboat as a carrier for his fleet of remote submersibles instead.

A consummate amateur, Doug is the first to admit how little he knows about anything and how much he enjoys the open source spirit: collaboration, cooperation and learning from others. Determination and hard work fills in everything in between.

Hackaday covered the beginnings of his ROV last winter. In the year since it has progressed from some sketches and a 10″ steel pipe turned into a pressure testing rig to a nearly-complete, 10 foot long,  custom-lathed 4″ aluminum torpedo laying on his shop table. In a bow-to-stern walk-through Doug shows how he is building science equipment for less than a penny on the dollar using largely off-the-shelf imaginatively-repurposed parts or things he could fabricate himself with only a lathe and a 3d printer.

Continue after the break for a breakdown of the tech used.

The body of the ROV alternates between wet (flooded) and dry sections to preserve balance. Surprisingly, the multitude of thrusters on-board are plain RC outrunners most of us would recognize from quadcopters – apparently with a little potting they are not overly harmed by immersion in salt water. Ditto for the LED banks which lack any heat-sinking, relying on exposure to near-freezing seawater for cooling. Dry sections are stuffed full of all manner of gear: a complement of HD IP cameras, RC LiPo (11.1v, 6Ah each) packs, motor ESCs, external & internal pressure sensors, humidity sensors, an inertial measurement unit and relay banks all controlled by an Arduino Mega with an ethernet shield.

The pride and joy of the electronics are an affordable pair of Lowrance sonars for ocean bed mapping, commonly used as fish-finders. He chose the model he did because the board can be collapsed smaller, making it easier to fit into a pressure vessel. Each sonar board is connected to a transducer, one side-scanning and one spotlight facing forward. These display up on the surface what the terrain looks like 150 feet away in the pitch black.

Unexposed wiring having to traverse a between dry sections is handled by brass hose barbs and sealed inside vinyl aquarium tubing. The pressure through the wet section crushes the tubing tight onto the wires. For exposed wiring, [Doug] has come up with own solution of centrifugally packing epoxy into plumbing fittings fitted with connection pins for a 2,600 PSI seal.

The ROV maintains a data connection to the surface with a simple, slightly-buoyant Cat-5e and polycord tether. 5000 feet of cord is too long of a run for household hardware so [Doug] has mounted ordinary Startech VDSL2 extenders which also reduce the wiring requirements down to a single twisted pair  (3000 feet yielded 46MBps and only 2ms lag). A bigger issue are the HD cams themselves which they found to be rather jello-like anywhere near HD performance.

When his carrier ship is finished [Doug] plans on sailing around the world, exploring the depths and doing meaningful science into retirement. He figures his $5,000 ROV will match ones sold for $1,200,000. For research projects that puts his open source ROV design in the realm of disposable relative to operations costs. For him it means he is able to own one at all.

All of [Doug]’s videos regarding both his sailing ship (with an ubiquitous $250 schoolbus diesel engine as a backup) and his ROV are superbly filmed, cut and edited. Camera angles change quickly enough to stave off boredom and show both scale and detail of the work. It is easy to spend hours watching how he overcomes each obstacle and budget hurdle.

Ever the collaborator, [Doug] is calling out for anyone who wants to stop by for a visit to work on the boat or to participate in the ROV build with advice. His videos regularly feature collaborators who travelled to help. If you feel you have something to contribute, he seems welcome for assistance.


Filed under: transportation hacks

GPS Tracker Tracks Your Stolen Bike

Bikes are great for cruising through congested cities but there is a serious downside to pedaling your two-wheeler around… bike theft. It’s a big deal, for example, yearly estimates for stolen bikes in NYC are in the 60,000 – 100,000 range. Only an extremely small percentage of those are ever recovered. [stbennett] just got himself a halfway decent bike and is not too interested in having it stolen, and if it is stolen, he wants a way to find it so he built himself a GPS tracker for his bike.

The entire project is Arduino-based. It uses a GSM Shield and a GPS module along with a few other small odds and ends. A 2-cell LiPo battery provides the required power for all of the components. It’s pretty neat how this device maintains an extremely long battery life. The metal cable of the bike lock is used as a conductor in the circuit. When the cable is inserted and locked into the lock housing a circuit is completed that prevents electricity from passing through a transistor to the Arduino. In other words, the Arduino is off unless the bike cable is cut or disengaged. That way it is not running 24/7 and draining the battery.

The entire system works like this, once the bike lock cable is cut, the Arduino wakes up and gives a 15 second delay before doing anything, allowing the legitimate user to reconnect the bike lock and shut down the alarm system. If the bike lock is not re-engaged, the unit starts looking for a GPS signal. At that time it will send out SMS messages with the GPS location coordinates. Punching those numbers into Google Maps will show you exactly where the bike is.

Of course your other option is to park your bike where nobody else can access it, like at the top of a lamp pole.


Filed under: transportation hacks

Electric Go-Cart Has Arduino Brains

Oh how times have changed. Back in the 30′s the VW Beetle was designed to be cheap, simple and easy for the typical owner to maintain themselves. Nowadays, every aspect of modern cars are controlled by some sort of computer. At least our go-carts are spared from this non-tinkerable electronic nightmare…. well, that’s not completely true anymore. History is repeating itself as [InverseCube] has built an electronic go-cart fully controlled by an Arduino. Did I forget to mention that [InverseCube] is only 15 years old?

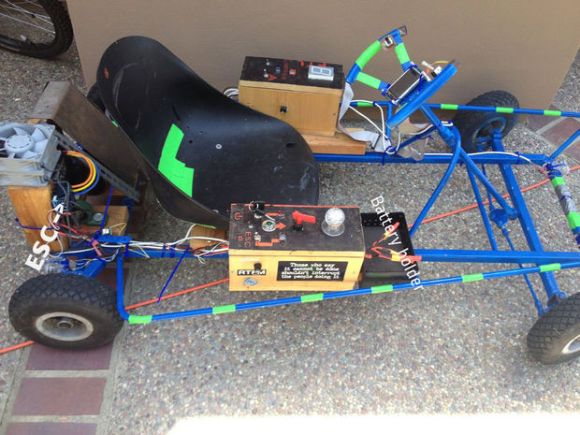
The project starts of with an old gas-powered go-cart frame. Once the gas engine was removed and the frame cleaned up and painted, a Hobbywing Xerun 150A brushless electronic speed controller (ESC) and a Savox BSM5065 450Kv motor were mounted in the frame which are responsible for moving the ‘cart down the road. A quantity of three 5-cell lithium polymer batteries wired in parallel provide about 20 volts to the motor which results in a top speed around 30mph. Zipping around at a moderate 15mph will yield about 30 minutes of driving before needing to be recharged. There is a potentiometer mounted to the steering wheel for controlling the go-cart’s speed. The value of the potentiometer is read by an Arduino which in turn sends the appropriate PWM signal to the ESC.

In addition to the throttle control, the Arduino is also responsible for other operational aspects of the vehicle. There are a bunch of LED lights that serve as headlights, tail lights, turn signals, brake lights and even one for a backup light. You may be wondering why an Arduino should be used to control something as simple as brake or headlights. [InverseCube] has programmed in some logic in the code that keeps the break lights on if the ESC brake function is enabled, if the throttle is below neutral or if the ESC enable switch is off. The headlights have 3 brightnesses, all controlled via PWM signal provided by the microcontroller.

There is also an LCD display mounted to the center of the steering wheel. This too is controlled by the Arduino and displays the throttle value, status of the lights and the voltage of the battery.


via reddit


Filed under: Arduino Hacks, transportation hacks