Posts with «teensy» label

Run UNIX On Microcontrollers With PDP-11 Emulator
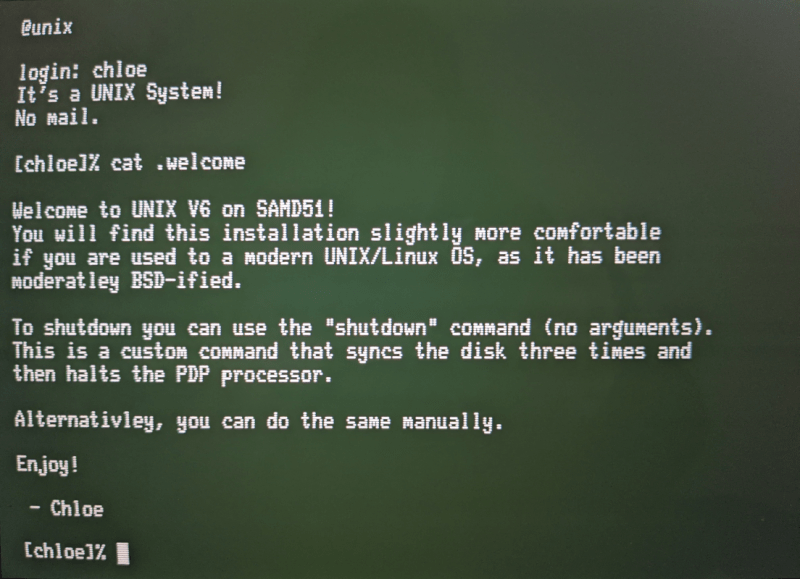
C and C++ are powerful tools, but not everyone has the patience (or enough semicolons) to use them all the time. For a lot of us, the preference is for something a little higher level than C. While Python is arguably more straightforward, sometimes the best choice is to work within a full-fledged operating system, even if it’s on a microcontroller. For that [Chloe Lunn] decided to port Unix to several popular microcontrollers.

This is an implementation of the PDP-11 minicomputer running a Unix-based operating system as  an emulator. The PDP-11 was a popular minicomputer platform from the ’70s until the early 90s, which influenced a lot of computer and operating system designs in its time. [Chloe]’s emulator runs on the SAMD51, SAMD21, Teensy 4.1, and any Arduino Mega and is also easily portable to any other microcontrollers. Right now it is able to boot and run Unix but is currently missing support for some interfaces and other hardware.

[Chloe] reports that performance on some of the less-capable microcontrollers is not great, but that it does run perfectly on the Teensy and the SAMD51. This isn’t the first time that someone has felt the need to port Unix to something small; we featured a build before which uses the same PDP-11 implementation on a 32-bit STM32 microcontroller.

So Many Choices: Our Favorite Makers Weigh in on Their Go-To Dev Boards

Dev boards give makers limitless options for their projects. Some of our high-tech pals share their personal processes to pick a board.

The post So Many Choices: Our Favorite Makers Weigh in on Their Go-To Dev Boards appeared first on Make: DIY Projects and Ideas for Makers.

Unique Musical Instrument Defies Description

Since the first of our ancestors discovered that banging a stick on a hollow log makes a jolly sound, we hominids have been finding new and unusual ways to make music. We haven’t come close to tapping out the potential for novel instruments, but then again it’s not every day that we come across a unique instrument and a new sound, as is the case with this string-plucking robot harp.

Named “Greg’s Harp” after builder [Frank Piesik]’s friend [Gregor], this three-stringed instrument almost defies classification. It’s sort of like a harp, but different, and sort of like an electric guitar, but not quite. Each steel string has three different ways to be played: what [Frank] calls “KickUps”, which are solenoids that strike the strings; an “eBow” coil stimulator; and a small motor with plastic plectra that pluck the strings. Each creates a unique sound at the fundamental frequency of the string, while servo-controlled hoops around each string serve as a robotic fretboard to change the notes. Sound is picked up by piezo transducers, and everything is controlled by a pair of Nanos and a Teensy, which takes care of MIDI duties.

Check out the video below and see if you find the sound both familiar and completely new. We’ve been featuring unique instruments builds forever, from not-quite-violins to self-playing kalimbas to the Theremincello, but we still find this one enchanting.

Hack a Day 11 Apr 21:00
arduino  fret  guitar  harp  midi  musical hacks  nano  plectrum  pluck  servo  solenoid  string  teensy  

The New Teensy 4.0: Big Brains, Tiny Body

The latest itty bitty powerhouse from PJRC has been released this week. The teensy line of dev boards has hit 4.0! They have managed to keep a tiny footprint, like you’ve come to expect from the Teensy. They’ve gained some serious horsepower thanks to the ARM Cortex-M7 running running at […]

Read more on MAKE

The post The New Teensy 4.0: Big Brains, Tiny Body appeared first on Make: DIY Projects and Ideas for Makers.

Ardunio’s Pluggable Discovery Programs With Any Protocol

The first Arduino was serial, and over the decade and a half, this has been the default way to upload code to an Arduino board. In 2008, support for in-circuit programmers was added, and later port detection was added. The latest version of the Arduino IDE adds something new: pluggable discovery. Now any protocol is supported by the Arduino IDE.

This feature is the brainchild of [Paul Stoffregen], creator of the Teensy. If you’ve ever used a Teensy, you’ll remember the Teensyduino application used to upload code to the board. The Teensy uses HID protocol instead of serial for uploading. After working to improve the integration between the Teensy and Arduino IDE, [Paul] stated extending the DiscoveryManager. After some discussion with the Arduino developers, this feature was then added to Arduino 1.8.9, released a month or so ago.

There are some issues with Pluggable Discovery, most importantly that it doesn’t yet exist in the Arduino Command Line Interface (yeah, that exists too). If you’re looking to contribute to Open Source, that would be a nice project to pick up.

With the right JSON, and configuration, it is now theoretically possible to extend the Arduino IDE to any sort of protocol. This means (again, theoretically), it’s possible to update the firmware in your DIY MIDI synth over SysEx message, or a parallel port, maybe. Someone is going to upload to an Arduino board over PCIe, eventually.

Mademoiselle Pinball Table Gets Rock ‘n Roll Makeover

Once upon a time, there was a music venue/artist collective/effects pedal company that helped redefine industry in Williamsburg, Brooklyn. That place was called Death By Audio. In 2014, it suffered a death by gentrification when Vice Media bought the building that DBA had worked so hard to transform. From the ashes rose the Death By Audio Arcade, which showcases DIY pinball cabinets made by indie artists.

Their most recent creation is called A Place To Bury Strangers (APTBS). It’s built on a 1959 Gottlieb Mademoiselle table and themed around a local noise/shoegaze band of the same name that was deeply connected to Death By Audio. According to [Mark Kleeb], this table is an homage to APTBS’s whiz-bang pinball-like performance style of total sensory overload. Hardly a sense is spared when playing this table, which features strobe lights, black lights, video and audio clips of APTBS, and a fog machine. Yeah.

[Mark] picked up this project from a friend, who had already cut some wires and started hacking on it. Nearly every bit of the table’s guts had to be upgraded with OEM parts or else replaced entirely. Now there’s a Teensy running the bumpers, and another Teensy on the switches. An Arduino drives the NeoPixel strips that light up the playfield, and a second Uno displays the score on those sweet VFD tubes. All four micros are tied together with Python and a Raspi 3.

If you’re anywhere near NYC, you can play the glow-in-the-dark ball yourself on July 15th at Le Poisson Rouge. If not, don’t flip—just nudge that break to see her in action. Did we mention there’s a strobe light? Consider yourself warned.

Want to get into DIY pinball on a smaller scale? Build yourself a sandbox and start playing.

Ergonomic Keyboard Designed from the Ground Up

In 2011, [Fabio] had been working behind a keyboard for about a decade when he started noticing wrist pain. This is a common long-term injury for people at desk jobs, but rather than buy an ergonomic keyboard he decided that none of the commercial offerings had all of the features he needed. Instead, he set out on a five-year journey to build the perfect ergonomic keyboard.

Part of the problem with other solutions was that no keyboards could be left in Dvorak (a keyboard layout [Fabio] finds improves his typing speed) after rebooting the computer, and Arduino-based solutions would not make themselves available to the computer’s BIOS. Luckily he found the LUFA keyboard library, and then was able to salvage a PCB from another keyboard. From there, he programmed everything on a Teensy microcontroller, added an OLED screen, and soldered it all together (including a set of Cherry MX switches).

Of course, the build wasn’t truly complete until recently, when a custom two-part case was 3D printed. The build quality and attention to detail in this project is impressive, and if you want to roll out your own [Fabio] has made all of the CAD files and software available. Should you wish to incorporate some of his designs into other types of specialized keyboards, there are some ideas floating around that will surely improve your typing or workflow.


Filed under: computer hacks

E-Paper Hacking with Ben Krasnow

Exploring the latest generation of e-paper, how it works, and how you can program and hack the display.

Read more on MAKE

The post E-Paper Hacking with Ben Krasnow appeared first on Make: DIY Projects and Ideas for Makers.

TeensyStep – Fast Stepper Library for Teensy

The Teensy platform is very popular with hackers — and rightly so. Teensys are available in 8-bit and 32-bit versions, the hardware has a bread-board friendly footprint, there are a ton of Teensy libraries available, and they can also run standard Arduino libraries. Want to blink a lot of LED’s? At very fast update rates? How about MIDI? Or USB-HID devices? The Teensy can handle just about anything you throw at it. Driving motors is easy using the standard Arduino libraries such as Stepper, AccelStepper or Arduino Stepper Library.

But if you want to move multiple motors at high micro-stepping speeds, either independently or synchronously and without step loss, these standard libraries become bottlenecks. [Lutz Niggl]’s new TeensyStep fast stepper control library offers a great improvement in performance when driving steppers at high speed. It works with all of the Teensy 3.x boards, and is able to handle accelerated synchronous and independent moves of multiple motors at the high pulse rates required for micro-stepping drivers.

The library can be used to turn motors at up to 300,000 steps/sec which works out to an incredible 5625 rpm at 1/16 th micro-stepping. In the demo video below, you can see him push two motors at 160,000 steps/sec — that’s 3000 rpm — without the two arms colliding. Motors can be moved either independently or synchronously. Synchronous movement uses Bresenham’s line algorithm to plan motor movements based on start and end positions. While doing a synchronous move, it can also run other motors independently. The TeensyStep library uses two class objects. The Stepper class does not require any system resources other than 56 bytes of memory. The StepControl class requires one IntervallTimer and two channels of a FTM  (FlexTimer Module) timer. Since all supported Teensys implement four PIT timers and a FTM0 module with eight timer channels, the usage is limited to four StepControl objects existing at the same time. Check out [Lutz]’s project page for some performance figures.

As a comparison, check out Better Stepping with 8-bit Micros — this approach uses DMA channels as high-speed counters, with each count sending a pulse to the motor.

Thanks to [Paul Stoffregen] for tipping us off about this new library.


Filed under: Microcontrollers

Robo-Flute Whistles MIDI

We aren’t sure this technically qualifies as music synthesis, but what else do you call a computer playing music? In this case, the computer is a Teensy, and the music comes from a common classroom instrument: a plastic recorder. The mistaken “flute” label comes from the original project. The contraption uses solenoids to operate 3D printed “fingers” and an air pump — this is much easier with a recorder since (unlike a flue) it just needs reasonable air pressure to generate sound.

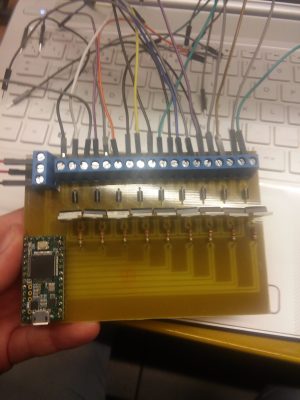
A Teensy 3.2 programmed using the Teensyduino IDE drives the solenoids. The board reads MIDI command sent over USB from a PC and translates them into the commands for this excellent driver board. It connects TIP31C transistors, along with flyback diodes, to the solenoids via a terminal strip.

On the PC, a program called Ableton sends the MIDI messages to the Teensy. MIDI message have three parts: one sets the message type and channel, another sets the velocity, and one sets the pitch. The code here only looks at the pitch.

This is one of those projects that would be a lot harder without a 3D printer. There are other ways to actuate the finger holes, but being able to make an exact-fitting bracket is very useful. Alas, we couldn’t find a video demo. If you know of one, please drop the link in the comments below.

We have seen bagpipe robots (in fact, we’ve seen several). We’ve also seen hammering shotguns into flutes, which is certainly more melodious than plowshares.


Filed under: Arduino Hacks, ARM, musical hacks