Posts with «ribbon» label

Screech Owl is a Tribute to The Eowave Persephone

The Eowave Persephone was a beautiful thing—a monophonic ribbon synth capable of producing clean, smoothly varying tones. [Ben Glover] used to own a nice example that formerly belonged to Peter Christopherson, but lost it in the shifting sands of time. His solution was to build one of his own from scratch.
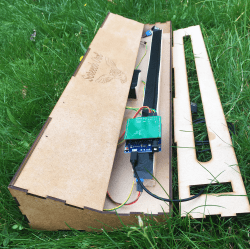
It’s a simple build, but the final result puts out a nice pleasant sound.

Known as the Screech Owl, the build is based around a custom shield designed to suit the Arduino Leonardo. The primary control interface is a Softpot 500 mm membrane potentiometer, layered up with a further thin film pressure sensor which provides aftertouch control. The Leonardo reads these sensors and synthesizes the appropriate frequencies in turn.

All the electronics is wrapped up inside a tidy laser-cut enclosure that roughly approximates the design of the original Eowave device. [Ben] noted the value of services like Fiverr and ChatGPT for helping him with the design, while he also enjoyed getting his first shield design professionally manufactured via JLCPCB.

It’s a tidy build, and in [Ben’s] capable hands, it sounds pretty good, too. We’ve seen some other great ribbon controlled synths before, too. Video after the break.

Get Better at Mortal Kombat by Hacking Your PS3 Controller

Fighting games like Mortal Kombat provide you with a variety of different available moves. These include kicks, punches, grabs, etc. They also normally include various combination moves you can perform. These combo moves require you to press the proper buttons in the correct order and also require you to time the presses correctly. [Egzola] realized that he could just hack his controller to simulate the button presses for him. This bypasses the learning curve and allows him to perform more complicated combinations with just the press of a single button.

[Egzola] started by taking apart his Playstation 3 controller. There were two PCB’s inside connected by a ribbon cable. Luckily, each individual pad for this cable was labeled with the corresponding controller button. This made it extremely simple to hack the controller. [Egzola] soldered his own wires to each of these pads. Each wire is a different color. The wires then go to two different connectors to make them easier to hook up to a bread board.

Each wire is then broken out on the breadboard. The signal from each button is run through a 4n25 optoisolator. From there the signal makes its way back to various Arduino pins. The 4n25 chips keeps the controller circuit isolated from the Arduino’s electrical circuit. The Arduino also has two push buttons connected to it. These buttons are mounted to the PS3 controller.

Now when [Egzola] presses one of the buttons, the Arduino senses the button press and simulates pressing the various controller buttons in a pre-programmed order. The result is a devastating combination move that would normally require practice and repetition to remember. You might say that [Egzola] could have spent his time just learning the moves, but that wasn’t really the point was it? Check out the video below for a demonstration.


Filed under: Arduino Hacks