8 Festive Projects to Ring in the New Year
 Ring in 2017 with some DIY projects made in the spirit of New Year's Eve.
The post 8 Festive Projects to Ring in the New Year appeared first on Make: DIY Projects and Ideas for Makers.
 Ring in 2017 with some DIY projects made in the spirit of New Year's Eve.
The post 8 Festive Projects to Ring in the New Year appeared first on Make: DIY Projects and Ideas for Makers.
Behold the unholy union of Amazon’s Alexa and that feature-limited animatronic bear from the 80s, Teddy Ruxpin. Alexa Ruxpin?
As if stuffing Alexa inside a talking fish weren’t bad enough, now Amazon’s virtual assistant can talk to you through the creepy retro plush thanks to [Tinkernut]’s trip down memory lane. Having located a Teddy Ruxpin on eBay for far less than the original $70 that priced it out from under his childhood Christmas tree, [Tinkernut] quickly learned that major surgery would be necessary to revive the Ruxpin. The first video below shows the original servos being gutted and modern micro servos grafted in, allowing control of the mouth, eyes, and nose via an Arduino.
With the bear once again in control of its faculties, [Tinkernut] embarked on giving it something to talk about. A Raspberry Pi running AlexaPi joined the bear’s recently vacated thorax with the audio output split between the bear’s speaker and the analog input on the Arduino. The result is a reasonable animation, although we’d say a little tweaking of the Arduino script might help the syncing. And those eyes and that nose really need to get into the game as well. But not a bad start at all.
This isn’t the first time that Teddy Ruxpin has gone under the knife in the name of hacks, and it likely won’t be the last. And the way toy manufacturers are going, they might just beat us hackers to the punch.

If you had a Teddy Ruxpin in the ’80s and ’90s, you probably remember inserting special tapes and hearing him read stories to you. Whether you loved or hated the little bear, it was hard to forget his weirdly moving mouth and eyes. Today though, with small and cheap development boards readily available, this mechanical system is just begging for a retrofit.
In this project, hacker “Tinkernut” employed an Arduino to sense the intensity of a sound input, and in turn used it to allow Ruxpin to lip sync to any audio source. This could be a song, story, or even output from a virtual assistant.
He chose the latter option, and after installing Alexa on a Raspberry Pi, used the two boards in tandem to control the retro toy. With this setup, he can ask it such questions as “how tall is the empire state building?” and have it answer back with audio and a semi-synced bear mouth.
Have an old Ruxpin lying around? Give new life to it by following Tinkernut’s instructions here.
 This holiday season there are so many ways to customize your lights with DIY electronics.
The post 10 Merry Circuits to Illuminate Your Holiday appeared first on Make: DIY Projects and Ideas for Makers.
We’ve noticed a lot of musical groups are named after insects. Probably has something to do with the Beatles. (If you study that for a while you’ll spot the homophonic pun, and yes we know that the Crickets inspired the name.) There’s also Iron Butterfly, Adam Ant, and quite a few more. A recent art project by a Mexican team — Micro-ritmos — might inspire some musical groups to be named after bacteria.
The group used geobacter — a kind of bacteria found in soil — a Raspberry Pi, an Arduino, and a camera to build an interesting device. As it looks at the bacteria and uses SuperCollider to create music and lighting from the patterns. You can see a video of Micro-ritmos, below.
Music is a bit subjective, of course. We thought the music sounded a little oppressive. Not sure how much of that is the code and how much is the characteristics of the bacteria itself.
We’ve seen SuperCollider in a banana piano, before (these are popular because for most people bananas have appeal). We’ve also seen other natural processes generating sound like this project for presenting the sunset to the blind.
[Ryan Bates] loves arcade games, any arcade games. Which is why you can find claw machines, coin pushers, video games, and more on his website.
We’ve covered his work before with his Venduino project. We also really enjoyed his 3D printed arcade joystick based off the design of a commercial variant. His coin pushing machine could help some us finally live our dream of getting a big win out of the most insidious gambling machine at arcades meant for children.
Speaking of frustrating gambling machines for children, he also built his own claw machine. Nothing like enabling test mode and winning a fluffy teddy bear or an Arduino!
It’s quite a large site and there’s good content hidden in nooks and crannys, so explore. He also sells kits, but it’s well balanced against a lot of open source files if you’d like to do it yourself. If you’re wondering how he gets it all done, his energy drink review might provide a clue.
 Pipe Organs may be out of vogue, but one makers MIDI-fied version definitely turned heads at the Orlando Maker Faire.
The post Listen to the Eerie Music of This Handmade MIDI Pipe Organ appeared first on Make: DIY Projects and Ideas for Makers.
[Tim] was tired of compromising his portrait-oriented digital photos by shoehorning them into landscape-only frames. Unable to find a commercial solution, he built his own rotating digital photo frame from a 27″ LCD TV.
It uses a Raspi 3 to find [Tim]’s pictures on a giant SD card. He originally wanted to have the Pi pull pictures from Google Photos and display them randomly, but the API doesn’t work in that direction. Instead, a Python script looks at the pictures on the SD card and determines whether each is landscape or portrait-oriented. If a picture was taken in portrait-mode, the display will rotate 90 degrees. Rotation is handled with an Arduino, a stepper motor, and some 3D-printed herringbone gears. The first version was a bit noisy, so [Tim] re-printed the motor mount and the pinion gear out of flexible filament.
[Tim] designed the mount and frame himself and laser-cut the pieces out of birch plywood. We like that he accounted for the front-heaviness and that he covered the high voltage circuitry with acrylic to mitigate the risk of shock. All the code and design files are available on his project page. Make the jump to see a brief demonstration followed by a walk-through and stay for the six-minute slide show.

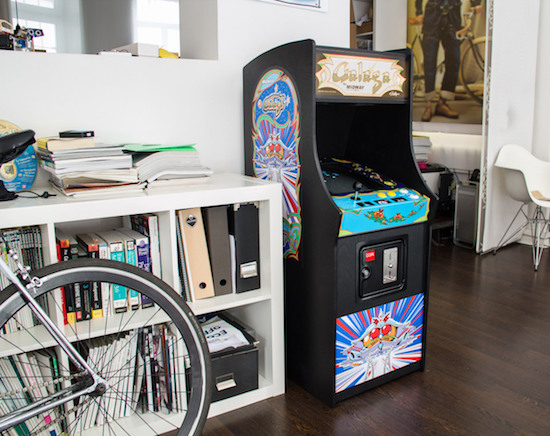
This arcade machine helps creator Alex Weber relive arcade memories, but is slightly easier to move than a full-sized “cab!”
Galaga is one of Weber’s–and many others’–top five arcade games. Easy to learn, but difficult to master, it was just asking to accept your money and time! Now though, using a Raspberry Pi and MAME software, you can have this and other old-school games at your disposal. Weber built a cabinet for this purpose around an old CRT television slightly smaller than original size.
In order to keep from having to fool with the TV every time it switched on, he made an automated remote control with an Arduino and IR LED that sends signals to turn it on and switches the TV to AV mode.
I have a soft spot for 8-bit arcades… I saw these for the first time. At least it felt like that. All machines where running. All coin doors were open! Somebody saw me standing in front of them with huge eyes and showed me how to trigger the switch to get credits for free. BAM! I was hooked.
You can see the full build on Weber’s tinkerlog site as well as Hackaday’s writeup here.

While exploring new tangible interfaces, designer Martin Hertig wanted to do something a bit different. He chose to transform the zippers on a guitar bag into a fully-functional instrument. Rather than strum the strings of the guitar, he simply pulls the bag’s zippers to jam: one zip for playing notes or chords, another for changing the bar, and a third for the vibrato.
As Hertig explains, the case was converted into a MIDI controller using an Arduino and conductive thread stitched along the zipper, while a Raspberry Pi synthesizer hidden inside produces the guitar sounds.
Intrigued? Head over to Zippy’s project page, and be sure to see it in action below!