Posts with «pro mini» label

Build your own Arduino balancing robot

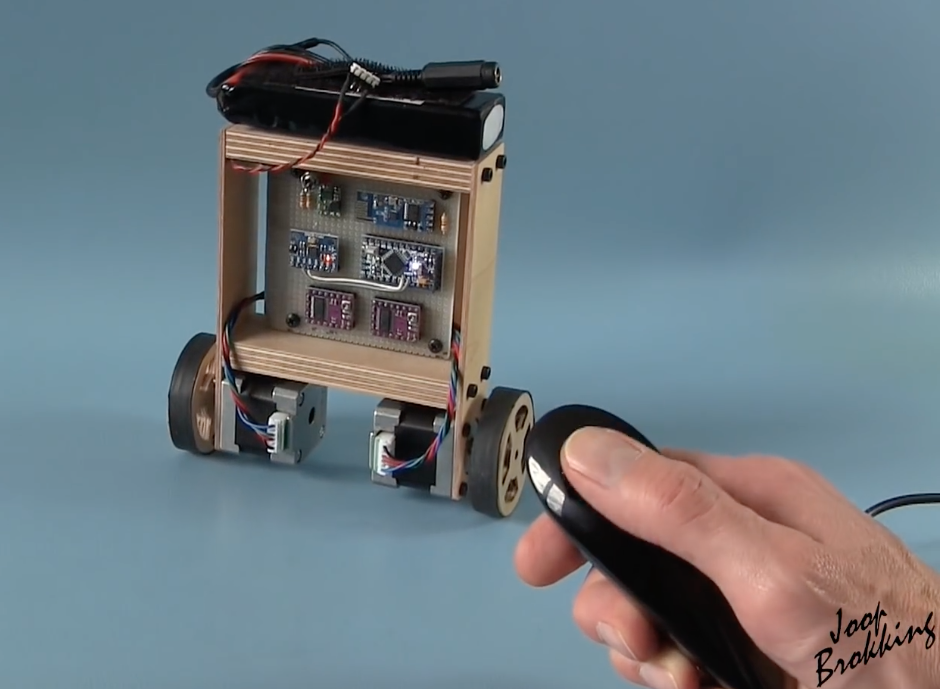
If you’re familiar with the Segway or other vehicles that balance in what is known as an “inverted pendulum” configuration, you may think that while interesting, creating something similar would be too complicated or out of your budget. Though perhaps still not simple, Joop Brokking takes you through his design for this type of bot in the video seen here, making it accessible if you’d like to build your own.

The robot, which will cost about $80 in parts, uses two stepper motors for greater movement precision than could be had with normal DC models, and employs an Arduino Pro Mini, along with an MPU-6050 accelerometer/gyroscope for control. It can be driven around by a Wii U-style nunchuck, which transmits to the robot via an Arduino Uno and wireless transceiver module.

You can find more info and product links for this project on Brokking.net.

A robotic dancing teapot

You may have seen robots that wobble around, such as BOB, OTTO and ZOWI. Though their locomotion style of shifting the unit’s weight on huge feet is clever, they all share a rather similar look. French computer scientist Paul-Louis Ageneau decided to do something about this and created his own biped in the form of a dancing teapot a la Disney’s Beauty and the Beast.

To accomplish this, he attached four servos to the robot’s hips and ankles, which were connected to an Arduino Pro Mini and powered by a 9V alkaline battery. All the electronics are housed inside the 3D-printed teapot. It’s a neat build in itself, and in a separate post he goes over how to play music on an Arduino, which should make this little guy even more entertaining!

You can find Ageneau’s original blog here, as well as the Disney-like bot’s code on GitHub.

Turning a Wii Nunchuk into an RC car controller

With the help of an Arduino, this dad turned a Wii Nunchuk into a wireless remote for a kid’s RC car.

The Wii Nunchuck has been a favorite control device for hackers since it’s debut in 2006. And why not, it has a simple design with a directional joystick, and can output signals via the I2C protocol. For this project, software engineer “trandi” used an Arduino Pro Mini to translate these signals into 9600bps serial signals needed for the wireless module he was using. The car is also hacked with a corresponding receiver, a TI Stellaris Launchpad, and a motor controller.

Perhaps what’s most interesting, however, is that it’s somewhat of a continuation of a project that he took on in 2013, repairing his then 18-month-old son’s toy car. Now several years older, maybe he has a new appreciation for this device and his dad’s skill! You can see more in trandi’s write-up here.

Why buy a soldering station when you can build one instead?

As with many products, if you want the best, you’ll pay top dollar for it. After seeing that the supposed best soldering station on the market sells for $500, YouTuber GreatScott! decided to instead purchase the iron and tip for a total of around $100, then reverse-engineer how the station should work.

From there, he used an Arduino Pro Mini along with a little OLED screen to display the temperature, and a toroidal transformer as well as several other components to power and complete his build. Finally, he 3D-printed a nice red enclosure and attached everything together, making his own custom soldering station.

You can see more on this station’s Instructables write-up, and check out GreatScott!’s channel for other interesting projects!

Turn and film your projects in style with this $8 DIY device

Using an Arduino along with some 3D-printed and salvaged parts, hacker “notionSunday” made an excellent photo turntable for under $10.

In a masterful display of converting one man’s junk into another man’s treasure, notionSunday used a VCR head as a very smooth-looking bearing surface for a small turntable. A DVD-ROM drive motor, a potentiometer from an old TV, and screws and wires from other electronics rounded out the internals of this build, as well as an Arduino Pro Mini with an H-bridge driver for control. All of this was placed inside of 3D-printed housing, then a disk was added to the top for other contraptions to rest on.

You can see it in action around the 8:00 mark in the video below. What really sticks out are the 3D-printed circumference markers, apparently there to indicate the speed of rotation or to hypnotize viewers. Check out notionSunday’s YouTube channel for more interesting projects, or his website for more pictures and code.

Control a tracked robot with your mind (or joystick)

Whether you choose to control this vehicle with your mind or a joystick, the camera mounted on it will give you a new view of the world.

Maker “Imetomi” was inspired to create a tracked robot after he was able to salvage a camera off of a cheap drone. This became the basis of his FPV setup, which he fitted onto a little tracked vehicle. Although this would have been enough for most people, in addition to building a joystick-based controller, he also made it work with a brainwave headset.

Imetomi now has something that he can drive around virtually, spying on passersby, as long as it stays within the VR transmitter’s 50-meter range. Be sure to check out the video below, where the small bot shows of its impressive all-terrain capabilities, and read his Instructables write-up here.


A DIY hexagonal Bluetooth speaker with sound-reactive LEDs

Imgur user Peter Clough recently created his own colorful “Magic Box” Bluetooth speaker assembly with a NeoPixel visual display.

If you need a speaker (or rather a speaker with an enclosure) the easiest way is usually to just buy one. On the other hand, if you want something really awesome and unique, why not build it yourself? Clough did just that using an Arduino Pro Mini and a Bluetooth receiver along with a strip of programmable LEDs that react to the emitted sounds–made possible by an electret microphone amp.

Cleverly, the case was sourced from a hobby supplies store, while neodymium magnets were used to keep the lid in place. Clough also employed a “really beefy” 20W 4Ohm speaker, as well as a rotary encoder with push button for volume and play/pause control.

You can find more details, including a schematic, on the project’s Imgur page.

WALTER - The Arduino Photovore Insect Robot

Primary image

What does it do?

Navigate around and seeking light

[Please excuse my English]

Cost to build

Embedded video

Finished project

Complete

Number

Time to build

Type

URL to more information

Weight

read more

WALTER - The Arduino Photovore Insect Robot

Primary image

What does it do?

Navigate around and seeking light

[Please excuse my English]

Cost to build

Embedded video

Finished project

Complete

Number

Time to build

Type

URL to more information

Weight

read more

WALTER - The Arduino Photovore Insect Robot

Primary image

What does it do?

Navigate around and seeking light

[Please excuse my English]

Cost to build

Embedded video

Finished project

Complete

Number

Time to build

Type

URL to more information

Weight

read more