[Christofer Hiitti] found himself with the latest Microsoft Flight Simulator on his PC, but the joystick he ordered was still a few weeks out. So he grabbed an Arduino, potentiometers and a button and hacked together what a joke-yoke.
The genius part of this hack is the way [Christopher] used his desk drawer for pitch control. One side of a plastic hinge is attached to a potentiometer inside a drawer, while the other side is taped to the top of the desk. The second pot is taped to the front of the drawer for pitch control and the third pot is the throttle. It works remarkably well, as shown in the demo video below.
The linearity of the drawer mechanism probably isn’t great, but it was good enough for a temporary solution. The Arduino Leonardo he used is based on the ATmega32u4 which has a built-in USB, and with libraries like ArduinoJoystickLibrary the computer interface very simple. When [Christopher]’s real joystick finally arrived he augmented it with a button box built using the joke-yoke components.
No matter how clicky your keyboard is, nothing compares to the sensory experience of using a typewriter. The sounds that a typewriter makes, from the deep clunk of hitting the spacebar to the staccato of keys striking paper to the ratchety kerchunk of returning the carriage, are a delight compared to the sterile, soulless clicks of even the noisiest computer keyboard. Oh, and the bell — who doesn’t love the bell?
Unwilling to miss out on the feel of real typing, [Jatin Patel] whipped up this solenoid-powered typewriter simulator. The first version had the core functionality, with a line of six solenoids mounted to a strip of wood. The coils are connected to an Arduino through a relay board; a Python program running on his PC reads every keypress and tells the Arduino which solenoid to fire. Each one sounds different somehow, perhaps due to its position on the board, or maybe due to differences in mounting methods. Whatever the cause, the effect is a realistic variability in the sounds, just like a real typewriter.
Version two, shown in the video below, ups the simulation with a motor that moves the solenoid rack one step with each keypress, to simulate the moving carriage of a typewriter. The last solenoid rings a bell when it’s time to return the carriage, which is done with a combination wrench as a handle. Weird hex, but OK.
The Arduino platform is one of the most versatile microcontroller boards available, coming in a wide variety of shapes and sizes perfect for everything from blinking a few LEDs to robotics to entire home automation systems. One of its more subtle features is the ability to use its serial libraries to handle keyboard and mouse duties. While this can be used for basic HID implementations, [Nathalis] takes it a step further by using a series of Arduinos as a KVM switch; although admittedly without the video and mouse functionality yet.
To start, an Arduino Uno accepts inputs from a keyboard which handles the incoming serial signals from the keyboard. From there, two Arduino Pro Micros are attached in parallel and receive signals from the Uno to send to their respective computers. The scroll lock key, which doesn’t do much of anything in modern times except upset Excel spreadsheeting, is the toggle switch between the two outputs. Everything is standard USB HID, so it should be compatible with pretty much everything out there. All of the source code and schematics are available in the project’s repository for anyone who wants to play along at home.
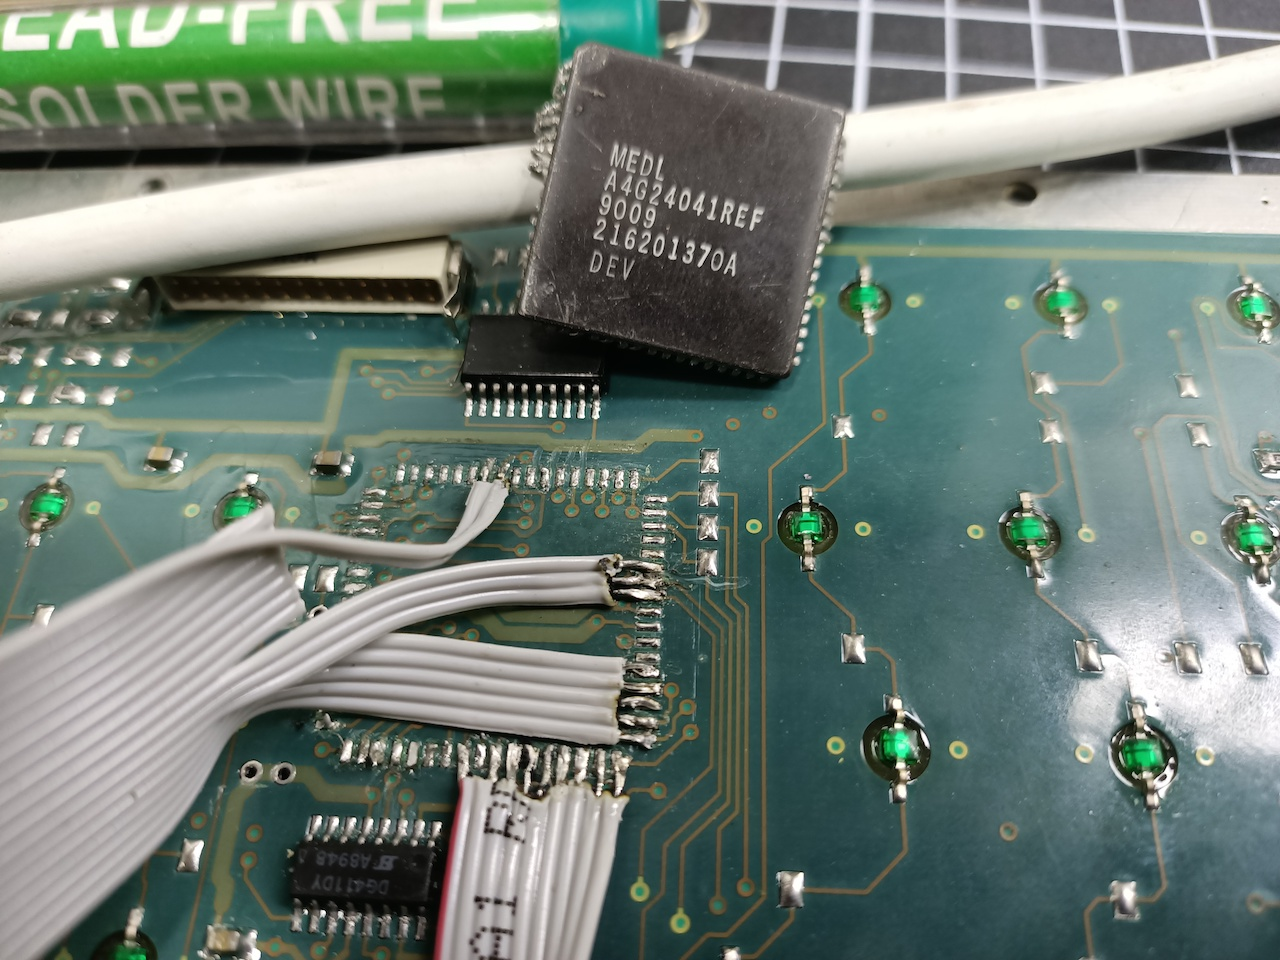
When [easyjo] picked up this late ’80s Marconi mil-spec keyboard for cheap, he knew it wouldn’t be easy to convert it to USB — just that it would be worth it. Spoiler alert: those LEDs aren’t a mod, they’re native. They get their interesting shape from the key traces, which are in the four corners.
Despite having way-cool buttons such as WPNS HOLD, and the fact that Control is on the home row where it belongs, this keyboard does not look fun to type on at all for any length of time. Of course, the point of this keyboard is not comfort, but a reliable input device that keeps out dust, sweat, liquids, and the enemy.
This is probably why the controller is embedded into the underside of the key switch PCB instead of living on its own board. [easyjo] tried to analyze the signals from the existing 26-pin connector, but it didn’t work out.
So once he was able to decode the matrix, he removed the controller chip and wired the rows and columns directly to an Arduino Leonardo. Fortunately, the LEDs were just a matter of powering their columns from the front side of the board.
The availability of certain kinds of military surplus can make for really interesting modernization projects, like adding POTS to a field telephone.
Remember back in the early-to-mid 2000s when pretty much every cheap USB keyboard you could find started including an abundance of media keys in its layout? Nowadays, especially if you have a customized or reduced-sized mechanical keyboard, those are nowhere to be seen. Whenever our modern selves need those extra keys, we have to turn to external peripherals, and [Gary’s] Knobo is one that looks like it could’ve come straight out of a fancy retail package.
The Knobo is a small macro keypad with 8 mechanical Cherry-style keys and a clickable rotary encoder knob as its main feature. Each key and knob gesture can be customized to any macro, and with five gestures possible with the knob, that gives you a total of thirteen inputs. On top of that, the build and presentation look so sleek and clean we’d swear this was a product straight off of Teenage Engineering’s money-printing machine.
The actions you can do with those inputs range from simple media controls with a volume knob all the way to shortcuts to make a Photoshop artist’s life easier. Right now you can only reprogram the Knobo’s Arduino-based firmware with an In-Circuit Serial Programmer to change what the inputs do, but [Gary] is currently working on configuration software so that users without any programming knowledge will be able to customize it too.
Puff and Suck (or Sip and Puff) systems allow people with little to no arm mobility to more easily interact with computers by using a straw-like unit as an input device. [Ana] tells us that the usual way these devices are used to input text involves a screen-based keyboard; a cursor is moved to a letter using some method (joystick, mouse emulator, buttons, or eye tracking) and that letter is selected with a sip or puff into a tube.
[Ana] saw such systems as effective and intuitive to use, but also limited in speed because there’s only so fast that one can select letters one at a time. That led to trying a new method; one that requires a bit more work on the user’s part, but the reward is faster text entry. The Puff-Suck Interface for Fast Text Input turns a hollow plastic disk and a rubber diaphragm into bipolar pressure switch, able to detect three states: suck, puff, and idle. The unit works by having an IR emitter and receiver pair on each side of a diaphragm (one half of which is shown in the image above). When air is blown into or sucked out of the unit, the diaphragm moves and physically blocks one or the other emitter-receiver pair. The resulting signals are interpreted by an attached Arduino.
How does this enable faster text input? By throwing out the usual “screen keyboard” interface and using Morse code, with puffs as dots and sucks as dashes. The project then acts as a kind of Morse code keyboard. It does require skill on the user’s part, but the reward is much faster text entry. The idea got selected as a finalist in the Human-Computer Interface Challenge portion of the 2018 Hackaday Prize!
Morse code may seem like a strange throwback to some, but not only does the bipolar nature of [Ana]’s puff-suck switch closely resemble that of Morse code input paddles, it’s also easy to learn. Morse code is far from dead; we have pages of projects and news showing its involvement in everything from whimsical projects to solving serious communication needs.
No one loves hacked keyboards more than Hackaday. We spend most of our workday pressing different combinations of the same 104 buttons. Investing time in that tool is time well spent. [Max] feels the same and wants some personality in his input device.
In the first of three videos, he steps us through the design and materials, starting with a layer to hold the keys. FR4 is the layer of fiberglass substrate used for most circuit boards. Protoboards with no copper are just bare FR4 with holes. Homemade CNC machines can glide through FR4, achieving clean lines, and the material comes in different mask colors so customizing an already custom piece is simple. We see a couple of useful online tools for making a homemade keyboard throughout the videos. The first is a keypad layout tool which allows you to start with popular configurations and tweak them to suit your weirdest desires. Missing finger? Forget one key column. Extra digit? Add a new key column. Huge hands? More spaces between the keys. [Max] copied the Iris keyboard design but named his Arke, after the fraternal sister to Iris which is fitting since his wrist rests are removable.
In the second video, we see how the case and a custom cable are designed. One of the most beautiful features of this build is the cable with 3D-printed boots that are sized to fit ordinary pin headers. The homemade keyboard that this article is being typed on just has a piece of yellow Cat5 between the halves. When the custom cable is assembled, we see a hack revealed by accident. Twelve wires for the cable are salvaged from some ribbon cable and by cutting the ribbon straight across, every scrap of wire is the same length. No more of those unruly wires at the end or that one short one that kinks all the others. There is also a cable boot design that didn’t make the final cut but featured some secure threaded ends that are still available for download.
Another bonus hack comes from the calipers used to break wires into subsections. Check out how to make your calipers run for years on a singe battery. Keyswitch wiring is explained in the final video, shown below, which is simple enough since it is a row-and-column arrangement. The third bonus hack is when we see that classic gray ribbon “stripped” by applying a hot iron to the tip. [Max], like others, has a video about making helping hands from coolant hoses, but here he chooses the more straightforward route of putting some gummy tack on the table and mashing the header into it. Like the shortcut with the keyboard layout design, an online tool generates the firmware.
While the vast majority of us are content to plod along with the squishy chiclet keyboards on our laptops, or the cheapest USB membrane keyboard we could find on Amazon, there’s a special breed out there who demand something more. To them, nothing beats a good old-fashioned mechanical keyboard, where each key-press sounds like a footfall of Zeus himself. They are truly the “Chad” of the input device world.
But what if even the most high end of mechanical keyboards doesn’t quench your thirst for spring-loaded perfection? In that case, the only thing left to do is design and build your own. [Matthew Cordier] recently unveiled the custom mechanical keyboard he’s been working on, and to say it’s an elegant piece of engineering is something of an understatement. It may even better inside than it does on the outside.
The keyboard, which he is calling z.48, is based around the Arduino Pro Micro running a firmware generated on kbfirmware.com, and features some absolutely fantastic hand-wiring. No PCBs here, just a rainbow assortment of wire and the patience of a Buddhist monk. The particularly attentive reader may notice that [Matthew] used his soldering iron to melt away the insulation on his wires where they meet up with the keys, giving the final wiring job a very clean look.
Speaking of the keys, they are Gateron switches with DSA Hana caps. If none of those words mean anything to you, don’t worry. We’re through the Looking Glass and into the world of the keyboard aficionado now.
Finally, the case itself is printed on a CR-10 with a 0.3 mm nozzle and 0.2 mm layers giving it a very fine finish. At 70% infill, we imagine it’s got a good deal of heft as well. [Matthew] mentions that a production case and a PCB are in the cards for the future as he hopes to do a small commercial run of these boards. In the meantime we can all bask in the glory of what passes for a prototype in his world.
If you have even the most passing interest in space and what it takes to get there, you’ve probably already played Kerbal Space Program (KSP). If you haven’t, then you should set aside about ten hours today to go check that out real quick. Don’t worry, Hackaday will still be here when you get back. Right now you need to focus on getting those rockets built and establishing a network of communication satellites so you can get out of low orbit.
For those of you who’ve played the game (or are joining us again after playing KSP for the prescribed 10, 12, 16 hours), you’ll know that the humble computer keyboard is not very well suited to jaunts through space. You really want a joystick and throttle at the absolute minimum for accurate maneuvers, but even you’ll be spending plenty of time back on the keyboard to operate the craft’s various systems. If you want the ultimate KSP control setup, you’ll need to follow in the footsteps of [Hugo Peeters] and build your own. Luckily for us, he’s written up an exceptionally well detailed guide on building KSP controllers that should prove useful even if you don’t want to clone his.
Wiring switches and buttons to the Arduino.
At the most basic level, building a KSP controller consists of hooking a bunch of switches and buttons to a microcontroller such as the Arduino or Teensy, and converting those to USB HID key presses that the game understands. This works fine up to a point, but is limited because it’s only a one-way method of communication. For his controller, [Hugo] forked KSPSerialIO, a plugin for KSP that allows bidirectional communication between the game and your controller, enabling things like digital readouts of speed and fuel levels on the controller’s panel.
Once the logistics of how you’ll talk to the game are settled, the rest is really up to the individual. The first step in building your own KSP controller is deciding what you want it to do. Are you looking to fly planes? Control a rover? Maybe you just want a master control panel for your space station. There’s a whole lot of things you can build in KSP, and the layout, inputs, and displays on your controller should ideally reflect your play style.
[Hugo] went with a fairly general purpose panel, but did spend quite a bit of extra time to get some slick LED bar graphs hooked up to display resource levels of different systems on his craft. That’s an extra step that isn’t strictly required for a build like this, but once you see it, you’re going to have a hard time not wanting to include it on your own panel. He also went through the expense of having the panel and case professionally laser cut and etched, which definitely gives it a polished feel.
When working on software development in a team environment, it’s important to know the status of your build at all times. Jenkins can display build automation info on a screen but where’s the fun in that? A popular office project is to build some kind of visual display of a project’s status, and [dkt01] has done just that with this stack light build monitor.
In this day and age of online shopping, random bits of industrial hardware are just an eBay away, so it’s easy to find some cool lamps or indicators for any project. [dkt01] sourced a standard 24V stack light off the shelf. With its green, red, and yellow indicators, its perfect for showing the current status of their build server.
The project uses an Arduino Pro Micro combined with an ENC28J60 Ethernet adapter. We used to see that chip all the time but in 2017 it’s somewhat of a classic setup since the great unwashed masses largely migrating to the ESP8266. However, for the purposes of this project, it was perfect for connecting to the wired office network (after all, you want to know the status of your build and not of your WiFi). [dkt01] even managed to get a web configuration to work despite the relatively meager resources of the ATmega32u4.
The build is cleanly executed, with the microcontroller and Ethernet hardware tucked into a 3D printed base for the stack light’s enclosure. It’s far more likely to become a permanent office fixture if it’s a tidy build without wires hanging out everywhere so a custom PCB ties everything together neatly. In another nice touch, the stack lights flash on initialization to indicate if the DHCP lease was successful, which makes troubleshooting easier. There’s an overview of all different light combinations and meanings in the video after the break.
Overall it’s a solid build with some off-the-shelf components that serves a genuine purpose. For a similar project built on a smaller scale, check out the Indictron. For something bigger, show us how you’ve learned to output your server status on the city’s traffic lights. Ask first, though.