Posts with «musical hacks» label

The Precise Science Of Whacking A Wine Glass

It’s common knowledge that tapping a wine glass produces a pitch which can be altered by adjusting the level of the tipple of choice inside. By filling twelve glasses with different amounts of liquid and tuning them to the twelve notes of the scale, it’s possible to make a one-octave instrument – though the speed and polyphony are bottle-necked by the human operator. If you think it sounds like a ripe project for automation, you’re correct: [Bitluni’s lab] has done what needed to be done, and created a MIDI instrument which plays the glasses using mallets.

Electronically it’s a simple build – some 12 V solenoids driven by MOSFETs, with an Arduino in charge. For the mechanical build, a 3D printer proved very useful, as each mallet could be made identical, ensuring a consistent tone across all glasses. Rubber covers printed in flexible filament were fitted to reduce the overtones and produce a clearer sound. [Bitluni] also utilised different types of glasses for the low and high pitches, which also helped to improve the clarity of the tone.

MIDI is of course the perfect protocol for this application; simple, lightweight and incredibly widely used, it’s the hacker’s delight for projects like this. The instrument can perform pre-programmed sequences, or be played live with a MIDI controller. Both of these are shown in the video after the break – stick around for a unique rendition of Flight Of The Bumblebee. For a more compact wine glass based music creation solution, we recommend this nifty project, which alters pitch using a water balloon raised and lowered into the glass by a servo. 

Hack a Day 31 Jul 16:00

Strike a Chord With This LED Ukulele

You may laugh off the ukulele as a toy or joke instrument, and admittedly, their starting price tag and the quality that usually comes with such a price tag doesn’t help much to get a different opinion on that. But it also makes it the perfect instrument for your next project. After all, they’re easy to handle, portable, and cheap enough to use a drill and other tools on them without too much regret. Plus, a little knowledge to play can get you far, and [Elaine] can teach you the essential, “all the pop songs use it”, four chords with her Arduino powered LED Ukulele.

As first step, [Elaine] drilled holes in her ukulele’s fingerboard to place some LEDs at all the positions required to play the four chords C, G, Am, and F. Connected to an Arduino attached to the ukulele’s back, each chord will light up its associated LEDs to indicate the finger positions required to play the chord itself. Taking the teaching part a step further, her next step is to extend each LED with a second, light sensing one, and read back if the fingers are placed at the correct position.

[Elaine] has already plans to turn the ukulele into an interactive game next. And if four chords are eventually not enough for you anymore, have a look at another LED based project teaching to play any major, minor and major seventh chord on the ukulele.

Stomping On Microcontrollers: Arduino Mega Guitar Effects Pedal

Effects pedals: for some an object of overwhelming addiction, but for many, an opportunity to hack. Anyone who plays guitar (or buys presents for someone who does) knows of the infinite choice of pedals available. There are so many pedals because nailing the tone you hear in your head is an addictive quest, an itch that must be scratched. Rising to meet this challenge are a generation of programmable pedals that can tweak effects in clever ways.

With this in mind, [ElectroSmash] are back at it with another open source offering: the pedalSHIELD MEGA. Aimed at musicians and hackers who want to learn more about audio, DSP and programming, this is an open-hardware/open-software shield for the Arduino MEGA which transforms it into an effects pedal.

The hardware consists of an analog input stage which amplifies and filters the incoming signal before passing it to the Arduino, as well as an output stage which does the DAC-ing from the Arduino’s PWM outputs, and some more filtering/amplifying. Two 8-bit PWM outputs are used simultaneously to make pseudo 16-bit resolution — a technique you can read more about in their handy forum guide.

The list of effects currently implemented covers all the basics you’d expect, and provides a good starting point for writing custom effects. Perhaps a library for some of the commonly used config/operations would be useful? Naturally, there are some computational constraints when using an Arduino for DSP, though it’s up to you whether this is a frustrating fact, or an opportunity to write some nicely optimised code.

[ElectroSmash] don’t just do pedals either: here’s their open source guitar amp.

Synthbike Rolls To The Beat

Modular synthesizers are some of the ultimate creative tools for the electronic musician. By experimenting with patch leads, knobs and switches, all manner of rhythmic madness can be conjured out of the æther. While they may overflow with creative potential, modular synths tend to fall down in portability. Typically built into studio racks and composed of many disparate modules, it’s not the sort of thing you can just take down the skate park for a jam session. If only there was a solution – enter the madness that is Synth Bike.

Synth Bike, here seen in the 2.0 revision, impresses from the get go, being built upon a sturdy Raleigh Chopper chassis. The way we see it, if you’re going to build a synth into a bicycle, why not do it with some style? From there, the build ratchets up in intensity. There’s a series of sequencer modules, most of which run individual Arduino Nanos. These get their clock from either a master source, an external jack, or from a magnetic sensor which picks up the rotation of the front wheel. Your pace dictates the tempo, so you’ll want to work those calves for extended raves at the park.

The features don’t stop there – there are drums courtesy of a SparkFun WAV Trigger, an arcade button keyboard, and a filter board running the venerable PT2399 digital delay chip. It’s all assembled on a series of panels with wires going everywhere, just like a true modular should be.

The best thing is, despite the perplexing controls and arcane interface, it actually puts out some hot tunes. It’s  not the first modular we’ve seen around these parts, either.


Tracktorino Shields You From Poor Interfaces

On-screen controls in a digital audio workstation expand the power of a DJ or musician, but they are not intuitive for everyone. The tactility of buttons, knobs, sliders and real-world controls feels nothing like using a mouse, trackpad, or even a touchscreen. Unfortunately, devices meant to put control into a DJs hands can be unavailable due to location or cost. [Gustavo Silveira] took charge of the situation so he could help other DJs and musicians take control of their workstations with a customized MIDI interface for Traktor DJ software.

MIDI is a widely used serial protocol which has evolved from a DIN connector to USB, and now it is also wireless. This means that the Traktorino is not locked to Traktor despite the namesake. On the Hackaday.io page, there’s even a list of other workstations it will work with, but since many workstations, all the good ones anyway, accept MIDI hardware like this, the real list is a lot longer.

The custom circuit board is actually a shield. Using an Arduino UNO, the current poster child of the Arduino world, opens up the accessibility for many people who don’t know specialized software. A vector drawing for a lasercut enclosure is also included. This means that even the labeling on the buttons are not locked into English language.

Here’s another project which combined laser cutting and MIDI to make some very clever buttons or turn your DIN MIDI connector into USB.

Art Deco Radio Gets FM Reception

Taking a vintage radio and cramming it full of modern, Internet-connected, guts has long been a staple of the hacking and making scene. While some might see it as a crime to take what’s arguably a legitimate piece of history and turn it into nothing more than a slipshod case for the Raspberry Pi, we have to admit there’s a certain appeal to the idea. Taking the beauty of classic design and pairing it with more modern capabilities is getting the best of both worlds.

But this project by [Nick Koumaris] is a somewhat unique take on the concept. Rather than sacrificing a real vintage piece of hardware to house the electronics, he’s designed a 3D printable case that looks like a classic 1936 AWA Radiolette. But what’s really interesting to us is that he then puts a basic FM radio inside of it.

That’s right, no Internet radio streaming or smartphone Bluetooth compatibility here. It’s just a regular FM radio, not entirely unlike the kind of hardware you’d expect to be inside of a classic radio. Of course, it’s much more modern, and [Nick] actually built it himself from a TEA5767 FM radio module and an Arduino Pro Mini.

While functionally it might not be terribly exciting, we do appreciate that he went through the trouble to make a vintage-looking user interface for the radio. While physical buttons would arguably have been more appropriate given the era, the art deco inspired font and graphics that show on the device’s Nokia 5110 LCD do look really slick.

Purists will surely be happy to see another project where a piece of vintage piece of audio equipment wasn’t sacrificed at the Altar of Hack, but we’ve also played host to many projects which weren’t nearly as concerned with historical preservation.

There’s More To MIDI Than Music – How About A Light Show?

MIDI instruments and controllers are fun devices if you want to combine your interest in music and electronics in a single project. Breaking music down into standardized, digital signals can technically turn anything with a button or a sensor into a musical instrument or effect pedal. On the other hand, the receiving end of the MIDI signal is mostly overlooked.

[FuseBerry], a music connoisseur with a background in electronics and computer science, always wanted to build a custom MIDI device, but instead of an instrument, he ended up with a MIDI controlled light show in the shape of an exploded truncated icosahedron ([FuseBerry]’s effort to look up that name shouldn’t go unnoticed). He designed and 3D-printed all the individual geometric shapes, and painstakingly equipped them with LEDs from a WS2818B strip. An Arduino Uno controls those LEDS, and receives the MIDI signals through a regular 5-pin DIN MIDI connector that is attached to the Arduino’s UART interface.

The LEDs are mapped to pre-defined MIDI notes, so whenever one of them is played, and their NoteOn message is received, the LEDs light up accordingly. [FuseBerry] uses his go-to DAW to create the light patterns, but any software / device that can send MIDI messages should do the trick. In the project’s current state, the light pattern needs to be created manually, but with some adjustments to the Arduino code, that could be more automated, something along the lines of this MIDI controlled Christmas light show.

Pipe Your Way Through The Jams

Playing the bagpipes is an art that takes a significant effort to master, both in keeping a constant air supply through balancing blowstick and bag and in learning the finger positions on the chanter. This last task we are told requires constant finger practice, and a favorite place for this is on the steering wheel as a would-be piper drives. [DZL] therefore took this to the next level, placing touch sensors round a car steering wheel that could be interpreted by an Arduino Pro Mini to produce a passable facsimile of a set of bagpipes via an in-car FM transmitter. It lacks the drone pipes of the real thing, but how many other Škodas feature inbuilt piping?

We’ve covered an unexpected number of bagpipe projects over the years, but never had a close look at this rather fascinating musical instrument. If you are curious, the US Coast Guard pipe band has a short guide to its parts, and we’ve brought you a set of homemade pipes built from duct tape and PVC pipe. They may once have been claimed as an instrument of war, but they seem to also be a favorite instrument of hardware hackers.

Thanks [Sophi] for the tip.

Hack a Day 18 Mar 12:00

The Furby Organ

Sometimes you have an idea that is so brilliant and so crazy that you just have to make it a reality. In 2011, [Look Mum No Computer] drew up plans in his notebook for a Furby organ, an organ comprised of a keyboard and a choir of Furbies. For those who don’t know know what a Furby is, it’s a small, cute, furry robotic toy which speaks Furbish and a large selection of human languages. 40 million were sold during its original production run between 1998 and 2000 and many more since. Life intervened though, and, [LMNK] abandoned the Furby organ only to recently take it up again.

He couldn’t get a stable note out of the unmodified Furbies so he instead came up with what he’s calling the Furby Forman Fusion Synthesis. Each Furby is controlled by a pair of Ardunios. One Arduino sequences parts inside the Furby and the other produces a formant note, making the Furby sing vowels.

We love the label he’s given for what would otherwise be the power switch, namely the Collective Awakening switch. Flicking it causes all 44 (we count 45 but he says 44) Furbies to speak up while moving their ears, eyes, and beaks. Pressing the Loop switch makes them hold whatever sound they happen to be making. The Vowel dial changes the vowel. But you’ll just have to see and hear it for yourself in the videos below. The second video also has construction details.

Want to make a Furby do whatever you want? Check out how [Jeija] has reverse engineered one to take control of it.

Thanks for the tip, [Måns Almered].

Hack a Day 12 Feb 16:30

Circuit Bent Casio SK-1 gets an Arduino Brain

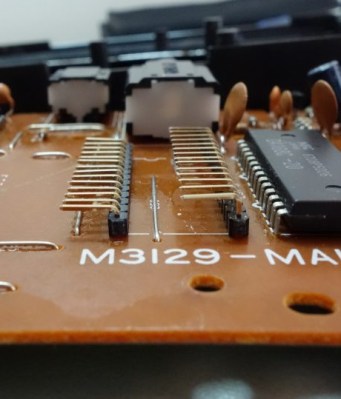
The Casio SK-1 keyboard is fairly well-known in the “circuit bending” scene, where its simple internals lend themselves to modifications and tweaks to adjust the device’s output in all sorts of interesting ways. But creating music via circuit bending the SK-1 can be tedious, as it boils down to fiddling with the internals blindly until it sounds cool. [Nick Price] wanted to do something a bit more scientific, and decided to try replacing his SK-1’s ROM with an Arduino so he could take complete control it.

Replacing the ROM chip with header pins.

That’s the idea, anyway. Right now he’s gotten as far as dumping the ROM and getting the Arduino hooked up in place of it. Unfortunately the resulting sound conjures up mental images of a 56K modem being cooked in a microwave. Clearly [Nick] still has some work ahead of him.

For now though, the progress is fascinating enough. He was able to pull the original NEC 23C256 chip out of the keyboard and read its contents using an Arduino and some code he cooked up, and he’s even put the dump online for any other SK-1 hackers out there. He then wrote some new code for the Arduino to spit data from the ROM dump back to the keyboard when requested. In theory, it should sound the same as before, but with the added ability to “forge” the data going back to the keyboard to make new sounds.

The result is what you hear in the video linked after the break. Not exactly what [Nick] had in mind. After some snooping with the logic analyzer, he believes the issue is that the Arduino can’t respond as fast as the original NEC chip did. He’s now got an NVRAM chip on order to replace the original NEC chip; the idea is that he can still use the Arduino to reprogram the NVRAM chip when he wants to play around with the sound.

We’ve covered some pretty fancy circuit bent instruments here in the past, but if you’re looking for something a bit easier to get your feet wet we ran a start-to-finish guide back in the Ye Olden Days of 2011 which should be helpful.