Posts with «musical hacks» label

Unique Musical Instrument Defies Description

Since the first of our ancestors discovered that banging a stick on a hollow log makes a jolly sound, we hominids have been finding new and unusual ways to make music. We haven’t come close to tapping out the potential for novel instruments, but then again it’s not every day that we come across a unique instrument and a new sound, as is the case with this string-plucking robot harp.

Named “Greg’s Harp” after builder [Frank Piesik]’s friend [Gregor], this three-stringed instrument almost defies classification. It’s sort of like a harp, but different, and sort of like an electric guitar, but not quite. Each steel string has three different ways to be played: what [Frank] calls “KickUps”, which are solenoids that strike the strings; an “eBow” coil stimulator; and a small motor with plastic plectra that pluck the strings. Each creates a unique sound at the fundamental frequency of the string, while servo-controlled hoops around each string serve as a robotic fretboard to change the notes. Sound is picked up by piezo transducers, and everything is controlled by a pair of Nanos and a Teensy, which takes care of MIDI duties.

Check out the video below and see if you find the sound both familiar and completely new. We’ve been featuring unique instruments builds forever, from not-quite-violins to self-playing kalimbas to the Theremincello, but we still find this one enchanting.

Hack a Day 11 Apr 21:00
arduino  fret  guitar  harp  midi  musical hacks  nano  plectrum  pluck  servo  solenoid  string  teensy  

Self-Playing Whistle While You Work From Home

In ridiculous times, it can help to play ridiculous instruments such as the slide whistle to keep your bristles in check. But since spittle is more than a little bit dangerous these days, it pays to come up with alternative ways to play away the days during lockdown life.

Thanks to some clever Arduino-driven automation, [Gurpreet] can maintain a safe distance from his slide whistle while interacting with it. Slide whistles need two things — air coming in from the top, and actuation at the business end. The blowing force now comes from a focused fan like the ones that cool your printed plastic as soon as the hot end extrudes it. A stepper motor moves the slide up and down using a printed rack and pinion.

Here’s a smooth touch — [Gurpreet] added a micro servo to block and unblock the sound hole with a cardboard flap to make the notes more distinct. Check out the build video after the break, which includes a music video for “My Heart Will Go On”, aka the theme from Titanic. It’s almost like the ship herself is playing it on the steam whistles from the great beyond.

Speaking of, did you hear about the effort to raise and restore the remains of her radio room?

Self-Playing Kalimba V2 Thanks to Readers Like You

Would you like to know the great thing about this community we have here? All the spitballing that goes on every day in the comments, the IO chat rooms, and in the discussion threads of thousands of projects. One of our favorite things about the Hackaday universe is that we help each other out, and because of that, our collective curiosity pushes so many designs forward.

[Gurpreet] knows what we’re talking about. He’s back with version two of his self-playing kalimba, driven as strongly as ever by the dulcet tones of the Avatar theme. Now the robo-kalimba is rocking two full octaves, and thanks to your comments and suggestions, has relocated the servos where they can’t be picked up by the soundboard.

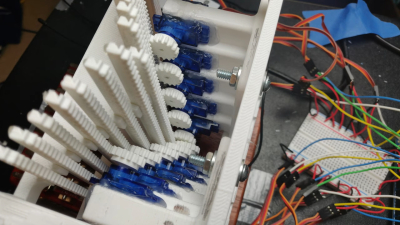
We gasped when we saw the new mechanism — a total of 15 rack and pinion linear actuators that make the kalimba look like a tiny mechanical pipe organ. Now the servos float, fixed into a three-part frame that straddles the sound box. [Gurpreet] melted servo horns to down to their hubs rather than trying to print something that fits the servos’ sockets.

Thumb your way past the break to check out the build video. [Gurpreet] doesn’t shy away from showing what went wrong and how he fixed it, or from sharing the 3D printering sanity checks along the way that kept him going.

Plucking kalimba tines is a difficult problem to solve because they’re stiff, but with timbre sensitive to many degrees of pressure. A slightly easier alternative? Make a toy player piano.

Plucky Kalimba Plays Itself

[Gurpreet] fell in love with the peaceful, floaty theme from the Avatar series and bought a kalimba so he could hear it resonate through his fingertips. He soon realized that although it’s nice to play the kalimba, it would be a lot cooler if it played itself. Then he could relax and enjoy the music without wearing out his thumbs.

After doing a bit of experimentation with printing tine-plucking extensions for the servo horns, [Gurpreet] decided to start the design process by mounting the servos on a printed base. The servos are slotted into place by their mounting tabs and secured with hot glue. We think this was a good choice — it’s functional and it looks cool, like a heat sink.

[Gurpreet]’s future plans include more servos to pluck the rest of the tines, and figuring out how feed it MIDI and play it real time. For the demo after the break, [Gurpreet] says he lapel mic’d the kalimba from the back and cut out the servo noise with Audacity, but ultimately wants to figure out how to quiet them directly. He’s going to try lubing the gears and making a sound-dampening enclosure with foam, but if you have any other ideas, let him know down below.

We don’t see too many kalimba projects around here, but here’s one connected to a Teensy-based looper.

Via [r/arduino]

Fabric(ated) Drum Machine

Some folks bring out an heirloom table runner when they have company, but what if you sewed your own and made it musical? We’d never put it away! [kAi CHENG] has an Instructable about how to recreate his melodic material, and there is a link to his website, which describes his design process, not just the finished product. We have a video below showing a jam session where he exercises a basic function set.

GarageBand is his DAW of choice, which receives translated MIDI from a Lilypad. If you don’t have a Lilypad, any Arduino based on the ATmega328P chip should work seamlessly. Testing shows that conductive threads in the soft circuit results in an occasional short circuit, but copper tape makes a good conductor  at the intersections. Wide metallic strips make for tolerant landing pads beneath modular potentiometers fitted with inviting foam knobs. Each twist controls a loop in GarageBand, and there is a pressure-sensitive pad to change the soundset. Of course, since this is all over MIDI, you can customize to your heart’s content.

MIDI drums come in all shapes and sizes, from a familiar game controller to hand rakes.

Baby’s First Jukebox is Fun for Parents, Too

Believe it or not, there’s a $400 toy mp3 player out there for kids. It looks pretty nice, with colorful buttons and a wood console and all, but those features don’t really justify the price tag. [DerThes] wanted one for his 2-year-old anyway, so he made his own ruggedized version for a whole lot less.

The simple and kid-friendly interface lets [DerThes Jr.] choose from one of nine albums to play by pushing one of the candy-colored buttons. The bottom row of buttons handle play/pause and moving through the track list. When mom and dad get tired of listening to whatever the kids are into these days, they can enter the special god mode code to access 99 of their favorite albums.

This baby boombox is built with an Arduino Uno and an Adafruit music maker shield. [DerThes] etched his own PCB to hold the buttons and the pair of shift registers needed to interface them with the Uno. If you’ve never etched before, here’s a good chance to dip your toe in the ferric chloride, because [DerThes] has the transparency in his repo and a line on a nice instructional video.

If you don’t think your toddler is ready to respect a field of momentaries, you could make a jukebox with NFC blocks.

[via Arduino blog]

Need Hackable Melodies? Here’s The TETRIS Theme and More

[Robson Couto] started to get interested in musical projects and as a side effect created downloadable code with simple notation for a good variety of themes, songs, and melodies. They are all for the Arduino and use only the built-in tone() function, but don’t let that distract you. If you look past that, you’ll see that each sketch is a melody that consists of single notes and durations; easily adapted to other purposes or simply used as-is. After all, [Robson] wanted the source of each tune to be easily understood, easily modified, and to have no external dependencies.

All that may sound a bit like MIDI, but MIDI has much more in common with hardware events than music notation because it includes (among other things) note starts and note ends as separate elements. Converting MIDI into a more usable format was a big part of a project that fed Bach music to a neural network and got surprisingly good results.

When doing music projects, sometimes having a recognizable melody represented very simply as notes and durations with only one note at a time can be an awfully handy resource, and you can find them on GitHub. There’s a brief video of the Tetris theme (actual name: Korobeiniki) being played after the break.

Hack a Day 25 Dec 18:00

Rock ‘n Roll With 3D-Printed Tonewheels

What can you do with ferromagnetic PLA? [TheMixedSignal] used it to give new meaning to the term ‘musicians’ gear’. He’s made a proof of concept for a DIY tone generator, which is the same revolutionary system that made the Hammond organ sing.

Whereas the Hammond has one tonewheel per note, this project uses an Arduino to drive a stepper at varying speeds to produce different notes. Like we said, it’s a proof of concept. [TheMixedSignal] is proving that tonewheels can be printed, pickups can be wound at home, and together they will produce audible frequencies. The principle is otherwise the same — the protruding teeth of the gear induce changes in the magnetic field of the pickup.

[TheMixedSignal] fully intends to expand on this project by adding more tone wheels, trying different gear profiles, and replacing the stepper with a brushless motor. We can’t wait to hear him play “Karn Evil 9”. In the meantime, put on those cans and check out the demo/build video after the break.

We don’t have to tell you how great Hammond organs are for making music. But did you know they can also encode secret messages?

Via the Arduino blog.

Wiping Your Windscreen To The Beat

Nothing spoils your mood quite like your windscreen wipers not feeling it when the beat drops. Every major car manufacturer is focused on trying to build the electric self driving vehicle for the masses, yet ignoring this very real problem. Well [Ian Charnas] is taking charge, and has successfully slaved his car’s wipers to beat of its stereo.

Starting with the basics, [Ian] first needed to control the speed of the wiper motor. This was done using a custom power supply adapted from another project. The brain of the system is a Raspberry Pi 3B+ which runs a phase locked loop algorithm to sync the music and the motor. Detecting the beat turned out to be the most difficult part of the project, and from the research [Ian] did, there is no standard solution. He ended up settling on “madmom“, a Python audio and music signal processing library, which runs a neural net to detect the beat in real time. The Raspi sends the required PWM and Enable signals to an Arduino over serial, which in turn controls the power supply. The entire system was neatly integrated in the car, with a switch in the dash that connects the motor to the new power supply on demand, to allow the wipers to still be used normally (and safely).

[Ian] filed a provisional patent application for the idea, and will be putting it on auction on eBay soon, with the hope that some major car manufacturer would be interested. For older cars, you can shove an Arduino into the stereo, or do a super cheap bluetooth upgrade. Check out the video after the break.

DIY MIDI Looper Controller Looks Fantastic!

Due to pedalboard size, complicated guitar pedals sometimes reduce the number of buttons to the bare minimum. Many of these pedals are capable of being controlled with an external MIDI controller, however, and necessity being the mother of invention and all, this is a great opportunity to build something and learn some new skills at the same time. In need of a MIDI controller, Reddit user [Earthwin] built an Arduino powered one to control his Boss DD500 Looper pedal and the result is great looking.

Five 16×2 LCD screens, one for each button, show the functionality that that button currently has. They are attached (through some neat wiring) to a custom-built PCB which holds the Arduino that controls everything. The screens are mounted to an acrylic backplate which holds the screens in place while the laser-cut acrylic covers are mounted to the same plate through the chassis. The chassis is a standard Hammond aluminum box that was sanded down, primed and then filler was used to make the corners nice and smooth. Flat-top LEDs and custom 3D printed washers finish off the project.

[Earthwin] admits that this build might be overkill for the looper that he’s using, but he had fun building the controller and learning to use an Arduino. He’s already well on his way to building another, using the lessons learned in this build. If you want to build your own MIDI controller, this article should help you out. And then you’re ready to build your controller into a guitar if you want to.

[Via Reddit]