Posts with «midi» label

Into the void with lights and shadows

Rodrigo Carvalho is a designer and interactive new media artist from Porto (Portugal) researching on real-time relations between sound, image and movement in audiovisual interactive spaces. He submitted to Arduino blog his latest project “Into the void” running on Arduino Mega:

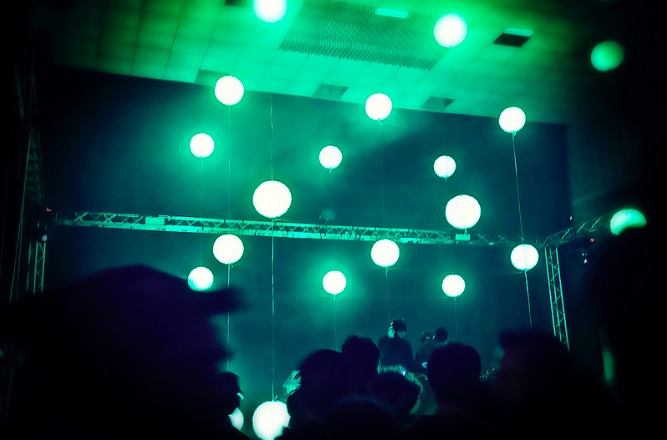
First version of “Into the Void”, a series of audiovisual installations exploring physical structures creating light and shadows with immersive audiovisual spaces.
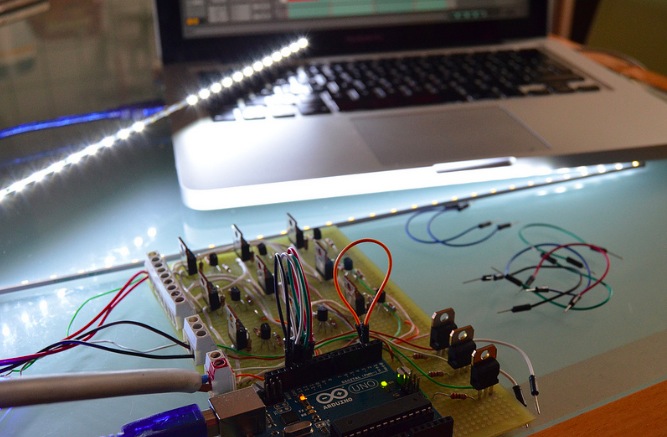
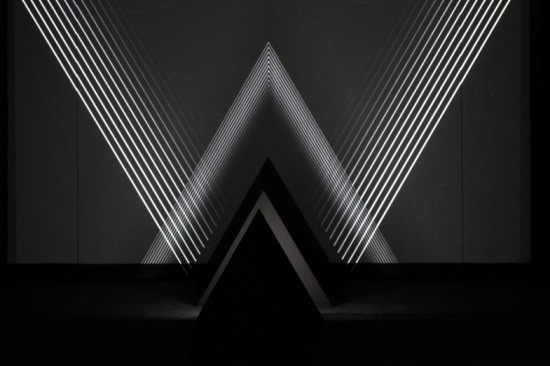
A array of triangles is placed on the floor, each one has a LED strip on the back which are connected to an Arduino. On MAX, series of random numbers generators and different probabilities trigger a signal to each triangle, making it turn on or off.
At the same time that a triangle is triggered a MIDI message is sent to Ableton Live and plays notes on a MIDI Instrument and an OSC message is sent to Processing for the Visual output.


The installation was created in collaboration with Ana Duarte, André Sousa and Daniel Correia and you can find more info at this link.

Arduino Blog 07 Jan 19:23

Create Big Music Mashups on This Enormous MIDI Sequencer Board

A picture might be worth a thousand words, but for an interactive sound work called GRIDI a picture is worth infinite midi loops!

Read more on MAKE

The post Create Big Music Mashups on This Enormous MIDI Sequencer Board appeared first on Make: DIY Projects, How-Tos, Electronics, Crafts and Ideas for Makers.

Start Gaming Early with IKEA High (Score) Chair

If you want your kid to be really great at something, you have to start them out early. [Phil Tucker] must want his kid to be a video gamer pretty badly. [Phil’s] build starts with a $20 IKEA high chair. He likes these chairs because at that price point, tearing into them isn’t a big risk. What’s more is you can buy extra trays so you can use it as a modular project with different trays serving different purposes.

The chair has two joysticks and two buttons, looking suspiciously like a video game controller. The current incarnation (see video, below) uses an Arduino Uno to trigger an Akai MPC1000 synthesizer via the MIDI interface.

Of course, you could control other MIDI devices or even program the Arduino to do other things (like act as a game controller). We’ve seen lots of IKEA hacks, including a laser cutter, a camera slide, and even a printer (not a 3D printer, although we covered that, too).


Filed under: Android Hacks, musical hacks

48 Solenoids Transform This 1960s Typewriter into a Computer Printer

Several years ago, Chris Gregg, a Tufts University lecturer and computer engineer, received a letter from his friend Erica. This wouldn’t be so unusual, except that it was typed on an actual typewriter, not a printer. Gregg is a fan of vintage typewriters, but, as with myself, makes many mistakes, […]

Read more on MAKE

The post 48 Solenoids Transform This 1960s Typewriter into a Computer Printer appeared first on Make: DIY Projects, How-Tos, Electronics, Crafts and Ideas for Makers.

DJ sets get more interactive with Cubled and Arduino

Cubled is an interactive installation made of 27 luminous spheres arranged in space to create a cube 5 mt (16.4ft) per side floating on a stage.

The project created by Giuseppe Acito of Opificio Sonico  has a structure made of steel wires, RGB LED Strips and Ikea paper lanterns.

The system is MIDI-controlled, the notes generated by a sequencer are converted to electric signals using an Arduino UNO and a Mosfet:

No DMX device was used for this system which is 12V DC powered, with slim electric wires in order to give the lightness needed to this installation. In this clip, the performance is splitted in 2 parts: in the first a kit of electronic percussion is “played” live by a step sequencer named Sonic Fraction Beatdown (a Max\MSP device for Ableton Live), the combinations of 12 MIDI notes generated are linked to the spheres. In the second part the combinations of sounds and lights are pre-programmed patterns clip and performed live by a Tenori-on Yamaha and Ableton Live. The installation was mounted inside the Link Club (Bologna – Italy) in December 2013, which hosted some world-famous DJ set, during a month of permanence.


Arduino Blog 27 May 21:24

Play Robotic Bongos using your Household Plants

[Kirk Kaiser] isn’t afraid to admit his latest project a bit strange, being a plant-controlled set of robotic bongos. We don’t find it odd at all.  This is the kind of thing we love to see. His project’s origins began a month ago after taking a class at NYC Resistor about creating music from robotic instruments. Inspired to make his own, [Kirk] repurposed a neighbor’s old wooden dish rack to serve as a mount for solenoids that, when triggered, strike a couple of plastic cowbells or bongo drums.

A Raspberry Pi was originally used to interface the solenoids with a computer or MIDI keyboard, but after frying it, he went with a Teensy LC instead and never looked back. Taking advantage of the Teensy’s MIDI features, [Kirk] programmed a specific note to trigger each solenoid. When he realized that the Teensy also had capacitive touch sensors, he decided to get his plants in on the fun in a MaKey MaKey kind of way. Each plant is connected to the Teensy’s touchRead pins by stranded wire; the other end is stripped, covered with copper tape, and placed into the soil. When a plant’s capacitance surpasses a threshold, the respective MIDI note – and solenoid – is triggered. [Kirk] quickly discovered that hard-coding threshold values was not the best idea. Looking for large changes was a better method, as the capacitance was dramatically affected when the plant’s soil dried up. As [Kirk] stood back and admired his work, he realized there was one thing missing – lights! He hooked up an Arduino with a DMX shield and some LEDs that light up whenever a plant is touched.

We do feel a disclaimer is at hand for anyone interested in using this botanical technique: thorny varieties are ill-advised, unless you want to play a prank and make a cactus the only way to turn the bongos off!


Filed under: Arduino Hacks, musical hacks
Hack a Day 17 Apr 03:00

Arduino Synth Guitar Really Rocks

[Gr4yhound] has been rocking out on his recently completed synth guitar. The guitar was built mostly from scratch using an Arduino, some harvested drum pads, and some ribbon potentiometers. The video below shows that not only does it sound good, but [Gr4yhound] obviously knows how to play it.

The physical portion of the build consists of two main components. The body of the guitar is made from a chunk of pine that was routed out by [Gr4yhound’s] own home-made CNC. Three circles were routed out to make room for the harvested Yamaha drum pads, some wiring, and a joystick shield. The other main component is the guitar neck. This was actually a Squire Affinity Strat neck with the frets removed.

For the electronics, [Gr4yhound] has released a series of schematics on Imgur. Three SoftPot membrane potentiometers were added to the neck to simulate strings. This setup allows [Gr4yhound] to adjust the finger position after the note has already been started. This results in a sliding sound that you can’t easily emulate on a keyboard. The three drum pads act as touch sensors for each of the three strings. [Gr4yhound] is able to play each string simultaneously, forming harmonies.

The joystick shield allows [Gr4yhound] to add additional effects to the overall sound. In one of his demo videos you can see him using the joystick to add an effect. An Arduino Micro acts as the primary controller and transmits the musical notes as MIDI commands. [Gr4yhound] is using a commercial MIDI to USB converter in order to play the music on a computer. The converter also allows him to power the Arduino via USB, eliminating the need for batteries.

[Thanks Wybren]


Filed under: Arduino Hacks, musical hacks

Digital to Analog to Digital to Analog to Digital Conversion

[Andy] had the idea of turning a mixing desk into a MIDI controller. At first glance, this idea seems extremely practical – mixers are a great way to get a lot of dials and faders in a cheap, compact, and robust enclosure. Exactly how you turn a mixer into a MIDI device is what’s important. This build might not be the most efficient, but it does have the best name ever: digital to analog to digital to analog to digital conversion.

The process starts by generating a sine wave on an Arduino with some direct digital synthesis. A 480 Hz square wave is generated on an ATTiny85. Both of these signals are then fed into a 74LS08 AND gate. According to the schematic [Andy] posted, these signals are going into two different gates, with the other input of the gate pulled high. The output of the gate is then sent through a pair of resistors and combined to the ‘audio out’ signal. [Andy] says this is ‘spine-crawling’ for people who do this professionally. If anyone knows what this part of the circuit actually does, please leave a note in the comments.

The signal from the AND gates is then fed into the mixer and sent out to the analog input of another Arduino. This Arduino converts the audio coming out of the mixer to frequencies using a Fast Hartley Transform. With a binary representation of what’s happening inside the mixer, [Andy] has something that can be converted into MIDI.

[Andy] put up a demo of this circuit working. He’s connected the MIDI out to Abelton and can modify MIDI parameters using an audio mixer. Video of that below if you’re still trying to wrap your head around this one.


Filed under: Arduino Hacks, digital audio hacks

Making a Player Piano Talk MIDI

[Ramon] was always fascinated with pianos, and when he came across a few player piano rolls in an antique shop, a small kernel of a project idea was formed. He wondered if anyone had ever tried to convert a player piano into a full MIDI instrument, with a computer tickling the ivories with a few commands. This led to one of the best builds we’ve ever seen: a player piano connected to a computer.

[Ramon] found an old piano in Craigslist for a few hundred dollars, and once it made its way into the workshop the teardown began. Player pianos work via a vacuum, where air is sucked through a few pin points in a piano roll with a bellows. A series of pipes leading to each key translate these small holes into notes. Replicating this system for a MIDI device would be impossible, but there are a few companies that make electronic adapters for player pianos. All [Ramon] would have to do is replicate that.

The lead pipes were torn out and replaced with 88 separate solenoid valves. These valves are controlled via a shift register, and the shift registers controlled by an ATMega. There’s an astonishing amount of electronic and mechanical work invested in this build, and the finished product shows that.

As if turning an ancient player piano into something that can understand and play MIDI music wasn’t enough, [Ramon] decided to add a few visuals to the mix. He found a display with a ratio of 16:4.5 – yes, half as tall as 16:9 – and turned the front of the piano into a giant display. The ten different styles of visualization were whipped up in Processing.

The piano has so far been shown at an interactive art exhibit in Oakland, and hopefully it’ll make it to one of the Maker Faires next year. There are also plans to have this piano output MIDI with a key scanner underneath all the keys. Very impressive work.

Video below.


Filed under: musical hacks
Hack a Day 26 Dec 00:00

A Custom Control Surface for Audio/Video Editing

Control surfaces (input devices with sliders, encoders, buttons, etc) are often used in audio and video editing, where they provide an easy way to control editing software. Unfortunately even small control surfaces are fairly expensive. To avoid shelling out for a commercial control surface, [Victor] developed his own custom control surface that sends standard MIDI commands which can be interpreted by nearly any DAW software.

[Victor]‘s control surface includes several buttons, a display, and a rotary encoder. His firmware sends MIDI commands whenever a button is pressed or the rotary encoder is turned. [Victor] plans on adding menu functionality to the currently unused LCD display which will allow the user to change the scrubbing speed and other various settings.

One advantage of making your own control surface is that you can customize it to your own needs. [Victor] has posted a model of his 3d-printed enclosure and his source code on the project page so you can easily modify his design with any button configuration you might want.


Filed under: digital audio hacks