Posts with «midi» label

Keytar Made Out Of A Scanner To Make Even the 80s Jealous

Do any of you stay awake at night agonizing over how the keytar could get even cooler? The 80s are over, so we know none of us do. Yet here we are, [James Cochrane] has gone out and turned a HP ScanJet Keytar for no apparent reason other than he thought it’d be cool. Don’t bring the 80’s back [James], the world is still recovering from the last time.

Kidding aside (except for the part of not bringing the 80s back), the keytar build is simple, but pretty cool. [James] took an Arduino, a MIDI interface, and a stepper motor driver and integrated it into some of the scanner’s original features. The travel that used to run the optics back and forth now produce the sound; the case of the scanner provides the resonance. He uses a sensor to detect when he’s at the end of the scanner’s travel and it instantly reverses to avoid collision.

A off-the-shelf MIDI keyboard acts as the input for the instrument. As you can hear in the video after the break; it’s not the worst sounding instrument in this age of digital music. As a bonus, he has an additional tutorial on making any stepper motor a MIDI device at the end of the video.

If you don’t have an HP ScanJet lying around, but you are up to your ears in surplus Commodore 64s, we’ve got another build you should check out.


Filed under: Arduino Hacks, digital audio hacks, musical hacks

Three Arduinos, Sixteen Square Waves

[Folkert van Heusden] sent us in his diabolical MIDI device. Ardio is a MIDI synthesizer of sorts, playing up to sixteen channels of square waves, each on its separate Arduino output pin, and mixed down to stereo with a bunch of resistors. It only plays square waves, and they don’t seem to be entirely in tune, but it makes a heck of a racket and makes use of an interesting architecture.

Ardio is made up of three separate el cheapo Arduino Minis, because…why not?! One Arduino handles the incoming MIDI data and sends note requests out to the other modules over I2C. The voice modules receive commands — play this frequency on that pin — and take care of the sound generation.

None of the chips are heavily loaded, and everything seems to run smoothly, despite the amount of data that’s coming in. As evidence, go download [Folkert]’s rendition of Abba’s classic “Chiquitita” in delicious sixteen-voice “harmony”. It’s a fun exercise in using what’s cheap and easy to get something done.


Filed under: musical hacks
Hack a Day 03 Aug 16:30
arduino  i2c  midi  music  musical hacks  

Musician creates MIDI-triggered LED cubes with Arduino

For the release of his latest EP, Dario Marturano brought together electronic music, technology, science, and dance to create an awe-inspiring music video called “Pyrite.” The artist (and STEAM advocate), who goes by the stage name Holograph, built a set of illuminated cubes using plexiglass boxes and LED strips that are MIDI-triggered via Arduino circuitry.

As Make: Magazine explains, the setup consists of an Arduino, some MOSFET for 12V (in the LED cubes), and opto-triac for 220V (for the big lightbulb props). Holograph wrote a MIDI sequence in Ableton Live that syncs with the tunes, assigning every note to a light-up box. The sequence is sent to Arduino, which activates the LEDs as the dancers move through their choreography.

It should be noted that this isn’t the first time the musician has employed MIDI-driven lights either. See the magic in action below!

Arduino Blog 28 Jul 17:19
arduino  featured  holograph  leds  midi  music  pyrite  

LEDs and MIDIs: Check Out the STEAM-Inspired Music of Holograph

"It's not only a musical project, but a union between different arts and sciences, where the sound meets design, electronics, and computer science"

Read more on MAKE

The post LEDs and MIDIs: Check Out the STEAM-Inspired Music of Holograph appeared first on Make: DIY Projects and Ideas for Makers.

Play some Super Arduino Bros. tunes with percussion

Have you ever wished your Arduino project could play tunes, or even just note-based sound effects? Connor Nishijima has, and that’s why over the last three years he has been hard at work developing Miduino–a free web service that enables Makers to automatically convert their MIDI music into ready-made sketches.

Unlike any built-in Arduino noisemaking functions such as tone(), Miduino’s output is polyphonic–meaning you can play up to six notes at once. Most recently, he has added two major updates to the service: percussion tracking and switch to software-based timing.

Now the only thing setting your Arduino apart from an NES is a proper triangle wave! While it’s not fully featured yet for the whole MIDI percussion spectrum, your basic snares, kicks and hi-hats will be joining the music!

Originally I collaborated with Len Shustek to tie his Playtune library into the service, but his library requires a hardware timer for each active note–which has its ups and downs.

With a hardware timer you’ll get extremely crisp sound every time, but an Arduino Uno can only play up to three notes at once and the original code didn’t know what to do with MIDI percussion channels.

Instead, Nishijima is polling for new notes and their expirations at about 22,050Hz using Timer 1 and generating different types of percussion with some RNG tricks. Admittedly it hasn’t been perfected yet, as some songs need the polling frequency turned down to avoid crashes. (Cut the Arduino some slack, it’s not supposed to be good at this!)

To demonstrate his latest upgrades, Nishijima plays Super Mario Bros. theme song with LEDs blinking to the iconic tunes. Although some would argue that this could be faked quite easily, the Maker has gone ahead and shared the code along with a couple other examples for any doubters–these include Van Halen’s “Eruption” and Mozart’s “Rondo Alla Turca.”


BINARY IO is an Arduino-powered, four-button MIDI controller

Developed as part of a semester project, BINARY IO is a nifty little MIDI controller capable of counting from one to 15 using only four buttons. The device, which uses binary code as an input mechanism, is powered by an Arduino Uno and Max/MSP.

With a little practice, BINARY IO becomes quite intuitive and fun to play. As demonstrated by its creators Benjamin Weber and Jeremy Ondrey, users can piece together new music with sounds ranging from the piano to the xylophone to the drums.

iPad Control for Guitar Pedals

[gutbag] is a guitarist. And guitarists are notorious knob-twiddlers: they love their effects pedals. But when your music involves changing settings more than a few times in the middle of a song, it can get distracting. If only there were little robot hands that could turn the knobs (metaphorically, sorry) during the performance…

Tearing into his EHX Pitch Fork pedal, [gutbag] discovered that all of the external knob controls were being read by ADCs on the chip that did all of the processing. He replaced all of the controls with a DAC and some analog switches, coded up some MIDI logic in an ATmega328, and built himself a custom MIDI-controlled guitar pedal. Pretty slick, and he can now control it live with his iPad, or sequence the knobs with the rest of their MIDI system.

This wasn’t [gutbag]’s first foray into pedal automation, however. He’d previously automated a slew of his pedals that were already built to take control-voltage signals. What we like about this hack is the direct substitution of DAC for potentiometers. It’s just hackier. (Oh, and we’re envious of [gutbag]’s lab setup.)

This isn’t the first time we’ve covered [gutbag]’s band, Zaardvark, either. Way back in 2013, we featured an organ-pedal-to-MIDI hack of theirs. Keep on rockin’.


Filed under: musical hacks

Play some tunes on a 13-note MIDI laser harp

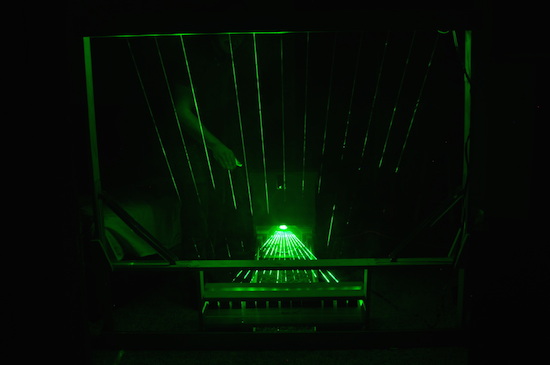
Nowadays, it seems like instruments come in all different shapes and sizes. Take Jon Bumstead’s an electronic harp, for example, that plays music by blocking laser beams — similar to how a musician would pluck a stick on the real thing.

The project consists of a laser diode, an Arduino, a galvo, several mirrors to reflect the beams, 13 photoresistors and a couple 3D-printed components for the mounts. The harp’s large frame is made up of three wooden parts that can be folded with a few hinges and held in place with 18 bolts, while the electronics are secured in a box with the galvo mounted at the top.

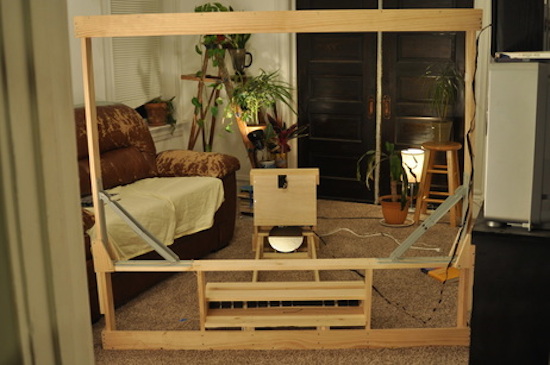
This laser harp has thirteen strings. To generate these strings, a laser beam is moved to thirteen different position (for thirteen different strings/notes) by moving a mirror galvanometer. The mirror galvanometer, or galvo for short, is a mirror that can quickly move to different positions depending on a control voltage that is sent to it. At the end of each laser beam is a photoresistor that is used to detect if a beam is blocked. When this is detected, a note is played. I also needed the laser beam to be turned off when moving positions so that it appeared as though there were thirteen distinct positions and not a continuous sheet of light.

To generate these signals, I used an Arduino. One of the greatest challenges of the project was creating  an analog output that was fast enough to move the galvo (and laser beam) so that it appeared like there were really thirteen different beams and not a single beam being moved to different positions. I constructed a 4-bit R2R digital to analog converter (DAC). The digital output of pins 8-11 incremented thirteen times (for the thirteen positions), and the DAC generated an analog voltage ranging from 0 to 4V. I then amplified this signal  and ran it through a differential amplifier to get an analog voltage from around -7 to 7 volts for the galvo. The laser diode was synchronized with the galvo using the Arduino.

According to the Maker, the harp can be programmed to direct the beam to any position at any speed. And not only can you put on your very own laser show, but you can control the type of MIDI signal being created as well.

This laser harp is really a MIDI controller (i.e. it does not have its own sound engine). You can select whatever type of MIDI signal you desire. I chose to select middle C to the C one octave higher in frequency. Another MIDI instrument or reader (I used by Macbook Pro and Garageband) must then be used to actually create audio signals that could be played through speakers.

You can see it action in the video below!

Build a Small, Custom USB MIDI Foot Board with Arduino

If you're playing for an audience you don't want to spend your set looking at a screen. See how one musician made this MIDI foot board for performances.

Read more on MAKE

The post Build a Small, Custom USB MIDI Foot Board with Arduino appeared first on Make: DIY Projects and Ideas for Makers.

Go Behind the Scenes of Installing an Interactive LED Art Exhibit

Nick Squires details his time spent using his maker skills to produce an interactive art installation and performance.

Read more on MAKE

The post Go Behind the Scenes of Installing an Interactive LED Art Exhibit appeared first on Make: DIY Projects and Ideas for Makers.