Posts with «micro» label

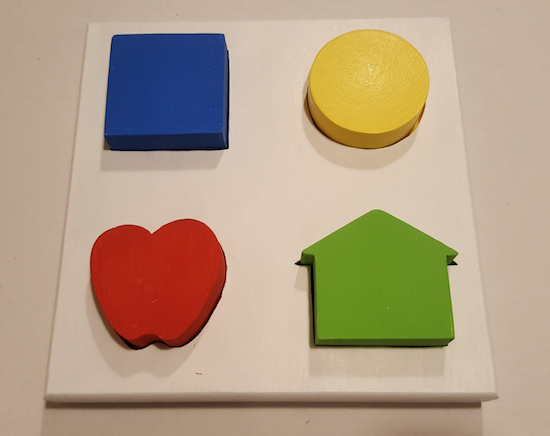
An interactive Lea shapes puzzle for visually impaired children

Using two Arduino Micros, these parents created a unique Lea shapes puzzle for their daughter Rebecca.

Because of a medical condition, Rebecca will need to have her vision assessed at the age of two or younger. This means that she’ll have to be tested without yet knowing her alphabet, and instead need to be familiar with Lea shapes which can act as a substitute for letters in a vision test. Unfortunately, her hearing is also impaired, meaning that a non-visual type of stimulus is needed to encourage a correct response.

To accomplish this, her parents came up with an excellent puzzle system, where when one of these shapes is dropped into the correct slot, the smart lights in the room change to the corresponding color. It’s an interesting project that will hopefully help with a pressing need.

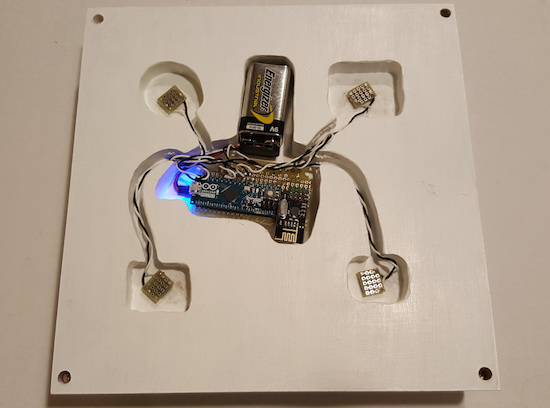
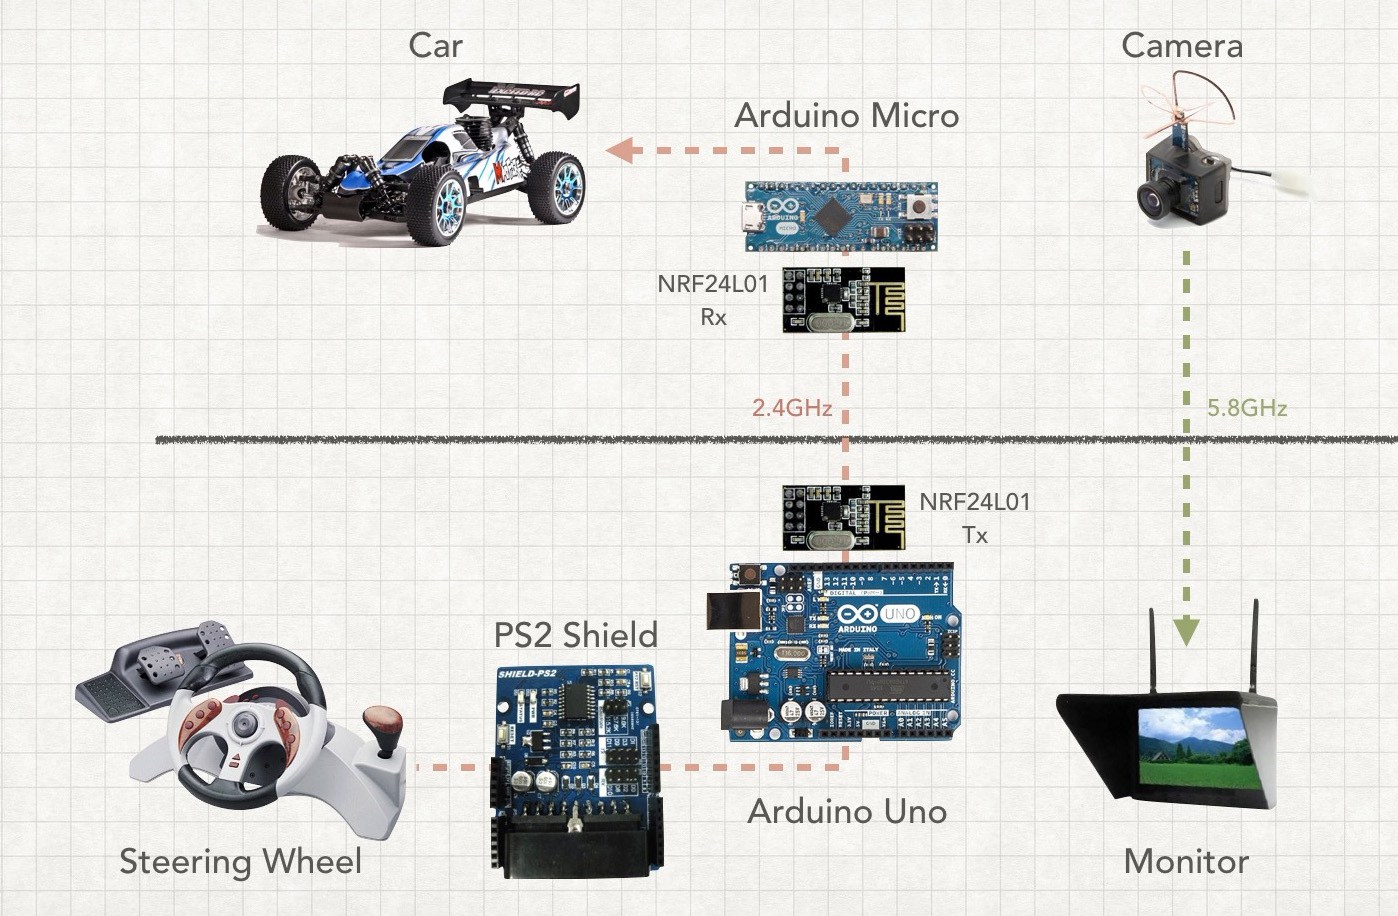
In terms of hardware, a Raspberry Pi 3 is used as a central hub along with a Hue smart lights bridge, which is paired with a couple of Arduinos and 2.4GHz radio modules that handle the wireless communication between the two devices.

You can see more about this build on their blog here and more background on their lighting system here.

Motorize any camera slider with Arduino!

Using a stepper motor, an Arduino Micro, and various mechanical bits, “Max Maker” shows us how to motorize a camera slider.

According to his video below, “There are many cheap sliders available, but none that are motorized.” On the other hand, in this project he demonstrates that with a little bit of work, and an excellent attention to detail, you can make the conversion yourself.

Even if you’re not interested in this kind of application, the video reveals some interesting tricks, such as transferring a hole pattern using tape at 0:30, and using nail polish/recessed lettering to label switches at 3:55. The slider can be set to slide down the rail between 10 seconds and 8 hours depending on your video or photography needs. Video results, seen around 5:00 in, are really amazing!

You can find more details on how to create a slider like this on the project’s Instructables page.

An experimental game with a conductive rubber band controller

RubberArms is an experimental rubber band game, created by Robin Baumgarten at the Global Game Jam 2017 in Yverdon-les-Bains, Switzerland.

The controller uses a conductive rubber cord from Adafruit that changes resistance as it’s stretched. This resistance is measured by an Arduino Micro/Leonardo (or a Teensy 3.2), which acts as a USB joystick sending signals to Unity3D. (The game is coded in Unity3D using Spring Joints and Line Renderers.)

At this point, the game is a simple prototype where you control the distance of two characters whose arms stretch whenever you stretch the rubber band, throwing little ‘Bleps’ around. You can read more about RubberArms on Baumgarten’s page, as well as his earlier project “Line Wobbler” here.

This 3D-printed bionic hand can replace or support a limb

3D-printed appendages are, as one might suspect, generally meant for those that are missing a limb. Moreover, there are many other people that might retain partial functionality of a hand, but could still use assistance.

Youbionic’s beautifully 3D-printed, myoelectric prosthesis is envisioned for either application, capable of being controlled by muscle contraction as if it were a real body part.

As seen in the video below, the Youbionic hand can manipulate many different items, including a small box, a water bottle, and a set of keys. Functionality aside, the movement is extremely fluid and the smooth black finish really makes it look great.

The device is currently equipped with an Arduino Micro, servos, various sensors, a battery pack, and a few switches. Even the breadboard appears to be very neat, though one would suspect the final version will use some sort of PCB.

You can learn more and order yours on Youbionic’s website.

Turn mini Pringles cans into electronic drums

Ever find yourself drumming on Pringles cans with your fingers? This hack adds a MIDI output to make it sound awesome!

If you’re tired of playing virtual drums on an iPad or other device, and need some tactile feedback, snack-sized Pringles cans not only sort of resemble drums, but provide a nice “bounce” when hit by a finger or thumb. All that’s required, besides washing the lid and canister to remove grease, is the attachment of a piezoelectric sensor to the lid to detect taps. These impulses are then fed to an Arduino Micro, converting everything into a MIDI signal, which can be read by your favorite electronic instrument.

With a bit of luck, you can plug it straight in to a MIDI drum synth and start playing. The four pads transmit kick drum, snare, closed hi-hat and open hi-hat note values according to the General MIDI specification.

You can find more information on this excellent hack on its Instructables page, or check out the video below to see it in action!


LipSync is an Arduino-based assistive device for smartphone use

With a mouth-operated joystick and “sip and puff” controls, the LipSync aims to make smartphones more accessible for everyone.

For the huge number of people that use them, smartphones have certainly made their lives easier. Unfortunately, these amazing gadgets are difficult to use for those with limited or nonexistent use of their arms and hands. The LipSync attempts to address this issue with a device that can be made in just over a weekend’s worth of work. It uses an Arduino Micro along with a Bluetooth module for communication, and allows someone to interface with the phone using its tiny joystick, as well as the user’s controlled breath.

Smartphones and other similar mobile devices have become a staple piece of technology in this day and age. For people in wheelchairs whom experience difficulties with gross or fine upper body motor control, the usage of mobile devices can be very challenging. The LipSync is an assistive technology device which is being developed to allow quadriplegics the ability to use touchscreen mobile devices by manipulation a mouth-operated joystick with integrated sip and puff controls.

You can find more information on this project, including the files needed to build one, on its Hackaday.io page.

Drive an RC car with first-person view

If you’ve ever dreamt of sitting in the driver’s seat of an RC car, you’ll love this recent project from Paul Yan. The designer has hacked together a first-person driving experience using a natural steering wheel that lets you feel like you’re playing a race kart game in real life.

As he describes in the video below, Yan used an old PS2 wheel controller, two Arduinos, a mini FPV camera, and a headset to act as a standalone monitor. The RC car–which is equipped with a Micro–interfaces with the wheel using an Uno and a PS2 Shield. Both Arduinos communicate via a pair of NRF24L01 modules.

I got the idea for this project while watching my three-year-old son play with his radio controlled toy cars. These all use the conventional two joysticks. The left is isolated to vertical movement to control the motor and the right stick is isolated to horizontal movement to control the turning direction of the front wheels.

Sorting cucumbers using AI, Raspberry Pi + Arduino

When it comes to farming veggies like cucumbers, the sorting process can often be just as hard and tricky as actually growing them. That’s why Makoto Koike is using Google’s TensorFlow machine learning technology to categorize the cucumbers on his family’s farm by size, shape and color, enabling them to focus on more important and less tedious work.

A camera-equipped Raspberry Pi 3 is used to take images of the cucumbers and send them to a small-scale TensorFlow neural network. The pictures are then forwarded to a larger network running on a Linux server to perform a more detailed classification. From there, the commands are fed to an Arduino Micro that controls a conveyor belt system that handles the actual sorting, dropping them into their respective container.

You can read all about the Google AI project here, as well as see it in action below!

This DIY stepper motor clock is weird yet wonderful

Just when you thought you’ve seen every possible kind of Arduino-driven clock, another one emerges. This “DIY strange-looking” device takes the form of a wheel with times written on it, which is rotated using an Arduino Micro and a 5V stepper motor. And while it may not be the most accurate timekeeper out there, it’s an excellent way for Makers to explore electronics, programming, and even geometry.

Unlike most clocks that have either two or three hands going around a 12-hour face, 17-year-old Instructables user “Electronics for Everyone” chose a fixed pointer to denote the time in 10-minute intervals instead.

The idea behind the clock is a circle with a circumfrence of 72cm that ticks at 1cm every 10 minutes, which means every 72 ticks will equal 12 hours…

You can find an entire breakdown of the build, along with its measurements and code, on its project page here.

Ride an Arduino-powered longboard with speed-reactive LEDs

For a recent column in the Dutch newspaper de Volkskrant, Rolf Hut built a slick longboard with LED strips that respond to speed. If you think that sounds awesome, wait until you see it in action.

As the Maker explains, four magnets and a Hall effect sensor are used to measure the longboard’s speed so the Adafruit NeoPixels can react at the same pace. To achieve this, the magnets are glued to the inside of each wheel, while a Hall sensor counts the number of revolutions and sends that information over to one of two Arduino Micros. The first Arduino translates that into a speed, while the second Micro converts that speed into a signal for the LEDs. Everything is powered by a power bank.

Intrigued? Head over to the Hut’s project page, where you will find a detailed breakdown of his build along with its code.