Posts with «mega» label

pedalSHIELD MEGA is a programmable guitar pedal for your Arduino

If you want to create new guitar sounds without having to redo your pedal wiring every single time, the pedalSHIELD MEGA from ElectroSmash could be just what you’re looking for.

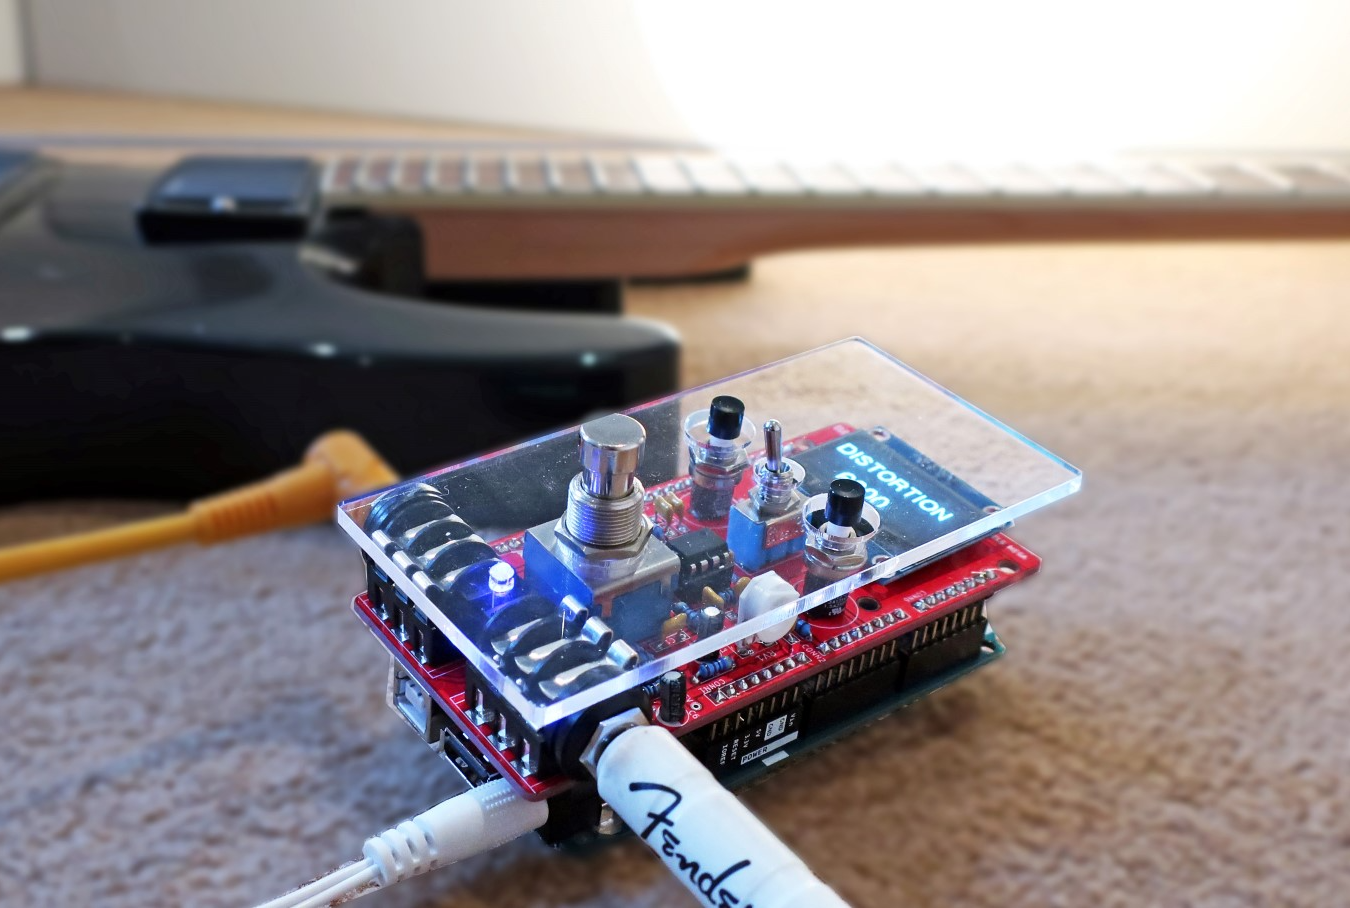
The pedalSHIELD MEGA takes input from a guitar via a standard ¼-inch cable, and uses an Arduino Mega to process the sounds to your liking. This new sound is then output using two PWM pins for a 16-bit resolution.

The device, which is available in kit form or as a PCB, sits on top of the Mega as an amazing looking shield. In addition to a 3PDT true bypass footswitch, a toggle switch, and two pushbuttons, the pedalSHIELD MEGA features an OLED display for visual feedback. Once assembled, all you need to do for an entirely unique sound is program your own effects in the Arduino IDE!

This shield that is placed on top of an Arduino Mega has three parts:

Analog Input Stage: The weak guitar signal is amplified and filtered, making it ready for the Arduino Mega ADC (Analog to Digital Converter).

Arduino Mega Board: It takes the digitalized waveform from the ADC and does all the DSP (Digital Signal Processing) creating effects (distortion, fuzz, volume, delay, etc).

 Output Stage: Once the new effected waveform is created inside the Arduino Mega board, this last stage takes it and using two combined PWMs generates the analog output signal.

You can find more details on the pedalSHIELD MEGA here, and see it in action below!

Make your own 3D-printed robotic vacuum with Arduino

Tired of cleaning your house? A robotic vacuum may be the logical solution, but if you’re “theking3737” something off-the-shelf just isn’t quite cool enough. Created as part of a school project, he was responsible for the hardware design, while a fellow classmate took care of the programming.

The DIY device uses an array of what appear to be ultrasonic sensors for navigation, and an Arduino Mega as the brains. It also features an HC-05 Bluetooth module that enables it to be controlled via an Android phone or smartwatch. All the electronics are housed inside a 3D-printed closure.

Impressively, the team had “never done anything like this before,” and the results look great—encouragement for anyone hesitant to start on a project because of inexperience!

Water speakers enhanced with an Arduino Mega

Maker “cool austin” is a fan of water speakers, which pulse jets of water inside plastic enclosures to the beat of your music, but thought they could be improved.

What he came up with is a multi-tower setup that not only dances with light and water to the beat of the music playing, but splits up the pulses into frequencies a la a VU meter.

The project uses an Arduino Mega—chosen because it has sufficient PWM outputs to control the water and lights in five of these enclosures via MOSFETs—to output signals to the water units for an excellent audio-visual display.

Water speakers from the store are great to watch, but I felt they could do more. So many years ago I had modified a set to show the frequency of music playing. At the time I used the Color Organ Triple Deluxe II, combined with a set of photocells potentiometers and transistors I was able to get a set of 3 speakers to function.

I then a few years ago had heard about the IC MSGEQ7 which has the ability to separate audio into 7 data values for an Arduino to read. I utilize an Arduino mega 2560 in this project because it has the required number of PWM pins to drive five water towers.

You can find more details on the water speaker equalizer here, and see it in action below!

Automated IC testing with Arduino Mega

Arduino boards by themselves are, of course, great for making a wide array of projects. Sometimes, however, you’ll need to add other integrated circuits (ICs) for extra functionality. If you want to be absolutely sure that the IC you’re using in your project is working correctly, this tester by Akshay Baweja will input the signals to the device, and analyze the outputs that it produces on a 2.4” touchscreen.

While this type of equipment would normally be quite expensive, Baweja’s Arduino Mega-powered gadget can be built for around $25.

I designed a shield for all components to fit-in and chose the Arduino Mega as my microcontroller board since both the ZIF Socket and LCD can be put side by side giving the build a compact and portable look and feel.

Be sure to check it out being demonstrated below, and if you want to create your own, code can be found on GitHub.

Crawl through a 1D LED dungeon with TWANG!

While video games have grown more and more complex over the last few decades, TWANG takes things in the opposite direction as an Arduino Mega-based 1D dungeon crawler consisting of an RGB LED strip.

The player—a dot—is controlled via an accelerometer mounted to a door spring used as a joystick. With it, the player can move forwards, backwards, and attack by “twanging” the spring to make it vibrate. The LEDs display a wide array of colors, including representations of glowing lava, water, and player disintegration when a mistake is made.

TWANG is inspired by the Line Wobbler game from Robin Baumgarten, and beautifully implemented as shown in the video below by Barton Dring. Code for the build can be found here, and 3D print files for the housing/joystick are also available.

Make an interactive coffee table with Arduino and LEDs

Rather than buying a coffee table, Marija from Creativity Hero decided to build her own, adding an array of 45 programmable LEDs on top of a pine base.

An Arduino Mega is used to take input from 45 sensors corresponding to each LED in a grid made with MDF baffles, and commands each light to change colors based on whether something is placed on that square section. The on/off colors used can be selected via a Bluetooth smartphone app, allowing you to customize the furniture to your liking.

This unique LED coffee table can create beautiful atmosphere and will be a real focal point in my living room. I wanted to make a simple design with some interesting features that will take my room to a whole new level. It is controlled via a custom-made Android application, so I can easily change the reactive color, or the background color, and I can even adjust the brightness.

You can find full details on the project here, as well as the tools and parts you’ll need.

Create an Arduino Mega-powered, cable-cutting machine

What do you do when faced with measuring and cutting a bunch of cables? If you’re Edward Carlson, you “simply” build a machine to do it for you!

While it may not save time on this run, at least on the next occasion that he needs a few cables cut, he can just program his device to snip everything to size!

His setup uses an Arduino Mega with an LCD/button shield to tell the machine how long to snip each wire, then employs a stepper motor to move the cable between two rollers to the correct length. When in position, a high-torque servo actuates a (normally) manual pair of clippers to cut it to size.

Be sure to check out the project explanation in the video seen here, or skip to around 5:30 to see it in action!

Recreating the Apollo Guidance Computer Display and Keyboard with Arduino

Nearly 50 years ago, mankind made the giant leap of being able to travel to the moon. To celebrate, ST-Geotronics has come of with a replica of the Apollo Guidance Computer Display/Keyboard, or AGC DSKY as it’s abbreviated.

The display was prototyped on a huge breadboard assembly, along with an Arduino Mega, then finished using a custom PCB and Arduino Nano.

3D-printed parts are used to form the housing, in addition to a variety of electronics. These include an actual GPS unit, along with a custom three-segment LED assemblies to display “+” and “-” as needed.

Be sure to check it out in the video seen here, showing off its interface, as well as an MP3 unit that plays back a 1962 JFK speech about going to the moon.

Build a six-wheeled RC vehicle for any terrain

In order to create the ultimate off-road RC rig, “asrebro” designed his own six-wheeled vehicle, operated with the help of Arduino.

To give it decent range and reliability, the hacker turned to a stock transmitter and receiver, but routed the PWM signals onboard to a Mega. The Arduino uses a pair of H-bridge boards to drive all six motors/wheels for tank-like movement.

Since an Arduino is used, this opens up a wide range of manual and automatic control options, and could even be used to power robotic accessories like a gripper or gimbal with a camera.

I decided to build a bigger robot that will easily overcome various obstacles on its way and will be able to move with a load of at least a dozen kilos. I also assumed that the robot should be able to cope in difficult terrain such as sand, snow and rubble. To make it possible, I built a 6-wheel [aluminum and duralumin] chassis equipped with 6 motors of sufficient high power and suitable motor driver and power supply. I also wanted my robot to be controlled from a long distance (at least 200 meters) so I used a good quality 2.4GHz transmitter and receiver.

You can see it in action below, traversing through a forest near Warsaw, Poland.

Playing chiptunes on an old reed organ with Arduino

After finding an organ left outside to rot, hacker “tinkartank” decided to use it for his own purposes, adding push buttons under each key as inputs to an Arduino Mega.

He also reused the control rods with potentiometers as a secondary input method, and added a tiny OLED to display the system’s menu. With this unique interface setup, the Mega drives a MOS6581 SID chip—originally used to produce sound on the Commodore 64—for music generation, and can interface with Eurorack modules as needed.

Want to see more? Be sure check out the SID organ in action below, and read the entire project write-up here.

Arduino Blog 03 Jan 15:27