

Wearable Fabric on the Arduino Store
We are happy to announce the first wearable kit on the Arduino Store . This kit has been made by Plug’n'Wear specifically for us. All fabrics in this kit are produced in Italy, and strongly related to a textile family business. If you want to get deeper into the story of this product have a look at Riccardo Marchesi presentation (still in Italian, soon to be traslated!) at World Wide Rome 2012.
Read over for Kit’s features

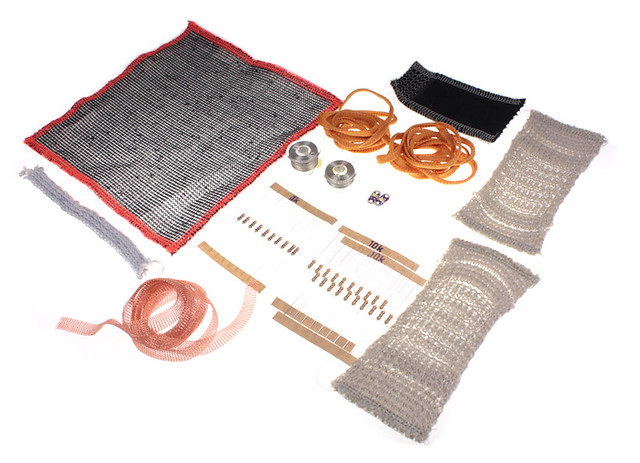
This kit features:
- 1x Circular Stretch Sensor Designed by Hannah Perner-Wilson, this circular knit stretch sensor works perfect when you need to detect tension in many projects.
- 2x Textile push button to make easy digital inputs in cloth, scarfs o bags.
- 2x Spools of Conductive thread, ready to be hooked over a sewing machine
- 2x Soft potentiometer kit will let you import analog data into your wearable project: this kit includes 1 meter of knitted conductive tape and a metal ring. Watch it in action (see video)
- 10x 1k ohm resistor
- 10x 10k ohm resistor
- 1x Textile perfboard is going to change the way you think of wearable circuits. You can sew or even solder components (SMD & through-hole) on this . It can be easily cut or sewn with a standard sewing machine. Washable. Size: 15 cm x 15 cm (6″ x 6″) / Pitch: 2.54 mm (0.1″)
- 1x Knitted Coated Copper Tape. Small conductive tape made of coated copper fine wire (112 micron). Flexible, easy to cut, sewable with a standard sewing machine, It can be easily welded ( The coating will melt and tape will be soldered). The surface of this tape has a good insulation thrughout its lenght. Resistance: 107 Ohm/m. Width: 9 mm (0.35″)
- 1x Analog Textile Press Button, working with a resistive principle (resistance goes down when you press it). It works as a bend sensor as well. By connecting more sensors together it is possible to make a matrix analog switch. Sensitive area 40mm x 40mm (1.57″x1.57″)
- 2x LilyPad LED Bright White A simple, very bright, 250mcd, white LED LilyPad
source: [arduino store]


