Posts with «instrumentation amplifier» label

Random thoughts on circuits labs

DNA melting

I spent some time yesterday thinking about whether we could do optical detection of DNA (particularly some variant of the DNA melting lab from MIT—see also the Fall 2008 class handouts).  I noted in the 2008 handouts that they were using a blue LED array driven by a 0.29A current source (made from an LM317T voltage regulator, a rather inefficient method). The wiki page uses a regulated 5V supply and a 25Ω series resistor, which would be around 60–70mA for a typical forward drop of 3.2–3.5V in a blue LED.  That’s still a pretty powerful light source for an LED. They say they are using LZ1-00B200, which has a 3.6V forward voltage, but can handle a full amp of current, so is more LED than is needed.

We can get a blue LED for under $2 that can handle 50mA continuously (LTL911CBKS5), though it has a forward voltage of typically 4.3V.  In surface mount for $1.14, we could get MLEBLU-A1-0000-000T01, which has a dominant wavelength of 465–485nm (depending on bin code) and a luminous flux of 10.7 lm at 150mA (forward voltage 3.2V).  I estimate the LED MIT mentions produces about 6lm at that current.  The expensive part of the illumination is not the LED, but the focusing lenses to concentrate the light and the optical filtering needed to keep the excitation wavelength from being detected by the photodiode.

I was thinking that it would be cool to use a laser as an excitation source, rather than an LED, since then no lenses or filter would be needed on the source—just a blocking filter on the photoreceptor. Unfortunately, blue lasers are very expensive.  What are cheap are the blue-violet lasers at 405nm, since the laser diodes are made in quantity for BluRay players. (Amazon has 405nm laser pointers for under $10 with shipping.) Unfortunately the usual fluorescent dyes used for DNA melting measurements (SYBR Green, LC Green Plus, EvaGreen) are not excited at 405nm, and need excitation wavelengths in the range 440nm–470nm).  I’ve been wondering whether one of the 405nm-sensitive dyes used in flow cytometry (like Sytox Blue dead cell stain) could be used.  But I’ve not found a double-stranded DNA dye for sale that is easily excited at 405nm (even Sytox Blue is way down in sensitivity from its peak), so laser excitation seems to be out—the excitation wavelengths needed for standard dyes require fairly expensive lasers.  The benchtop lasers usually used in labs and flow cytometry equipment are priced in the “if-you-have-to-ask” price range.  Buying enough copies for a student lab is more than this lab is worth.

I still don’t see a way to make the DNA melting curve project work within our course.  Even MIT gives up half a semester to this lab, and we don’t have that much time (nor that caliber of students, on average).

Soldering project

I want the students to learn to solder (at least through-hole parts, not necessarily surface-mount). I don’t want to do the traditional blinky-light soldering practice, so I’ve been looking for a place in the course where it makes sense to require soldering, rather than wiring up a breadboard.

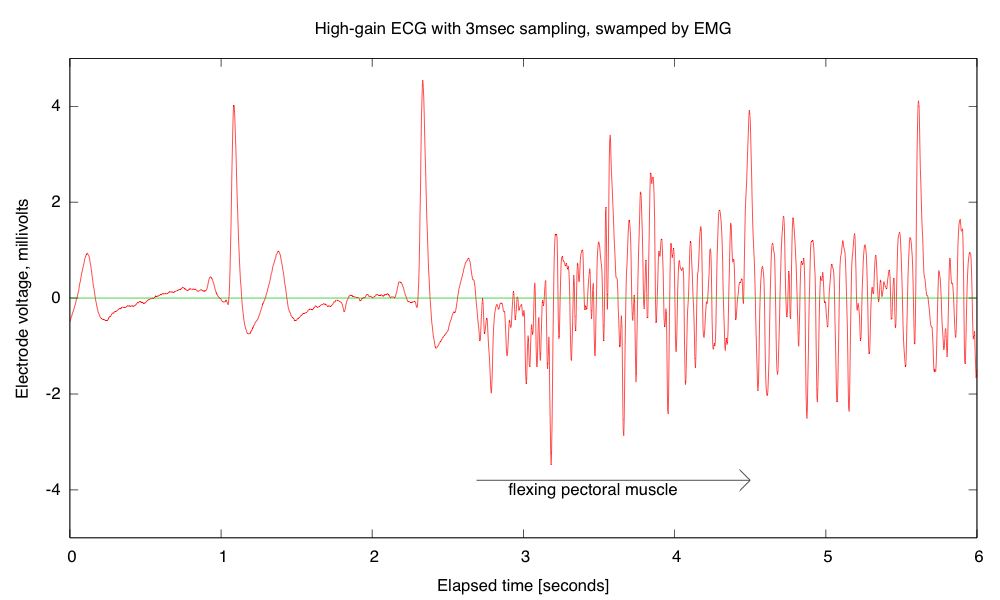
Breadboards have problems with loose wires, so the more complex the circuit, the more problems a breadboard causes.  Breadboards also have problems connecting to wires that have to leave the breadboard—particularly wires to moving objects.  This suggests that the EKG/EMG circuit would be the most appropriate as a soldering project, as it is fairly complicated and the long wires to the Ag/AgCl gel electrodes can cause a lot of problems with loose connections (my first check on debugging is to wiggle the header pins for those wires).

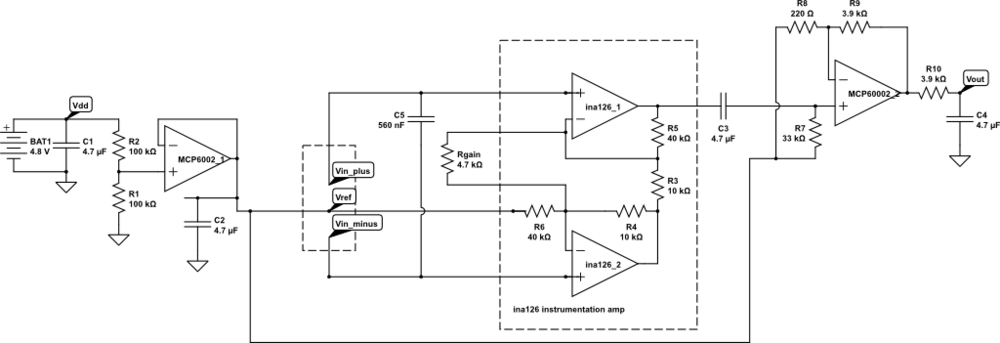
But I want the students to be doing some designing for the EKG circuit, not just soldering up a predetermined circuit, so I’m thinking of designing an instrumentation-amp protoboard, which has an ina126 instrumentation amp and an MCP6002 dual op amp chip, with power pins wired up and a place for the Rgain resistor and bypass capacitors, but everything else in a breadboard-like configuration, so that resistors, capacitors, and jumper wires could be added.   Off-board connections could be done with screw terminals to make sturdy connections.

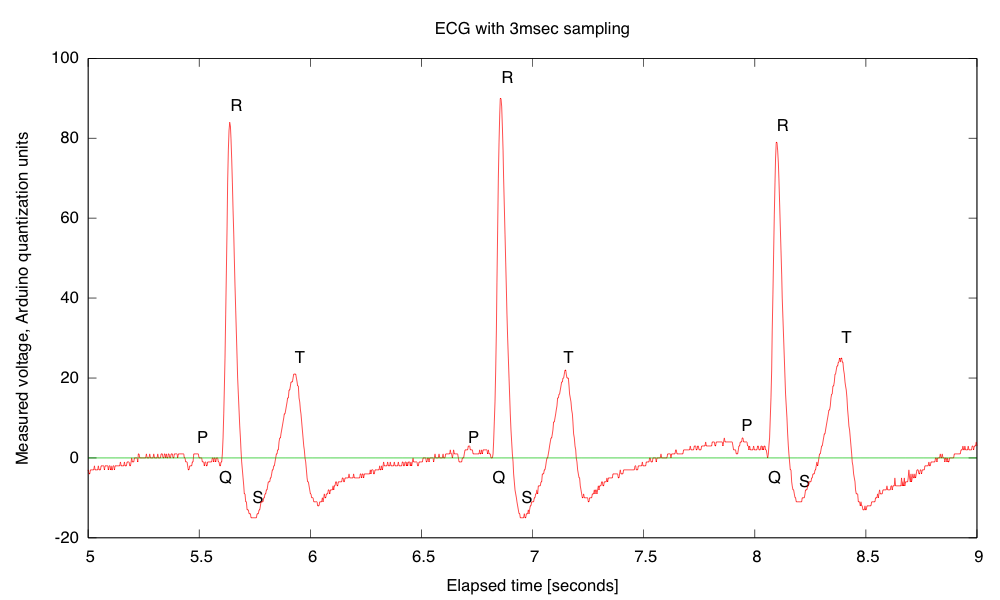
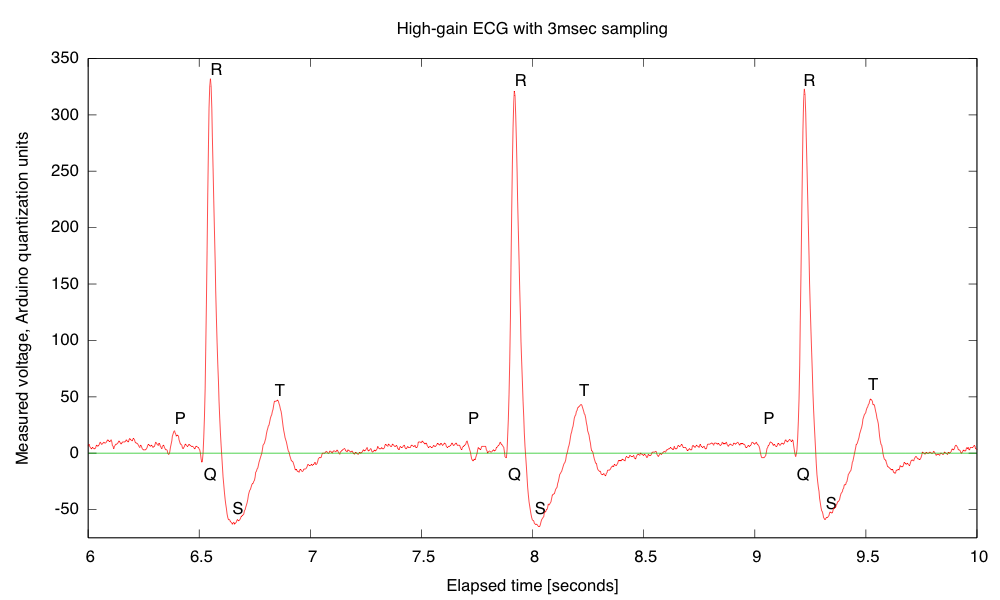
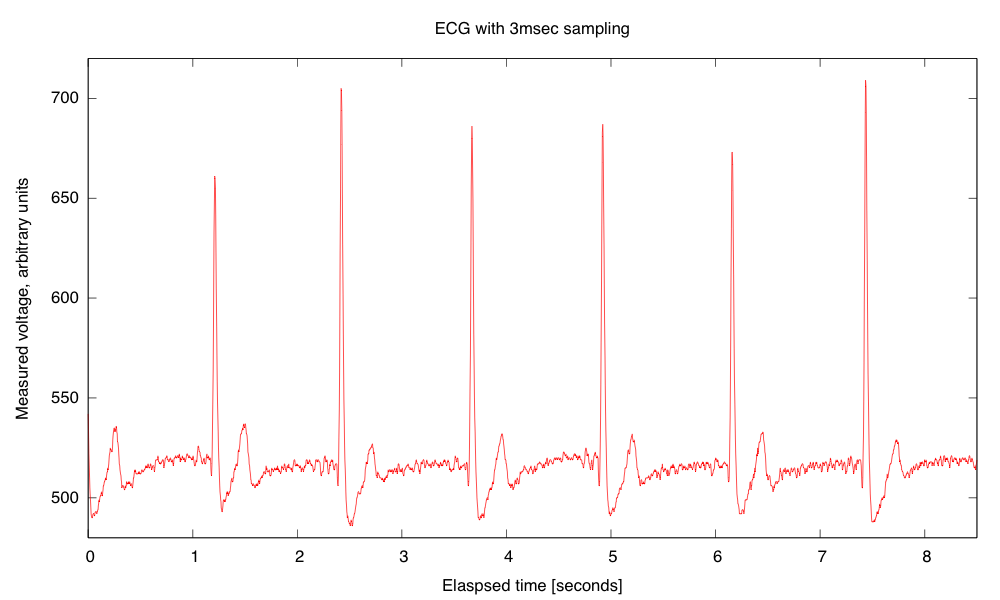
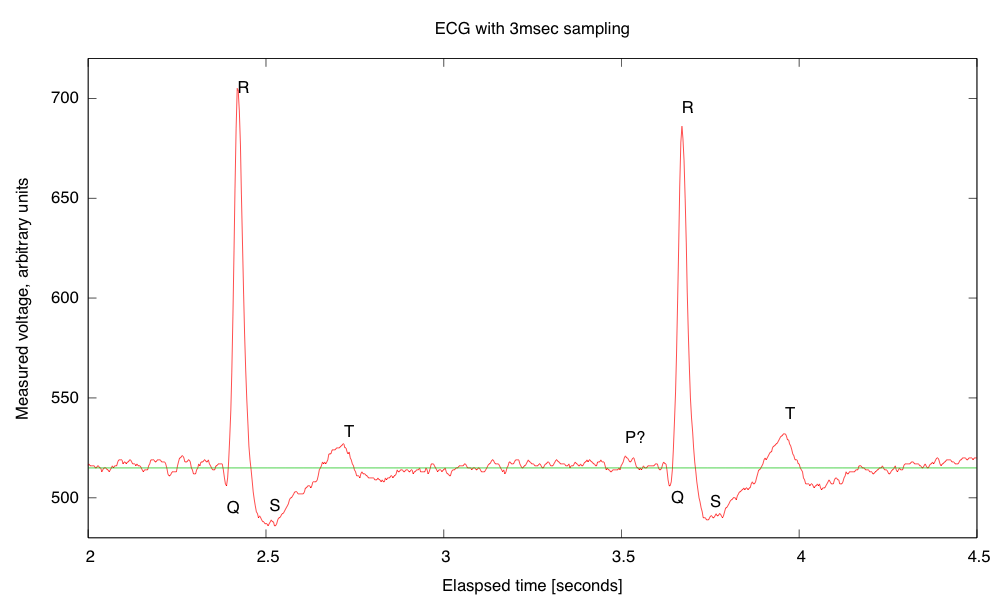
My son and I came up with the further idea of adding an optional LED output, to make a blinky-light-EKG device.  I think that the approximately 1.5V, 30msec pulse that I was seeing for the R segment of the EKG would be enough to make a visible flash—I’ll have to try it out on my breadboard.  I tried it today, but I was only seeing 0.5V pulses today (poorer contact with the electrodes?), and I had to raise the 3.9kΩ feedback resistor to 10kΩ to increase the gain of the final stage., which was enough to get weak flashes from an LED with a 100Ω series resistor.  Because the op amp has limited output current (±23mA short circuit), I felt it fairly safe to put the LED directly between the op amp output and the Vref signal, which gives a good flash even with a green LED.

The lower voltage that I got this time (until I raised the gain) makes it clear that if I do make an EKG protoboard, it should have room for some trim pots for adjusting the final gain.


Filed under: Circuits course Tagged: Arduino, bioengineering, blinking light, circuits, course design, DNA melting, ECG, EKG, electrocardiogram, instrumentation amplifier, laser, op amp, pulse, violet lasers

More thoughts on EKG

Before doing the EKG lab, we should definitely discuss safety concerns,  including things like the following chart (information from http://electronicstechnician.tpub.com/14086/css/14086_34.htm):

Human reaction at 60Hz Current in mA
 Perception—slight tingling sensation  1.1
 Can’t let go (120 lb. person)—arm and hand muscles close involuntarily  10.0
 Can’t let go (175 lb. person)  16.0
 Can’t breathe—paralysis of the chest muscles  18.0
 Heart fibrillation—rapid irregular contractions of the heart muscles, which could be fatal  65.0

The very small voltages we work with (5–10 V DC) means that we rarely need to be concerned about safety issues in the lab. Most of the resistance of the body comes from the skin, and varies enormously according to how sweaty the skin is. Cleaning dead skin cells off (as is done with most preps for EKG electrodes) reduces the resistance of the skin quite a bit. DC is somewhat safer than AC, because skin is less conducting than the rest of the body, and so acts as a capacitor in parallel with a resistor. Puncturing or scraping the skin reduces resistance considerably.

It would probably be useful to have students measure the resistance between two Ag/AgCl electrodes and compute the currents that would flow at different voltages. When I tried this on two chest electrodes (just after showering, so clean, damp skin) I measured around 50kΩ. Pressing the electrodes more firmly against the skin dropped the resistance to 25 kΩ, and it gradually crept back up.

I keep thinking that the 3-wire design for EKGs is overkill. The 3rd wire seems to be just provided to bias the body to be between the power rails of the instrumentation amplifier. It should be sufficient to bias one of the electrodes with a large resistor to the reference voltage directly, rather than through the body.

I tried this.  First I hooked up the 3-wire system of the 2-stage EKG amplifier (though there was a mistake on that post, as the Rgain resistor was really 4.7kΩ, not 820Ω).  This was to make sure that I was getting good contacts and a clean signal. I then disconnected the bias lead and tried to bias the opposite end of the wires.  This did not work at all.  Disconnecting the bias wire resulted in a large signal with a period of 16.7ms (60Hz, though with a complex waveform).  Adding resistors between Vplus and Vref, Vminus and Vref, or both, just made this noise worse.  I then tried taking my body out of the loop, connecting a 25 kΩ resistor between the clip leads.  Without the biasing resistors I saw the same complex 60Hz signal.  It seems to come from capacitive coupling to the leads, as moving my hand closer or further from the leads changes the magnitude of the signal, and grounding myself eliminates it.  Putting 24kΩ resistors between Vplus and Vref and between Vminus and Vref reduced the noise, but did not eliminate it.  Touching either Vplus or Vminus was enough to produce huge noise again.

I tried another experiment, where I attached the ground electrode not to Vref directly, but through a 0.56 μF capacitor.  This worked fine, even though there was no DC bias connection for the instrumentation amp inputs!  It stopped working if I then touched either the +5V or 0V power rail—the DC bias is important, but my body was working as a pretty good capacitor, holding the DC bias for quite a while.  It is clear that the AC path to ground is crucial also.

I found that I could clean up the EKG signal by putting a 0.56 μF capacitor between Vplus and Vminus—enough that the P part of the EKG was visible.

Clean EMG with P,Q,R,S,T parts of signal all clearly visible. The remaining noise seems to be mainly quantization noise in the Arduino analog-to-digital converter, which could be reduced by increasing the amplifier gain.

Since the remaining noise seemed to be all quantization noise, I upped the amplifier gain.  Trying to raise the gain on the first stage did not work, so I raised the gain on the second stage.

Higher gain EKG circuit, with capacitor on the inputs.  The first-stage gain should be 22.02, and the second stage  18.73, for a total gain of 412.4.

The higher gain amplifier did produce good traces, with less evidence of quantization noise:

The “Arduino units” are 4.967 V/ 1024 = 4.851 mV at the output of the EKG, or 11.76µV at the electrodes. The R peaks are about 3.9mV and the S dips about -0.7mV.  The first R-R interval is 1.368 seconds for a pulse rate of 43.86 bpm.

One thing that is important—the EKG readings are resting EKGs.  If I flex the left pectoral muscle, I can swamp out the EKG signal.

Every EKG is also an EMG (electromyograph), and flexing muscles between the electrodes (here the left pectoral muscle) can swamp out the EKG signal. I computed the electrode voltage from the recorded signal, the measured Arduino A-to-D reference voltage, and the gain of the EKG amplifier. The zero-reference is determined by recording the Vref signal as well as the EKG output signal. The quantization noise from the A-to-D converter is about 3μV (less than 1 pixel in this picture).


Filed under: Circuits course, Data acquisition Tagged: Arduino, bioengineering, circuits, course design, ECG, EKG, electrocardiogram, instrumentation amplifier, op amp, pulse

EKG recording working

My son and I spent some time today debugging his data logger.  I also convinced him to add some documentation, though not nearly as much as I think is needed.  This version is just a text command interface, with no GUI—the PyGUI interface he was building seemed to slow things down a lot, and is not yet ready for use.

The data logger works fine as long as the sampling interval is at least 3msec.  With 2msec sampling, I think that serial communications (over a 115200 baud USB serial connection) is getting overwhelmed.  The Arduino seems to be capable of sending out data ok at 2msec/sample, though 1msec/sample causes it to miss some timer interrupts.

If the Python program can’t empty the serial port fast enough, I think that there operating system problems. My MacBook Pro sometimes gets wedged with long runs at higher sampling rates—I’ve had to reboot it a couple of times today. If the problem is with the MacBook Pro, it may be possible to run with slightly shorter sampling intervals on faster hosts, before hitting the limits of the Arduino.

I did manage to get a nice recording for about 8.5 seconds at 3msec sampling:

Recording of EKG trace on the Arduino. The value 512 represents the midpoint of the Arduino voltage scale. The EKG circuit and Arduino used separate power supplies, so the reference voltage is about 2.506V, while AREF on the Arduino was 4.96V, so the reference voltage should be about 517.  In a separate recording of the EKG signal and Vref, I found Vref to be 515±1.  The arbitrary units are about 4.844mV at the input to Arduino.  If my gain of my EKG is set to 591 as I expect from the resistor values, the arbitrary units should correspond to 8.2µV at the electrodes, and the biggest peak is about +1.6mV and the deepest drop is about -0.24mV.

I think that the signals were clearer today, because I was using a ground electrode on my chest, rather than on my elbow, reducing the common-mode noise a little. The 3msec resolution allows zooming in to get a pretty clear view of the structure of the pulses:

Detail of a couple of pulses showing the QRS complex and the T pulse. I’m not sure whether or not a P pulse is visible—if so it is almost buried in the noise. I’ve added a line where I believe that the reference voltage is, though it was not recorded on this run. The R-R interval here is about 1251±2msec for a pulse of 0.80 Hz or 48.0 bpm, which is about my usual resting pulse.

Although it took my son and me a little debugging to get everything working today, overall I’m quite pleased with the data logger code he wrote. He still has more documentation to add (both in-code and external), and there are some more features that could be added, but it is basically usable as is.

Incidentally, I found out today from Cardiology Explained by E.A. Ashley and J. Niebauer, that

ECG terminology has two meanings for the word “lead”:

  • the cable used to connect an electrode to the ECG recorder
  • the electrical view of the heart obtained from any one combination of electrodes

So it is not surprising that I was confused by the usage—I was only familiar with the first usage, which corresponds to normal engineering terminology.


Filed under: Circuits course, Data acquisition Tagged: Arduino, bioengineering, circuits, course design, ECG, EKG, electrocardiogram, instrumentation amplifier, op amp