Posts with «featured» label

Slap my zombie hand for internet fame!

Halloween time is a great moment to explore nice interactive projects and get inspired for installations for other selfie occasions. To spice up the office Donnie Plumly, a creative technologist, decided to make and share with us a molded zombie arm that takes pictures and post them to Twitter.

He used a silicone arm (molded on his own hand ), a custom steel mount to clip to an office partition, and a vibration sensor hooked up to an Arduino Uno. Once the arm is slapped a photo will be taken using an IR Led and passed to the Eye-Fi card in the camera.

The photo is then saved into a Dropbox folder and, using If This Then That (IFTTT), posted to Twitter on the account @ZombieSelfie.

Donnie created also a very useful tutorial  on Instructable to make it yourself!

Give me your number and get a unique micro-noise piece

Prankophone  is the new interactive installation by Dmitry Morozov (his amazing projects have been featured on this blog ).  This time he created  a sound object, a hybrid of synthesizer, telephone and logic module:

The main principle of the object’s functioning is as follows: depending on the current mode, the apparatus calls to random or pre-defined recipients and plays them algorithmic melodies created from their phone numbers. The speakers transmit both the synthesized sounds and the sound from answering person. The common sound layer is involving a random recipient who doesn’t suspect anything. The person who answers the phone can’t hear any other sounds except for the synthesized ones.

You can play with it in 4 different modes:

Autonomous mode –  it generates the numbers by itself and tries to reach them, and play them the sounds.
Manual mode – when you dial any number by pressing standard phone keys it gets automatically transformed into sounds.
Keyboard mode – mode of dialing the number on the one-octave keyboard where 10 keys correspond to 10 digits.
Live mode – the number is defined by any of the previous methods, but the sounds are reproduced not automatically but from the keyboard, thus the user may “communicate” through sound with the person who answered.
It runs on Arduino Mega and you can listen to its sounds on the following video:

Making beyond the Wall: get to know chinese makers

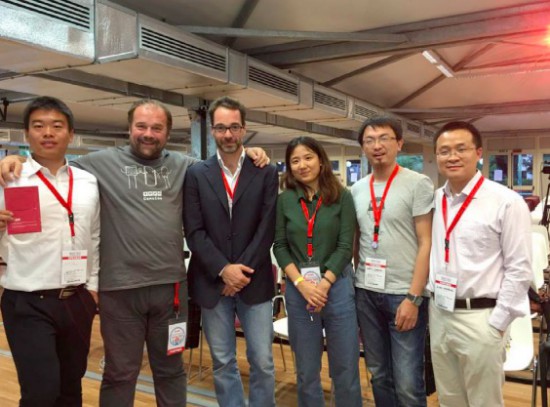
Last June Arduino partnered with Seeedstudio to manufacture Genuino boards for the chinese market and during Maker Faire Rome Massimo Banzi took part to an interesting panel to promote  4 chinese delegates from business, education, design and research domains presenting their work and discussing what does it mean to be a maker in China. (in the pic from left to right, Lin, Massimo, Alessio, Jin, Chenille & Flamingo).

The panel titled Making beyond the Wall and moderated by Alessio Jacona tried to address the growing maker movement in China which is not so visible to the European community while the hype of manufacture in Shenzhen, the Chinese Silicon Valley, is gaining more and more international media attention.

Flamingo was the first presenter of the session. Indeed he was also the first person to use Arduino boards in China back in 2007. As an evangelist, he taught physical interactions in China Central Academy of Fine Arts and even started the digital firm K1ND Beijing with Ogilvy China, which focus on interactive design with open source technologies for business projects.

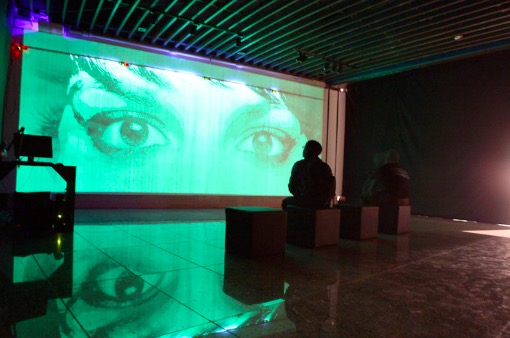
He introduced LightBot (watch video on youku) made in collaboration with Jun Huang, an architect based in China. It’s an installation using LEDs as a brush to draw on light-sensitive canvas. The material on the wall glows after being exposed to light, particularly ultraviolet light, and fades away after some time. Lightbox is powered by an Arduino controlling 1024 LED lights installed on the pallet and stepper motors to control the movement.

Then it was the turn for  Jin  introducing Minibuilder and Candy Project (we featured her work in our blog earlier) created during her fellowship at Iaac. With her international background, Jin explained how she realized how the culture of making in China is focusing more on hardware startups with strong potential to accelerate thanks to great manufacturing opportunities. Whereas in the West, people see it more as a hobby or prefer to explore the conceptual development in a lab environment.  Nowadays she is implementing a new VR projects in China.

Later Lin explained his work as a tutor at the University of Science and Technology in Beijing and also his commitment as a community manager of mechanics and robotics in arduino.cn forum, the community of Arduino fans who also participated to Arduino Day. He worked on various projects and applied Arduino in hemiplegia rehabilitation equipment through sensor feedback and in a gearbox to detect malfunctions through vibration, temperature and stress.

Last but not least, Chenille talked about how he wrote the first book about Arduino in China and more recently, translated the third edition of Getting started with Arduino book into Chinese. He’s now working on a brainwave-controlled music player.

The panel was a good chance to present to an european crowd real experiences from the voice of chinese makers and sharing good practices for future collaborations.

Are you based in China and  want to share a project made with an Arduino or Genuino board? Submit it to the blog, we’d like to feature it and tell your story!

Arduino IDE 1.6.6 released and available for download

Today we are very proud to release Arduino IDE 1.6.6 and updated cores for all supported platforms (AVR 1.6.9, SAM 1.6.5, SAMD 1.6.2)

This update brings an impressive 723 closed issues and 147 pull requests merged.

Most intriguing features are:

  • Long-awaited new arduino-builder: this is a pure command-line tool which takes care of mangling the code, resolving library dependencies and setting up the compilation units. It can also be used as a standalone program in a continuous-integration environment
  • Pluggable USB core: your Arduino can finally act as a lot of different USB devices without any need to change the core, thanks to the new modular architecture. Libraries based on the new subsystem are already being developed!
  • Serial plotter: you can now plot your data in realtime, as easy as writing Serial.println(analogRead(A0)) inside your loop


  • New goodies for library developers, like unlocked examples while developing and optional linkage into an archive
  • ArduinoISP example has been improved a lot and now you can flash your AVR chip using ANY other board (including third-party ones )
  • Both Libraries and Boards managers notify if a library/core can be updated with a simple popup – no more outdated code floating around!
  • A LOT of bug fixes, adjustments, documentation refinement thanks to our tireless users and contributors. The complete list of fixes and credits is available here.

Don’t forget to report any issue you find, either on Github or on the Arduino forum: your help is very much appreciated. It doesn’t matter if you are not a tech specialist: every feedback adds value.

Happy coding!


Better you team up if you want to win the game!

Team Game is an interactive installation to reflect about video games and controllers made by Caroline Buttet. It runs on an Arduino Uno or Genuino Uno controlling a flex sensor, a custom made potentiometer, and a light sensor with the help of Unity software and Uniduino plugin:

It’s a simple game in which you need to roll a ball from one side to another of the screen. The trick is, you need some custom controllers to play. And you also need 2 partners that will play with you so that you can progress through the 3 levels. Rather than playing against the others, you will have to team up in order to win!

See the game in action described by Caroline:

Learn more about Uniduino plugin and how to use it with Arduino:

Now it’s time for Genuino Zero and Micro, get them now!

As we promised last week, you can find on the Arduino Store a variety of Genuino products available for purchase. After Genuino Uno, Genuino Starter Kit (in Italian and English) and Genuino Mega, today we have 2 new entries: Genuino Micro (18.00€ + tax) and Genuino Zero (42.90€ + tax).

Genuino is Arduino.cc’s sister-brand created by Arduino co-founders Massimo Banzi, David Cuartielles, Tom Igoe, and David Mellis, the Arduino.cc team and community. While Arduino branded product are sold in the US only for now, Genuino brand is used for boards and products sold everywhere else in the world. Genuino and Arduino boards share the same components, characteristics and quality of manufacturing. They are actually the same boards under a different name, and you can purchase them depending on the area of the world where you live in.

Arduino ZERO (USA only) & Genuino ZERO (outside USA) are a simple and powerful 32-bit extension of the platform established by the UNO. They provide a platform for innovative projects in smart IoT devices, wearable technology, high-tech automation, crazy robotics, and much more.

Arduino Micro (coming next in the USA) & Genuino Micro (already available outside USA) are the smallest of the family, easy to integrate in everyday objects to make them interactive. The Micro is based on the ATmega32U4 microcontroller featuring a built-in USB which makes the Micro recognisable as a mouse or keyboard. Looking for ideas on your next project with the Micro? Get inspired looking at these projects on the blog.

Play with sensors on your Windows 10 devices from an Arduino

At build 2015 Microsoft announced an important collaboration with Arduino. Windows became the first Arduino certified OS and introduced Windows Virtual Shields for Arduino and Windows Remote Arduino able to bridge technologies designed to connect the physical world of Arduino with the Windows ecosystem and computing power. Today on the Windows blog, an update on the topic:

Now you can get the Windows Insider Preview of Windows 10 IoT Core with the next four technology investment.

1)Windows 10 IoT Core Universal Windows Platform (UWP) support for Arduino Wiring

2)>Windows 10 IoT Core Universal Windows Platform support for direct memory mapped UWP Providers

3)Windows Store availability of the Windows Virtual Shields Application

4)Windows Store availability of the Windows Remote Arduino Experience Application

Arduino Wiring
We want to make it easy for you to use existing Arduino Wiring Sketches, libraries, and hardware with Windows 10 IoT Core Universal Windows Apps (UWA) on a Raspberry Pi 2 or other supported board. By creating a new Visual Studio template, supporting NuGet Packages, and platform improvements we’re making it easier than ever to build on Windows 10 IoT Core.Simply drag-and-drop (or cut-and-paste) your favorite and readily-available Arduino Wiring INO and library files into Visual Studio, connect your hardware over GPIO, SPI, I2C, ADC or PWM to your Raspberry Pi 2 or other supported Windows 10 IoT Core device, and run your code. Visual Studio and Windows will do all the heavy lifting to create a UWA and deploy it on your behalf, and you can also leverage the power of Visual Studio with Windows to debug your Arduino Wiring code.
With Arduino Wiring being supported as an extension to the Universal Windows Platform, you can even create a UWA that combines Arduino Wiring, C# and XAML. This enables you to build great projects with mixed mode programming like the plotter near the end of this video. Try out Arduino Wiring here.

Windows Virtual Shields for Arduino Application
This technology lets you leverage sensors and actuators on your Windows 10 device from an Arduino over USB, WiFi, and Bluetooth. For example, you can access your Windows 10 Phone accelerometer or your Windows 10 Desktop Screen from an Arduino over WiFi.
The Windows Virtual Shields for Arduino application is now in the Windows Store, and has improved the workflow to get started. The app is all you need on the Windows 10 device. Try it out here.

Windows Remote Arduino Experience
This technology lets you develop on your Windows 10 device and access the physical world via an Arduino over USB, WiFi, and Bluetooth. For example, you can program in C# on your Windows 10 Phone and drive a servo connected on your Arduino over Bluetooth.
We also created a Windows app that enables you to explore GPIO, ADC, and PWM functionality without writing any code on your Windows 10 device. The Windows Remote Arduino Experience app is now available in the Windows Store. Give it a try!

Keep reading on their blog.

Ready to go Mega? Arduino and Genuino Mega are in the store!

Starting today you can purchase Genuino Mega on the Arduino Store (35€ + tax) anywhere outside the USA,  and also Arduino Mega on the US Store (45.95$ + tax) USA only.


The Genuino MEGA 2560, like Arduino Mega 2560, is designed for more complex projects as it provides 54 digital I/O pins, 16 analog inputs and a larger space for your sketch. It’s the recommended board for 3D printers and robotics projects because it gives you plenty of room and opportunities and it’s compatible with most shields designed for the Uno and the older Diecimila or Duemilanove Arduino boards.

Genuino Mega and Arduino Mega share the same components, characteristics and quality of manufacturing. They are actually the same board under a different brand. Depending on the area of the world where you live you’ll be able to purchase an Arduino Mega or a Genuino Mega.

Explore inspiring projects made with the Mega.

Arduino Blog 27 Oct 17:25

Installing Libraries and how to write a Library for Arduino

Libraries are files written in C or C++ which provide sketches with extra functionality, for example the ability to control an LED matrix, read an encoder, connect to a sensor, display, or module, etc. They are very useful to lower the barriers for creating amazing interactive projects and use a wide range of components.  Libraries can be created by everyone and shared with the open source community!

To use an existing library in a sketch you can use the Library Manager (available from IDE version 1.6.2), open the IDE and click to the “Sketch” menu and then Include Library > Manage Libraries and follow the Guide on this page.


If you want contribute with a new library for an Arduino or a Genuino board, you are welcome to do so. The best way to start is to learn how to turn a sketch into a library and when you are good at it, learn how to code with basic Arduino principles in mind in order to allow beginners to get started with Arduino easily. Follow the Guidelines at this page, here’s a preview of what you’ve find:

Be kind to the end user. Assume you are writing an API for an intelligent person who has not programmed before. Come up with a clear mental model of the concept you’re working with, and the terms and functions you will use.

Use full, everyday words. Don’t be terse with your function names or variables. Use everyday terms instead of technical ones. Pick terms that correspond to popular perception of the concept at hand. Don’t assume specialized knowledge. For example, this is why we used analogWrite() rather than pwm(). Abbreviations are acceptable, though, if they’re in common use or are the primary name for something.For example, “HTML” is relatively common and “SPI” is effectively the name of that protocol (“serial-peripheral interface” is probably too long). (“Wire” was probably a mistake, as the protocol it uses is typically called “TWI” or “I2C”.)

Avoid words that have different meanings to the general public. For example, to programmers, an error is a notification that something happened. To the general public, errors are bad things.

When you are ready, you can share your new library and documentation on this dedicated area of the Forum.

Arduino Blog 26 Oct 20:29
arduino  featured  forum  genuino  ide  libraries  

Genuino Uno now available for online purchase!

We are happy to announce that Genuino Uno is now available for purchase on the Arduino Store (20 euro + tax).

In the last months we’ve been re-organizing manufacturing and starting today we are ready to provide the community with a series of Genuino boards.

Genuino and Arduino boards share the same components, characteristics and quality of manufacturing. They are actually the same boards under a different brand:

Thanks for your patience and stay tuned because in the next days we are going to release more Genuino boards!

Arduino Blog 22 Oct 17:15