Today we are happy to release the Arduino IDE 1.6.8 and updated cores for almost all supported platforms (AVR 1.6.10, SAM 1.6.7, Curie 1.0.5).
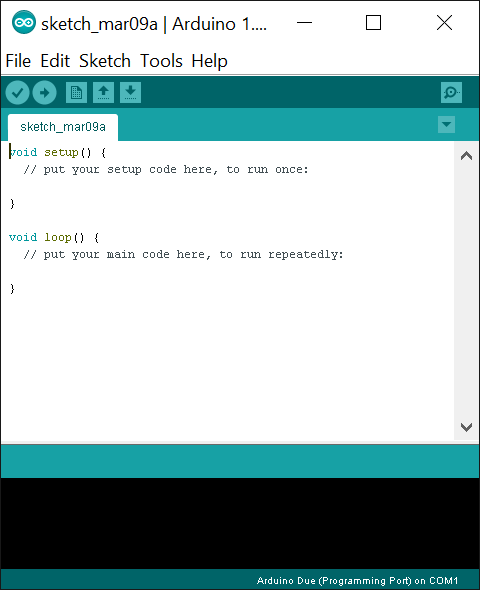
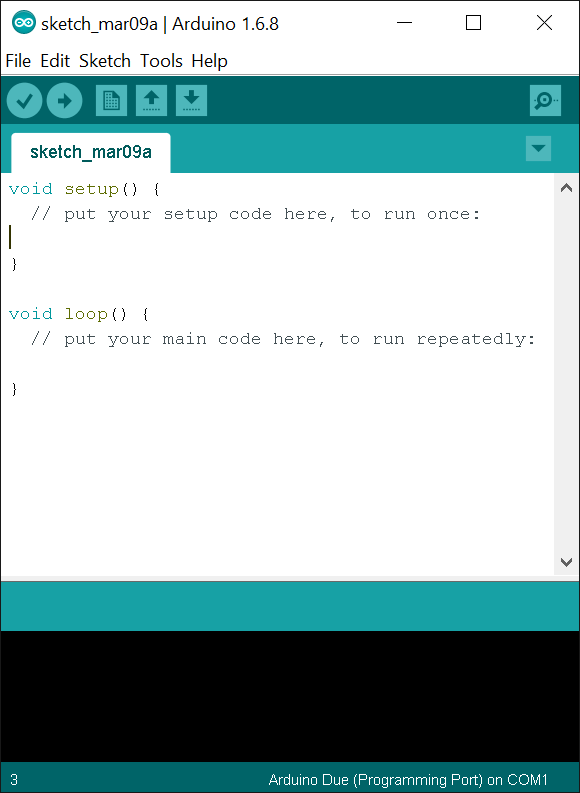
This new version of Arduino Software adds support for scaling interface for UHD monitors: if the IDE is too small because your display resolution is very high or just because you want it bigger now you can set the scaling factor from the preferences panel:
Just uncheck the “Automatic” box, set the magnification to a suitable value and restart the IDE. Below you can see the “before” and “after” screenshot examples:
Another improvement is that the IDE now tries harder to remember the last window position when it’s closed and to restore it when it’s opened again. It’s a small improvement that should save some clicks every time the IDE is opened. (check Credits)
In collaboration with Intel we also released the new core, here are some of the updates:
we solved the upload problems encountered by some users on the 101 and we increased general upload speed.
the Arduino and Genuino 101 CurieIMU library is now reviewed, more usable and with many examples that show the features of the onboard sensor
we included new libraries for the Curie Core: CurieTimerOne: it’s now easier to play with Hardware Timers (for RTC functionality, instead, use CurieTime)
CurieEEPROM: use this library to simulate the non-volatile memory available on AVR cores.
CurieSoftwareSerial: the Curie version of the library allows you to create serial ports on (almost) any digital pin.
The complete changelog on the Intel core is available here.
We also included some frontend enhancement and improvements and, as usual, we made a lot of bug fixes, adjustments and fresh documentation thanks to the contribution of our community. The complete list of fixes and credits is available here.
Don’t forget to report any issue you find, either on Github or on the Arduino forum: your help is very much appreciated. It doesn’t matter if you are not a tech specialist: every feedback adds value.
Enjoy coding!
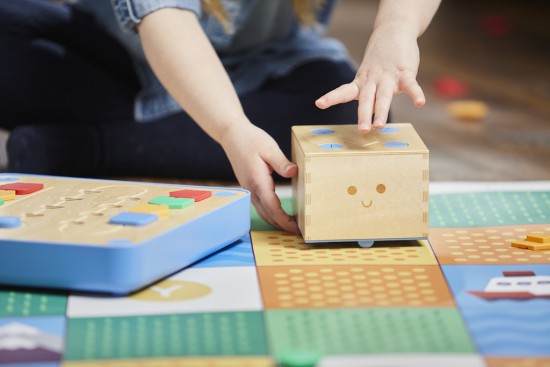
Our good friends over at Primo Toys have just launched their brand new Cubetto Playset and joined Arduino AtHeart program! Cubetto is a playful wooden robot that helps young children (3-6) discover programming through storytelling, adventure and collaboration. It’s the first coding toy of its kind to work without a screen or digital interface, and lets children learn to code before they can read or write. Cubetto is for boys and girls of any language anywhere in the world. It has been designed to help create a new, universal standard in tangible coding that will help will drive today’s coding revolution from the ground up.
The Cubetto Playset is exclusively available on Kickstarter for the discounted price of $149 until April 6th:
Part of the Arduino At Heart program, Cubetto provides gender-neutral play that boosts a child’s creativity, critical thinking, spatial awareness and communication skills. A beta version of the product, which raised over $80,000 (nearly £57,000) on Kickstarter in 2013, is used by more than 300 schools and 500 families in over 40 countries worldwide. Following years of testing and numerous iterations, Cubetto now boasts a learning platform that expands and connects to a limitless number of devices via Bluetooth.
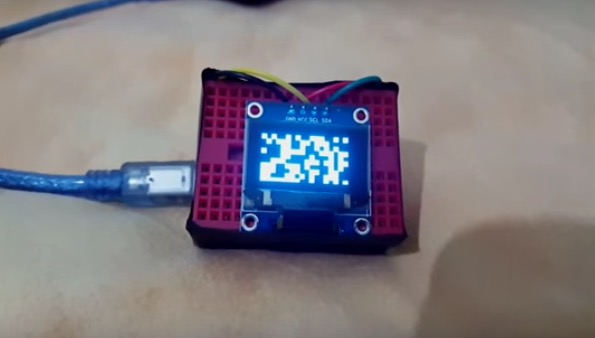
RuntimeProject made a tutorial to create a little cellular automata on a small 126×64 OLED using Arduino Nano.
He worked on one type of cellular automata, the Game of Life by John Conway, which has a grid of cells each having 2 states True or False/on or off/alive or dead. These cells are governed by 2 simple rules:
Rule 1: A cell which is dead and is surrounded by exactly 3 alive cells, will be born
Rule 2: A cell which is alive and has either 3 or 2 alive cells will remain alive, else it dies
The Arduino-based Cellular Automata works using 2 libraries the, Adafruit GFX library to handle all graphics and text displayed on the OLED; Adafruit SSD1306 library which is the driver for the OLED.
Hernando Barragán is the grandfather of Arduino of whom you’ve never heard. And after years now of being basically silent on the issue of attribution, he’s decided to get some of his grudges off his chest and clear the air around Wiring and Arduino. It’s a long read, and at times a little bitter, but if you’ve been following the development of the Arduino vs Arduino debacle, it’s an important piece in the puzzle.
Wiring, in case you don’t know, is where digitalWrite() and company come from. Maybe even more importantly, Wiring basically incubated the idea of building a microcontroller-based hardware controller platform that was simple enough to program that it could be used by artists. Indeed, it was intended to be the physical counterpart to Processing, a visual programming language for art. We’ve always wondered about the relationship between Wiring and Arduino, and it’s good to hear the Wiring side of the story. (We actually interviewed Barragán earlier this year, and he asked that we hold off until he published his side of things on the web.)
The short version is that Arduino was basically a fork of the Wiring software, re-branded and running on a physical platform that borrowed a lot from the Wiring boards. Whether or not this is legal or even moral is not an issue — Wiring was developed fully open-source, both software and hardware, so it was Massimo Banzi’s to copy as much as anyone else’s. But given that Arduino started off as essentially a re-branded Wiring (with code ported to a trivially different microcontroller), you’d be forgiven for thinking that somewhat more acknowledgement than “derives from Wiring” was appropriate.
See what we mean?
The story of Arduino, from Barragán’s perspective, is actually a classic tragedy: student comes up with a really big idea, and one of his professors takes credit for it and runs with it.
This story begins in 2003 as Barragán was a Masters student at the Interaction Design Institute Ivrea (IDII) in Italy. He was advised and heavily influenced by Casey Reas, one of the two authors of Processing.
At the same time, Massimo Banzi is teaching a class in essentially microcontrollers-for-designers at Ivrea using a PIC-based board called the Programma2003 and a curious language that you’ve never heard of, “JAL: Just Another Language“. At the time, there was no GCC support for the PIC, so the choices for open-source development were few. Worse, most of the design students are using Macs, and JAL only compiles on Windows. It wasn’t user friendly.
Barragán’s thesis is a must-read if you want to know where Arduino comes from. The summary is everything you know now: it’d be revolutionary if one could make a hardware / software platform that were easy enough that artists and non-microcontroller-nerds could get into. This is exactly the revolution that was underway in the computer graphics front, powered by Processing. Make it open source and freely available, and you’ll take over the world. So he turned to the Atmel AVR chips, which had the GCC open-source toolchain behind it.
From Wiring to Arduino
So by 2004, Barragán had a few prototypes of Wiring boards out, and he and his fellow students were using them informally for projects. The GUI will look ridiculously familiar if you’ve used Processing or Arduino. Since the students were already familiar with Processing, it made a lot of sense to just clone it — with Casey Reas’ blessing of course. Barragán wrote a little program that maybe you’ve heard of: Blink.
Now Barragán needed a faculty advisor at Ivrea, and his interests clearly aligned best with Massimo Banzi. So with his thesis work well underway and Reas’ backing, Barragán took on Banzi as his advisor. With Banzi and three other faculty members, the Wiring platform got its first real test-run, the “Strangely Familiar” workshop and show (PDF). It was a stunning success — in the space of only four weeks students actually made stuff.
Massimo Banzi teaching class with Wiring
Barragán graduated in 2004 and moved back to Colombia. The success of “Strangely Familiar” lead Massimo Banzi to drop Programma2003 like a hot potato and teach his physical design classes using Wiring.
Work began on the Arduino project, according to Banzi, because he wanted a board that was cheaper to make than the Wiring board. So he replaced the ATmega128 microcontroller for a cheaper, smaller version, and chopped off everything that wasn’t “essential” from the Wiring board, like the power LED. This became the “Wiring Lite” board — and eventually the first Arduino prototype.
Giving Arduino its Due
It is not the case that Arduino doesn’t acknowledge Wiring at all. They do. There are a few sentences in the first paragraph of the Credits section of the website, as mentioned above. That and $4.50 will buy you a Grande, Quad, Nonfat, One-Pump, No-Whip, Mocha, but how much more can one ask for?
The Arduino project has been marketed with extreme savvy, something that cannot be said of Wiring. Banzi hooked up with influential people in the US, eventually friend-of-a-friending himself into contact with Dale Dougherty, who invented not just “Web 2.0” but also the “Maker Movement” and Make Magazine. Arduino and Make was a match made in heaven, and the rest is history.
But as mentioned at the top of the article, this is a classic tale of woe. Banzi had better connections and more marketing drive and skill. He pushed the exact same project — rebranded — a lot harder, better, and further than Barragán did, or probably could. Arduino is a household name simply for that reason. If Massimo Banzi hadn’t been behind the wheel, it’s unlikely that you’d be complaining about how many Wiring-based projects we feature.
And, being open-source software and hardware, Barragán gave away the shop. He probably (naïvely) expected to get more credit from his former advisor, or even get invited along on the ride. He asks why Arduino forked Wiring instead of continuing to work with him, and the answer is absolutely clear — Arduino was taking it for their own. And they could. It’s not nice, but that’s business.
Still, we feel Barragán’s pain. So we’re glad, after a decade of silence, that Barragán is speaking out on behalf of himself and Wiring, because it sets the record straight and because his project really was “Arduino” before there was an Arduino.
Casa Jasmina and FabLab Torino in partnership with Officine Arduino e Toolbox Coworking are hosting the IX° edition of the Share Prize, an international competition that promotes and supports contemporary art in the digital age .
The prize theme is ”House Guests” and focuses on the use of electronic art inside the private domestic space.
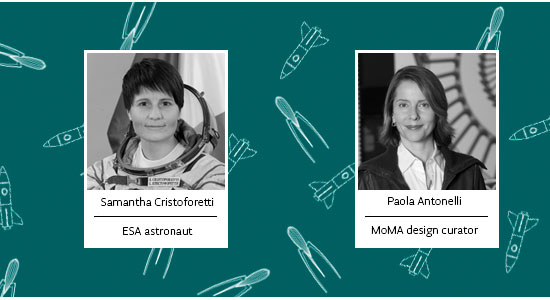
Share prize’s artistic director is Bruce Sterling, writer, journalist and critic of the new media. He invited two special guests to join the international jury: Cap. Samantha Cristoforetti and Paola Antonelli.
Captain Samantha Cristoforetti is the European Space Agency astronaut protagonist of Futura mission, the second long-duration mission ASI, engineer and design enthusiast. Paola Antonelli, is the Senior Curator of the Department of Architecture & Design as well as the Director of R&D at MoMA New York. Paola Antonelli was responsible for adding video games, the Arduino control board and innovative 3DPrinted objects to the NY MoMA’s permanent design collection.
The jury is then completed by Chiara Garibaldi, the SHARE Festival director, Jasmina Tesanovic, widely known as “the Jasmina of Casa Jasmina”.
On March 4th the Share jury will meet to select the entries for Share Festival and Samantha Cristoforetti and Paola Antonelli are going to give a public talk at Toolbox Coworking from h.17:30 to h.19:30 (CET). Stay tuned on our social channels for the live streaming link.
This week we’re happy to introduce a new Genuino Reseller from Canada with Julie Gendron of RobotShop!
- Tell us a bit more about RobotShop
At RobotShop, we specialize in personal and professional robot technology and offer a wide range of robotic products and services in this sector. We have offices in USA, Canada and France. Our vision is to be the world leading source for personal and professional robot technology that help increase the pleasure, knowledge, liberty and security of individuals. We are also committed to promoting and advocating the interest and necessity of robotics use towards positive ends, allowing humanity to attain a better world.
- What’s your company’s super power
Putting robotics at your service!
- What’s your favourite Arduino or Genuino project?
We enjoy Arduino robots and projects from beginners that are starting in robotics. For example this Arduino robot from a beginner on the Let’s Make Robots Blog and forum. We like it because it represents the Arduino and Genuino brand well with a simple and fun “do it yourself” / hobbyist project. This is the meaning of Arduino; for anyone to be able to build a robot or interactive project easily. This is why we help the way we can, by providing Arduino tutorials that can help beginners as well as more advanced Arduino users.
“Bees in the Backyard” is a citizen science technology project to investigate the nesting behavior of Mason bees, created by Mike Teachman, amateur bee enthusiast and Paul Perrault senior field applications engineer.
Mason bees are somewhat unique because, unlike honeybees, they are solitary, every female is fertile, there are no worker bees, they carry pollen on their bellies, they nest in holes and are vital to pollination of many fruit trees.
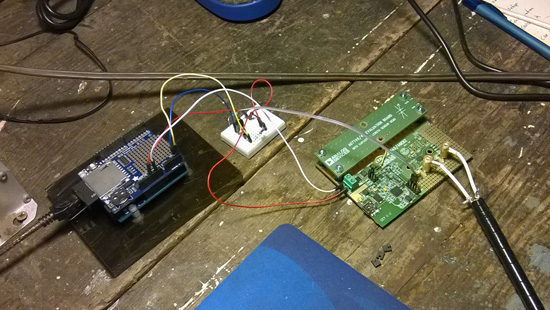
The idea behind the project was to turn each bee’s entire nest into a capacitive sensor with the use of off-the-shelf open source hardware like Arduino Uno:
Following the innovative work of the UPEI in using non-invasive capacitance sensors to detect bees entering and exiting a hive, we decided to extend this study to determine if we could measure not just a bee moving past an opening in a hive, but actually measure bee activity, along with a sense of their deliveries. This involved the invention of a new type of non-invasive sensor, along with the development of a measurement system that would be used to gather large amounts of data.
The plan for the team for 2016 is to improve the project deploying an improved monitoring system at the same site and in particular:
• Develop a new capacitance sensor tube with increased accuracy
• Improve the visual appeal of nesting block and associated electronics
• Develop algorithms to mine the measurement dataset for bee activity patterns
Trojan 77 is a gamified simulation of the Trojan virus running on Arduino Uno. The Trojan is a malware designed to provide unauthorised remote access to a user’s computer amongst other harmful possibilities and this prototype was designed to be exhibited at a technology museum to show the most important effects the virus. Inspired by the tilting labyrinth game, the prototype simulates a few key effects of the Trojan virus like passwords leaking out, files being deleted and culminating in a system crash.
Trojan 77 was created by a team of Physical Computing students (Dhrux Saxena, Gunes Kantaroglu, Liliana Lambriev, Karan Chaitanya Mudgal) at CIID:
The idea of designing something analog to explain a digital construct was an exciting challenge to undertake. The way that computer viruses operate can be very complicated and hard to explain without overloading people with detailed information. Making this information visual via animated projections helped to communicate the effects in a fun and memorable way.
The Trojan moved through several prototyping stages. Initially, the wooden structure was built, followed by the maze. The structure as a whole became functional with the addition of Arduino and Processing. Two servo motors controlled by a joystick enabled the tilt while the movement of the ball triggered distinct light sensors which in turn triggered events in a Processing sketch mapped onto the maze.
The students created also a great video documentary to explain the project with a style inspired by the work of Charles and Ray Eames:
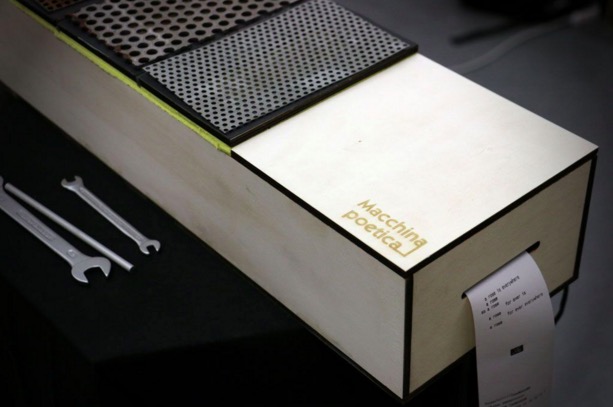
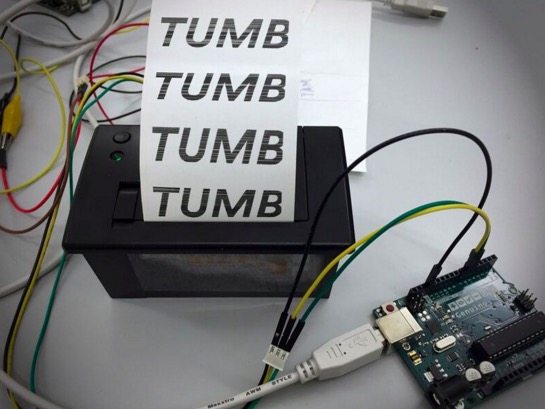
Macchina Poetica is a digital prototype converting sounds into onomatopoeic words and images and it’s inspired by the art of the Futurism movement.
Futurism is a modernist, avant-garde artistic movement originated in Italy in the early 20th century. Thanks to sound representation, Futurism artists aimed to emphasize speed, technology, youth and violence, all concepts arising from industrial innovations and war.
In order to keep continuity with this particular artistic movement, the authors, Alessandra Angelucci, Aris Dotti, Rebecca Guzzo, students at Master of Advanced Studies in Interaction Design SUPSI, decided to design an object that looks like the musical instrument of Futurism movement (precisely a Celesta). The object plays a metallic sounds and the user is facilitated in understanding how to use the object due to a instrument-like interface.
The machine is built using 4 piezo sensors, a thermal printer, a board, electrical cables, 4 resistors (1K), a 6 volt power supply and a Genuino Uno board.
The instrument’s interface is designed with plywood, metal plates and sponge that serves as a shock absorber. Between the metal plates and the sponge there are the piezo sensors along with resistors communicating with the Genuino Uno board every time the user interacts with the metallic plates. Once the Genuino receives the signal, it sends a command to the thermal printer that will print a word or a Futurism poem.
The interaction takes place when the user with the help of a metal tool (for example a screwdriver or a wrench) strikes the metal plates with different pressures. At the end of the performance the user and the viewers can have a clear overview of the produced sounds reviewing the printed paper outputs.
The prototype is the result of two weeks physical computing class Creating Tangible Interfaces held by Ubi De Feo at Maind program SUPSI in Lugano, the goal of the course is how to make tangible interfaces via learning fundamentals of electronics prototyping and interaction design. (Applications are open for the next edition 2016/2017 starting in September 2016)
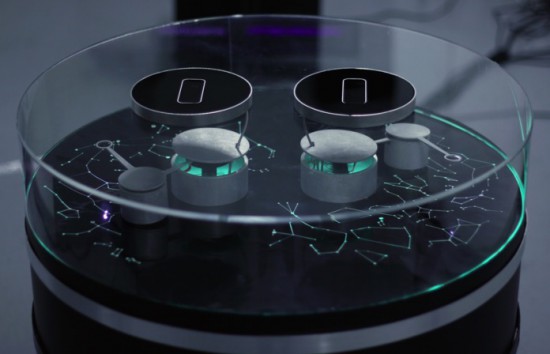
Stellar is an interactive installation by sound artist Francesco Fabris, which aims to create a sonic representation of stars and constellations through a dedicated interface.
The project has been developed using two Arduino Uno, LeapMotion and Max7 software managing data of more than 300 stars and 44 constellations, stored from the open-source software Stellarium, and coded to interact with the robotic arms.
One Arduino Uno board controls four servo motors and a second one controls the led stripes. The motors are controlled with two LeapMotion but since LeapMotion doesn’t support two devices on one computer, he used two miniMac connected through an Ethernet network.
Since there’s no sound in space, Francesco wanted to conceptualize a link between electromagnetic and sound waves to create a minimalistic, interactive device which would allow visitors to learn about specific stars through sound information:
The base of the system is a cylindrical structure, on top of which are displayed the most important constellations of the northern sky. Above this representation are two robotic arms. When the tip of one of the arms aligns with a star, information on the selected star is transformed into simple sine waves, changing the colour the star emanates.
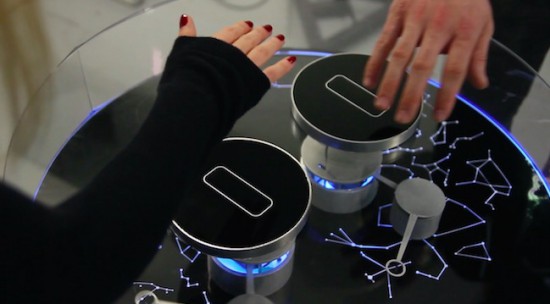
Two players can use the system at the same time, by moving their right hands over the two black, circular sensors. This allows them to move the robotic arm both horizontally and vertically.
The data analyzed for each star are: temperature (color index: red star = old and cold, blue star = hot and young), brightness (as seen from Earth), distance (from Earth) respectively transformed into: frequency (Hz), amplitude (dB), duration (ms).
The colder the star, the lower the pitch; the brighter it appears to us from Earth, the louder the sound; the further from Earth, the longer the duration.
For example, a bright, red star four thousands light years from the Earth would generate a low frequency, loud and long sound. A blue star which is closer to the Earth would generate a high frequency, weaker and shorter sound.
The background drone-sound is white noise (which is a combination of all frequencies, the opposite of space-silence). When a constellation is triggered, the number representing its area (squared degrees), becomes the cutoff frequency of a low-pass filter for the noise signal. In this way, larger constellations will gradually increase their frequency.
Don’t miss the “Making of” video:
Stellar has been produced with the support of the DE.MO./MOVIN’UP I Session 2015 project, and promoted by the Ministry of Cultural Heritage & Activities & Tourism, General Directorate for Contemporary Art, Architecture and Urban Suburbs and GAI – Association for the Circuit of the Young Italian Artists.