Posts with «design» label

New Project: Building a Robot Arm Part 4: Adding Control with an Arduino

This project is part 4 in the building a robot arm tutorial. In the first part I show how to design the arm, the second part shows how to design the base, and the third shows how to design the mount. After all of the Computer Aided Drafting (CAD) and 3D modeling […]

Read more on MAKE

The post Building a Robot Arm Part 4: Adding Control with an Arduino appeared first on Make: DIY Projects, How-Tos, Electronics, Crafts and Ideas for Makers.

Selfie typewriter hammers out ASCII portraits

Dimitry Morozov, better known as vtol, is a Russian musician, engineer and artist who decided that selfies were far too modern for his liking. Instead, he wanted people to wait for their gratification, and so hooked up an iSight camera to an Arduino-controlled Brother sx-4000 typewriter. Once a person sticks their face in front of the machine, named i/o, the typewriter painstakingly hammers out a portrait in ASCII art. The hardware was shown off at the 101 festival in Smolny, St. Petersburg in Russia, which ended earlier this month - but you can still see the device in action if you watch the video.

Via: Kotaku

Source: vtol

Engadget 24 Apr 18:38
arduino  art  design  dimitrymorozov  io  misc  typewriter  video  vtol  

In Russia, you have to type out your selfies

Dimitry Morozov, better known as vtol, is a Russian musician, engineer and artist who decided that selfies were far too modern for his liking. Instead, he wanted people to wait for their gratification, and so hooked up an iSight camera to an Arduino-controlled Brother sx-4000 typewriter. Once a person sticks their face in front of the machine, named i/o, the typewriter painstakingly hammers out a portrait in ASCII art. The hardware was shown off at the 101 festival in Smolny, St. Petersburg in Russia, which ended earlier this month - but you can still see the device in action if you watch the video.

Filed under: Misc

Comments

Via: Kotaku

Source: vtol

Engadget 24 Apr 18:38
arduino  art  design  dimitrymorozov  io  misc  typewriter  video  vtol  

An open hardware quartz crystal microbalance for ultra high mass sensitivity

Marco Mauro is a physicist currently employed as Scientific Coordinator at Novaetech, the first Spin-off Company of the National Institute for Astrophysics (INAF) in Italy. He shared with us all the info about a project he’s been working on  and based on Arduino Micro.

OpenQCM is a fully open source scientific microbalance capable of weighing mass deposition down to 1 billionth of gram:

The sensing core of the microbalance is a piezoelectric quartz crystal oscillator. The deposition of a very tiny mass on the surface causes the variation in the quartz frequency. openQCM belongs to a new generation of innovative smart sensor which boast high resolution and ultra high mass sensitivity. The open source strategy made the creation of openQCM available at low cost which represents a bit fraction of the cost of similar scientific products.

openQCM was built keeping in mind the emergent principles of the open source hardware movement. The open source hardware gives people the freedom to control their technology through the open exchange of all the project features, 3D design, electronics and software. The open hardware potentiality is even greater when it comes to hardware for scientific applications.

openQCM is exactly something like that, the first open hardware quartz crystal microbalance with applications in a wide range of scientific fields, such as chemical and biological sensing, material science.

openQCM has an Arduino Micro board inside at heart. By hacking the timer counter of the AtMega32U4 Arduino microcontroller, it is possible to measure the quartz crystal frequency variations using the 16 Mhz microprocessor clock. openQCM team has designed an Arduino Micro shield with an embedded quartz crystal oscillator driver circuit and a temperature sensor. The output of the quartz crystal oscillator driver is fed to the Arduino Micro timer counter and the analog value of the temperature sensor is fed to the analog pin of the board. This configuration allow you measure the quartz crystal frequency with a resolution of 1 Hz, which roughly corresponds to a mass resolution of 700 pg over the entire quartz surface in air.

One of the major challenge of an open hardware project is that such devices require funding to prototype and manufacture. That’s why the openQCM team have selected the 3d printing technology to keep high quality and low cost. Using 3d printing to print out the prototypes via the SLS process from OS Formiga P100, P110, P395, and P730, the openQCM team created the device’s parts, which required a precision down to 60 µm.

The open source concept made openQCM publicly available so that anyone (scientists, technology enthusiast, makers, hobbyist …) can study, modify, and develop the hardware based on the original design. openQCM is now working and ready to win the heart of the scientific community and more.

Go and make one yourself!

Developed on Hackaday: Olivier’s Design Rundown

The Hackaday writers and readers are currently working hand-in-hand on an offline password keeper, the Mooltipass. A few days ago we presented Olivier’s design front PCB without even showing the rest of his creation (which was quite rude of us…). We also asked our readers for input on how we should design the front panel. In this new article we will therefore show you how the different pieces fit together in this very first (non-final) prototype… follow us after the break!

This is the bottom PCB, containing the main micro-controller, the Arduino headers and the FPC connector for the OLED screen. Finding low profile standard .1″ female connectors was one of our longest Google searches. The ones you can see above are pass-through connectors, which means that the pins can go through the PCB.

This is the CNC-milled prototype case. On the bottom you may notice two slots having a smaller depth to the other end, positioned right on top of the Arduino connectors. As previously mentioned in our Developed on Hackaday articles, we want to give the final users the ability to convert their secure password keeper into an Arduino platform. As you may have guessed, converting the Mooltipass will be as simple as cutting this thin plastic layer (see top of the picture) to access the Arduino headers and unlock the platform.

This is how the bottom PCB fits into the case. 4 screws can be used to keep everything in place. The large elevated plastic area serves as a flat surface for the smartcard:

The OLED screen then rests on the case’s sides:

Enough space is left behind the screen for the flex PCB to comfortably bend. Finally, the top board fits in the remaining space and the acrylic panel is put on top of the assembly:

As our last article stated, we obviously still have some things to perfect. In the meantime, we are going to hand solder a few prototypes and ship them out to our current developers.

Want to stay informed? You can join the official Mooltipass Google Group or follow us on Hackaday Projects.


Filed under: Featured, hardware

Wearable soundscape from Canada


I’m reblogging from Core77 this interesting wearable project because I’d like to highlight the using of Arduino Lilypad board:

Bio Circuit stems from our concern for ethical design and the creation of media-based interactions that reveal human interdependence with the environment. With each beat of the heart, Bio Circuit connects the wearer with the inner workings of their body.

It was created at Emily Carr University by Industrial Design student Dana Ramler, and MAA student Holly Schmidt and provides a form of bio feedback using data from the wearer’s heart rate to determine what “sounds” they hear through the speaker embedded in the collar of the garment. Here’s the schematic of technology:


Have a look at the video below to see how it works and don’t miss BioCircuit Project page on Dana’s Portfolio:


BouncyIrises, a Physical/Digital Interaction Game

First year ITP student Xuedi ("Zoodie") Chen presented this awesome physical/virtual game installation as part of ITP's Winter Show.

Read the full article on MAKE

Tropism Well: A Tall Drink of Water

Instead of cricking your neck to drink from a water fountain, what if the fountain cricked its neck for you? Tropism Well is an interactive sculpture that senses when someone is near and bows to pour water into a glass.

Making Drones in Tijuana

I was invited to speak at Tijuana Innovadora, a regional conference/expo. Mark Hatch of TechShop, Jason Short, an industrial designer by day and Drone programmer by night, as well as David Cuartielles of the Arduino team came as well to speak on an open source hardware panel. I must say that crossing the border into Mexico on foot the night before was an unexpected highlight of the trip. (The line leading in the opposite direction was unimaginably long.)

Our host for the event was Guillermo Montoya of Udrones.com, a Mexican company that is owned by 3D Robotics, which is run by Jordi Munoz and Chris Anderson. 3D Robotics is the business side of DIY Drones and sells the arduPilot controller along with planes and quad copters. It has a design and engineering center in San Diego and now does most of its manufacturing is in Tijuana, with plans to move all of it there eventually.

In the evening, after a tasty dinner at a Tijuana cervicheria, we visited the small manufacturing facility of Udrones on the outskirts Guillermo said they had been in the new facility for six months, after starting in his apartment. An electrical engineer, Guillermo is a childhood friend of Jordi Munoz, who is also from Tijuana and talked his friend into starting up this facility. They manufacture ArduPilot boards, cut body parts out on two CNC machines, and then assemble and test the quadcopters and ship them internationally.

The team of Udrones.com (from left to right, above) is Jesus Cain, Manuel Arriaga, Jose Guillermo Romero, Oscar Nunez, and Raul Montoya. Not shown is Lissana Lozano, who helped us find our way around the conference and the city. Raul and Jesus are also students at the university. They said it takes them about a half-hour to assemble a quadcopter.


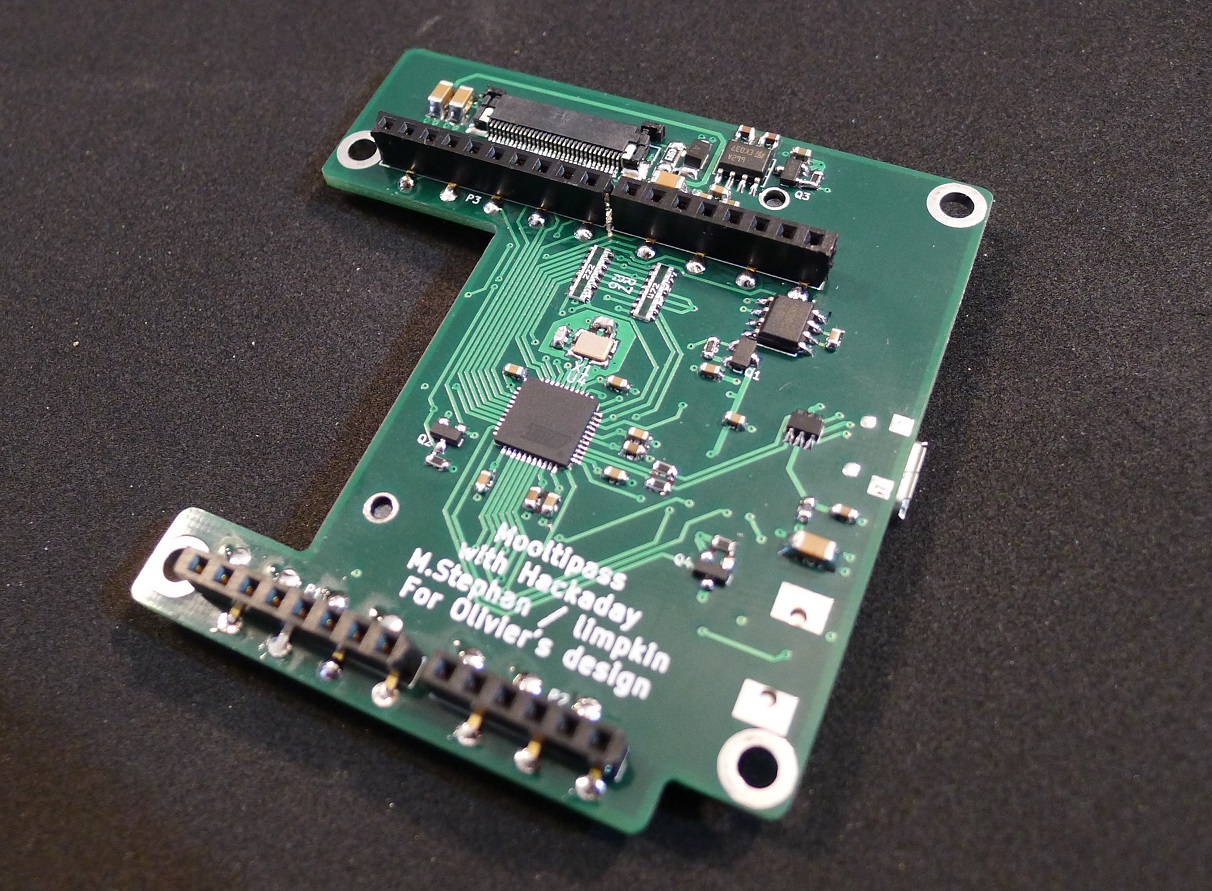
Jason Short checks out a special black ArduPilot board.

One of the questions that Guillermo asked me was why there weren’t more signs of the maker movement in Spanish-speaking countries, particularly in Central and South America. He noted that there had not been a mini Maker Faire in those regions. There aren’t many hacker spaces either, although at World Maker Faire in NYC I met Tiburcio de la Carcova who had opened a makerspace in Santiago, Chile. I don’t have a good answer for Guillermo. David Cuartielles, who is Spanish, thought that the delays in translating technical information into Spanish is largely responsible. (MAKE is not published in a Spanish edition.) I would like to think that the example of Guillermo and his team might inspire others to see what’s possible.


Filed under: Arduino, Design, Drones, Open source hardware

roBOt festival: 5° edizione

Il roBOt festival, giunto quest’anno alla sua quinta edizione, è un evento di carattere internazionale, promosso dall’Associazione Culturale Shape (e realizzato con il sostegno della Regione Emilia Romagna e del Comune di Bologna), il cui obiettivo è quello di mostrare “sul campo” lo stato dell’arte creativo, applicato ad ambiti quali l’arte, la sperimentazione e l’intrattenimento.

roBOt è terra d’elezione per chiunque metta in campo fortissimamente se stesso affrontando con spirito pioneristico ed innovatore le nuove arti contemporanee, quelle in grado di interagire con la tecnologia.

Il tema centrale di quest’anno riguarda “Il linguaggio del futuro”:

La moltitudine di sistemi non verbali e multimediali che rendono possibile lo scambio di informazioni, quindi la competenza comunicativa, di ogni singola entità all’interno della rete globale interconnessa.

Il roBOt festival è in cerca di nuove produzioni relative a installazioni, video, animazioni, performance, fotografia, design e autoproduzioni. Maggiori dettagli, così come il regolamento per la partecipazione alla selezione, possono essere trovati qui.

La deadline per la partecipazione è fissata per il 24 Giugno 2012.

[Via: roBOt festival]