Posts with «bluetooth» label

Bluetooth Record Player Puts a New Spin On Vinyl

You know, we were just discussing weird and/or obsolete audio formats in the writers’ dungeon the other day. (By the way, have you ever bought anything on DAT or MiniDisc?) While vinyl is hardly weird or (nowadays) obsolete, the fact that this Bluetooth record player by [JGJMatt] is so modern makes it all the more fantastic.

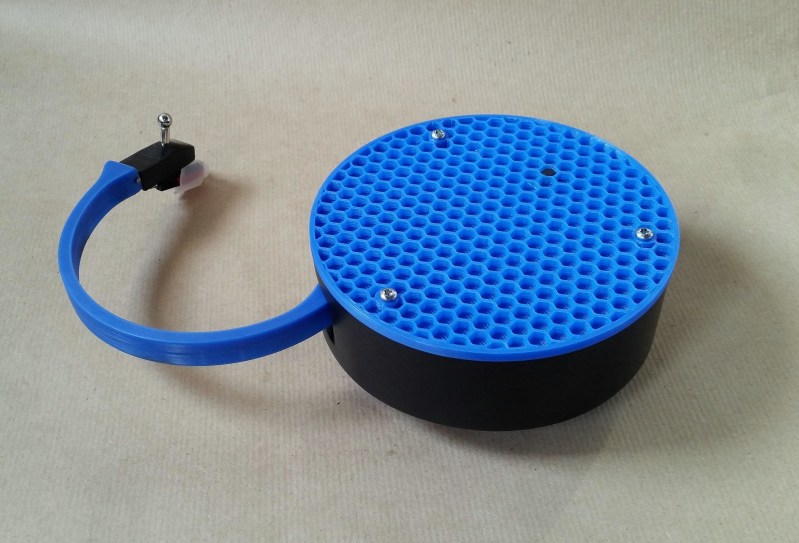
Not since the Audio-Technica Sound Burger, or Crosley’s semi-recent imitation, have we seen such a portable unit. But that’s not even the most notable part — this thing runs inversely to normal record players. Translation: the record stands still while the the player spins, and it sends the audio over Bluetooth to headphones or a speaker.

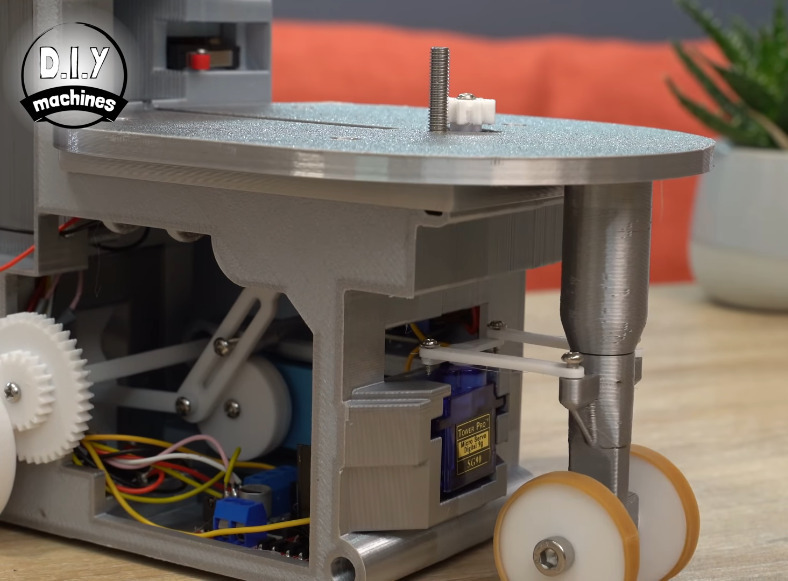
Inside this portable player is an Arduino Nano driving a 5 VDC motor with a worm gear box. There really isn’t too much more to this build — mostly power, a needle cartridge, and a Bluetooth audio transmitter. There’s a TTP223 touch module on the lid that allows [JGJMatt] to turn it off with the wave of a hand.

[JGJMatt] says this is a prototype/work-in-progress, and welcomes input from the community. Right now the drive system is good and the Bluetooth is stable and able, but the tone arm has some room for improvement — in tests, it only played a small section of the record and skidded and skittered across the innermost and outermost parts. Now, [JGJMatt] is trying two-part arm approach where the first bit extends and locks into position, and then a second arm extending from there and moves around freely.

Commercial record players can do more than just play records. If you’ve got an old one that isn’t even good enough for a thrift store copy of a Starship record, you could turn it into a pottery wheel or a guitar tremolo.

3D Printed Gesture-Controlled Robot Arm is a Ton of Tutorials

Ever wanted your own gesture-controlled robot arm? [EbenKouao]’s DIY Arduino Robot Arm project covers all the bases involved, but even if a robot arm isn’t your jam, his project has plenty to learn from. Every part is carefully explained, complete with source code and a list of required hardware. This approach to documenting a project is great because it not only makes it easy to replicate the results, but it makes it simple to remix, modify, and reuse separate pieces as a reference for other work.

[EbenKouao] uses a 3D-printable robotic gripper, base, and arm design as the foundation of his build. Hobby servos and a single NEMA 17 stepper take care of the moving, and the wiring and motor driving is all carefully explained. Gesture control is done by wearing an articulated glove upon which is mounted flex sensors and MPU6050 accelerometers. These sensors detect the wearer’s movements and turn them into motion commands, which in turn get sent wirelessly from the glove to the robotic arm with HC-05 Bluetooth modules. We really dig [EbenKouao]’s idea of mounting the glove sensors to this slick 3D-printed articulated gauntlet frame, but using a regular glove would work, too. The latest version of the Arduino code can be found on the project’s GitHub repository.

Most of the parts can be 3D printed, how every part works together is carefully explained, and all of the hardware is easily sourced online, making this a very accessible project. Check out the full tutorial video and demonstration, embedded below.

3D printing has been a boon for many projects, especially those involving robotic arms. All kinds of robotic arm projects benefit from the advantages of 3D printing, from designs that focus on utility and function, to clever mechanical designs that reduce part count in unexpected ways.

Remote Control Robot Deals Dominoes

Oh, dominoes — the fun of knocking them down is inversely proportional to the pain of setting them all up again. [DIY Machines] is saving loads of time by automating the boring part with a remote control domino-laying machine. If only it could pick them back up.

This machine can be driven directly over Bluetooth like an R/C car, or programmed to follow a predetermined path via Arduino code. Here’s how it works: an Arduino Uno drives two servos and one motor. The 1:90 geared motor drives the robot around using a 180° servo to steer. A continuous servo turns the carousel, which holds nearly 140 dominoes. We love that the carousel is designed to be hot-swappable, so you can keep a spare ready to go.

[DIY Machines] really thought of everything. Every dozen or so dominoes, the machine leaves a gap in case one of the dominoes is tipped prematurely. There are also a couple of accessories for it, like a speedy domino loading stick and a fun little staircase bridge to add to your domino creations. Though all the machine files are freely available, [DIY Machines] requests a small donation for the accessories files. Check out the complete build video after the break, followed by a bonus video that focuses on upgrading the machine with an HM10 Bluetooth module for controlling it directly with a phone.

This certainly isn’t the first domino-laying device we’ve seen, though it might be the most accessorized. [Matthias Wandel]’s version uses only one motor to move and deal the dominoes.

Light Up the Night with a Tetrahedral LED Hat

People get into electronics for all kinds of reasons, but we would guess that the ability to blink the blinkenlights is probably pretty high on the survey results. [Kuchbert] has been going to Deichkind shows for the last decade and has wanted to build one of the German techno-rap band’s signature tetrahedral LED hats for about as long.

Up inside the hat is an Arduino Nano driving WS2812B LEDs and a portable battery to power everything. Thanks to an HC-05 Bluetooth module, the show can be controlled with an Android app. The many, many holes in the acrylic panels were milled out, but they could just as easily be laser-cut, or if you have infinite patience, drilled by hand. The code is coming once it has been cleaned up a bit. Everything else you’d need is already there waiting. This helmet even has its own lil’ music video, which we’ve carefully beat-matched in after the break.

Naturally, this makes us think of all the Daft Punk helms that have blinked by on this blog over the years. This hand-soldered one might be the most meticulously made.

A Simple App Controlled Door Lock

[Adnan.R.Khan] had a sliding door latch plus an Arduino, and hacked together this cool but simple app controlled door lock.

Mechanically the lock consists of a Solarbotics GM3 motor, some Meccano, and a servo arm. A string is tied between two pulleys and looped around the slide of a barrel latch. When the motor moves back and forth it’s enough to slide the lock in and out. Electronically an Arduino and a Bluetooth module provide the electronics. The system runs from a 9V battery, and we’re interested to know whether there were any tricks pulled to make the battery last.

The system’s software is a simple program built in MIT App Inventor. Still, it’s pretty cool that you can get functionally close to a production product with parts that are very much lying around. It also makes us think of maybe keeping our childhood Meccano sets a little closer to the bench!

Hack a Day 17 Jan 06:00

Inject Keystrokes Any Way You Like With This Bluetooth Keystroke Injector

[Amirreza Nasiri] sends in this cool USB keystroke injector.

The device consists of an Arduino, a Bluetooth module, and an SD card. When it’s plugged into the target computer the device loads the selected payload from the SD card, compromising the system. Then it does its unique trick which is to switch the injector over to Bluetooth mode. Now the attacker has much more control, albeit local, over the system.

While we would never even be tempted to plug this device into a real computer, we like some of the additional features, like how an added dip switch can be used to select from up to eight different payloads depending on the required attack. The addition of a photo diode is also interesting, and makes us dream of all sorts of impractical movie hacker scenarios. [Amirreza] says it’s to trigger when the person leaves the room and turns the lights off.

[Amirreza] has all the code and design files on the GitHub. There are also a few payload examples, which should be fun to hack on. After all, one of life’s pleasures is to find new ways to mess with your friends.

A Better Embroidery Machine, With 3D Printing and Common Parts

In concept, an everyday sewing machine could make embroidery a snap: the operator would move the fabric around in any direction they wish while the sewing machine would take care of slapping down stitches of colored thread to create designs and filled areas. In practice though, getting good results in this way is quite a bit more complex. To aid and automate this process, [sausagePaws] has been using CNC to take care of all the necessary motion control. The result is the DIY Embroidery Machine V2 which leverages 3D printed parts and common components such as an Arduino and stepper drivers for an economical DIY solution.

It’s not shown in the photo here, but we particularly like the 3D printed sockets that are screwed into the tabletop. These hold the sewing machine’s “feet”, and allow it to be treated like a modular component that can easily be removed and used normally when needed.

The system consists of a UI running on an Android tablet, communicating over Bluetooth to an Arduino. The Arduino controls the gantry which moves the hoop (a frame that holds a section of fabric taut while it is being embroidered), while the sewing machine lays down the stitches.

[sausagePaws]’s first version worked well, but this new design really takes advantage of 3D printing as well as the increased availability of cheap and effective CNC components. It’s still a work in progress that is a bit light on design details, but you can see it all in action in the video embedded below.

Wireless Controllers For Retro Gaming

There’s no limit to the amount of nostalgia that can be minted through various classic platforms such as the NES classic. The old titles are still extremely popular, and putting them in a modern package makes them even more accessible. On the other hand, if you still have the original hardware things can start getting fussy. With modern technology it’s possible to make some changes, though, as [PJ Allen] did by adding wireless capabilities to his Commodore 64.

Back when the system was still considered “modern”, [PJ] tried to build a wireless controller using DTMF over FM radio. He couldn’t get it to work exactly right and ended up shelving the project until the present day. Now, we have a lot more tools at our disposal than analog radio, so he pulled out an Arduino and a few Bluetooth modules. There’s a bit of finesse to getting the old hardware to behave with the modern equipment, though, but once [PJ] worked through the kinks he was able to play his classic games like Defender without the limitations of wired controllers.

The Commodore 64 was incredibly popular in the ’80s and early ’90s, and its legacy is still seen today. People are building brand new machines, building emulators for them, or upgrading their hardware.

This Arduino Feeds The Dog

Part of the joy of owning a dog is feeding it. How often do you get to make another living being that happy? However, sometimes you can’t be there when your best friend is hungry. [El Taller De TD] built an auto dog feeder using an Arduino and stepper motor. The video and links are in Spanish, but if your Spanish is rusty, YouTube’s caption autotranslation isn’t bad and Google Translate can help you with the web site.

The electronics are reasonably simple: an Arduino, a Bluetooth module, and a stepper motor driver. Mechanically, the motor and some PVC pipe are all you need. There’s a small phone application to drive the Bluetooth using App Inventor.

This would be a pretty straightforward first project and — of course — could be useful for any kind of animal. For dog use, we might have hardened the external wires and circuit boards a bit though. In addition there are plenty of things you could do in software, for example you could feed every 8 hours. It seems like you could add a sensor to tell when you are out of food, or perhaps if the food was not feeding for some reason.

We’ve looked at using App Inventor with Bluetooth before and it is pretty easy. We might have been tempted to go with Blynk to have more options for communication, but either way is pretty easy.

Well-Loved Toy Turned Into Robotic Glockenspiel

If there’s a happier word ever imported into the English language than “Glockenspiel”, we’re not sure what it is. And controlling said instrument with a bunch of servos and an Arduino makes us just as happy.

When [Leon van den Beukel] found a toy glockenspiel in a thrift store, he knew what had to be done – Arduinofy it. His first attempt was a single hammer on a pair of gimballed servos, which worked except for the poor sound quality coming from the well-loved toy. The fact that only one note at a time was possible was probably the inspiration for version two, which saw the tone bars removed from the original base, cleaned of their somewhat garish paint, and affixed to a new soundboard. The improved instrument was then outfitted with eight servos, one for each note, each with a 3D-printed arm and wooden mallet. An Arduino runs the servos, and an Android app controls the instrument via Bluetooth, because who doesn’t want to control an electronic glockenspiel with a smartphone app? The video below shows that it works pretty well, even if a few notes need some adjustment. And we don’t even find the servo noise that distracting.

True, we’ve featured somewhat more accomplished robotic glockenspielists before, but this build’s simplicity has a charm of its own.