Posts with «art» label

Robot Draws Using Robust CNC

While initially developed for use in large factory processes, computer numeric control (CNC) machines have slowly made their way out of the factory and into the hands of virtually anyone who wants one. The versatility that these machines have in automating and manipulating a wide range of tools while at the same time maintaining a high degree of accuracy and repeatability is invaluable in any setting. As an illustration of how accessible CNC has become, [Arnab]’s drawing robot uses widely available tools and a CNC implementation virtually anyone could build on their own.

Based on an Arudino UNO and a special CNC-oriented shield, the drawing robot is able to execute G code for its artistic creations. The robot is capable of drawing on most flat surfaces, and can use almost any writing implement that will fit on the arm, from pencils to pens to brushes. Since the software and hardware are both open source, this makes for an ideal platform on which to build any other CNC machines as well.

In fact, CNC is used extensively in almost everything now, and are so common that it’s not unheard of to see things like 3D printers converted to CNC machines or CNC machines turned into 3D printers. The standards used are very well-known and adopted, so there’s almost no reason not to have a CNC machine of some sort lying around in a shop or hackerspace. There are even some art-based machines like this one that go much further beyond CNC itself, too.


Filed under: robots hacks
Hack a Day 22 Jun 00:00
arduino  art  cnc  drawing  g-code  robot  robots hacks  

Creating Interactive Art: The Museum of Funny Ladies

The Museum of Funny Ladies is an interactive way for people to experience the story of Sybil Adelman, a pioneer comedy writer from the 1970s.

Read more on MAKE

The post Creating Interactive Art: The Museum of Funny Ladies appeared first on Make: DIY Projects and Ideas for Makers.

Complex, Beautiful Device is Limited to Text-speak and Cat Pictures (WTF, LOL)

Beautifully documented, modular, and completely open-source, this split flap display project by [JON-A-TRON] uses 3D printing, laser cutting and engraving, and parts anyone can find online to make a device that looks as sharp as it is brilliantly designed. Also, it appears to be a commentary on our modern culture since this beautifully engineered, highly complex device is limited to communicating via three-letter combos and cat pictures (or cat video, if you hold the button down!) As [JON-A-TRON] puts it, “Why use high-resolution, multi-functional devices when you can get back to your industrial revolution roots?” Video is embedded below.

The only limitation is that the device has no way of knowing the state of individual displays, so it’s unable to spell out specific messages – an operator simply holds a button to scroll through letters, and stops when the correct letter is displayed. For a similar project that has serious control hardware (but none of the cheeky commentary) check out this scratch-built alphanumeric split flap display.

[via Adafruit Blog]


Filed under: classic hacks

Maker Spotlight: Miriam Langer

Miriam, a Professor of Media Arts & Technology, started using Arduino in 2008 to bring new possibilities to her interactive exhibits.

Read more on MAKE

The post Maker Spotlight: Miriam Langer appeared first on Make: DIY Projects and Ideas for Makers.

Maker Spotlight: Tim Deagan

Tim Deagan does seemingly everything — fire effects, metalworking, painting, leatherworking... Is there anything this man doesn't make?

Read more on MAKE

The post Maker Spotlight: Tim Deagan appeared first on Make: DIY Projects and Ideas for Makers.

Autonomous Musical Soundscapes from 42 Fans and 7 Lasers

[dmitry] writes in to let us know about a new project that combines lasers with fans and turns the resulting modulation of the light beams into an autonomous soundscape. The piece is called “divider” and is a large, wall-mounted set of rails upon which seven red lasers are mounted on one end with seven matching light sensors mounted on the other end. Interrupting the lasers’ paths are forty-two brushless fans. Four Arduino Megas control the unit.

Laser beams shining into light sensors don’t do much of anything on their own, but when spinning fan blades interrupt each laser beam it modulates the solid beams and turns the readings of the sensors on the far end into a changing electrical signal which can be played as sound. Light being modulated by fan blades to create sound is the operating principle behind a Fan Synth, which we’ve discussed before as being a kind of siren (or you can go direct to that article’s fan synth demo video to hear what kind of sounds are possible from such a system.)

This project takes this entire concept of a fan synth further by not only increasing the number of lasers and fans, but by tying it all together into an autonomous system. The lasers are interrupted repeatedly and constantly, but never simultaneously. Listen to and watch it in action in the video below.

There isn’t a lot of in-depth technical information on the project page, but there are many really good photos. We especially love the way that the whole assembly is highly visual with the lasers turning on and off and interacting with different fans.

Any changing electrical signal can be played as sound, and if there’s one thing projects like self-playing musical hardware can teach us, it’s that if you have an electrical signal that looks strange or chaotic, hook a speaker up to it because it probably sounds pretty cool!


Filed under: musical hacks

Make masterpieces with a homemade CNC painting machine

Longtime artist Jeff Leonard has built a pair of Arduino-driven CNC painting machines with the motivation to grow his toolbox and expand the kinds of marks he could make simply by hand. By pairing the formal elements of painting with modern-day computing, the Brooklyn-based Maker now has the ability to create things that otherwise would’ve never been possible.

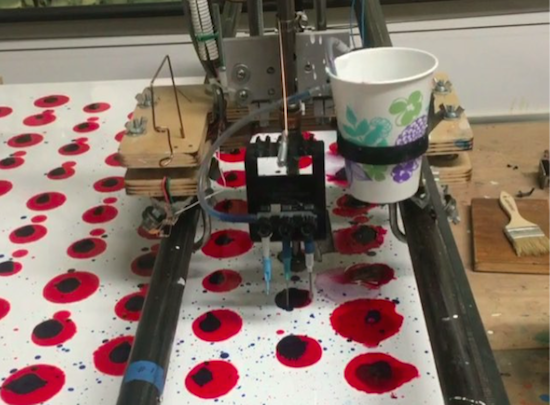
Machine #1 consists of a 5’ x 7’ table and is capable of producing pieces of art up to 4’ x 5’ in size. The device features a variety of tools, including a Beugler pinstriping paint wheel, a brush with a peristaltic pump syringe feed, an airbrush with a five-color paint feed system and five peristaltic pumps from Adafruit, a squeegee, and pencils, pens, markers and other utensils.

In terms of hardware, it’s equipped with three NEMA 23 stepper motors, three Big Easy Drivers, as well as an Arduino Mega and an Uno. There are two servos and five peristaltic pumps on the carriage–the first servo raises and lowers the tool, while the second presses the trigger on the airbrush. An Adafruit motor shield on the Uno controls the pumps, and the AccelStepper library is used for the Big Easy Drivers.

According to Leonard:

I am coding directly into the Arduino. There are many different codes that I call and overlap and use as a painter overlaps techniques and ideas. There is a lot of random built into the code, I don’t know what the end result will be when I start. Typically on any kind of CNC machining the end result has been made in the computer and the machine executes the instructions. I am building a kind of visual synthesizer that I can control in real-time. There are many buttons and potentiometers that I am controlling while the routines are running. I take any marks or accidents that happen and learn how to incorporate them into a painting.

I am learning Processing now and how to incorporate it into the image making.

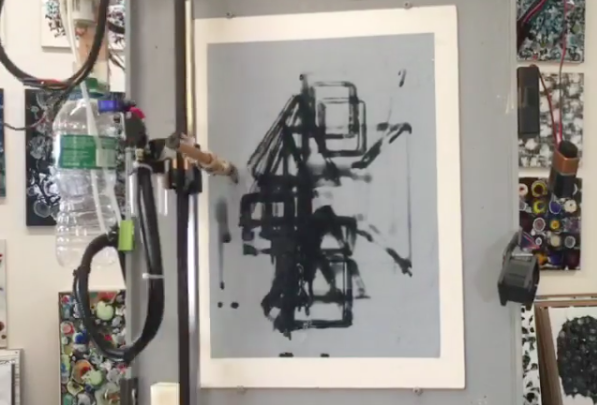
Machine #2, however, is a bit different. This one is actually a standup XY unit that was made as a concept project. It paints using water on magic paper that becomes black when wet and disappears as it dries, used mainly as a way to practice calligraphy or Chinese brush painting. Not only does it look great, there’s no clean up either!

In terms of tools, the machine has a brush and an airbrush. Two NEMA 17 stepper motors are tasked with the XY motion. There are also three servos–one servo lifts and lowers the armature away from the paper since there is no Z-axis, another controls the angle of the brush, and the third presses the trigger of the airbrush. A peristaltic pump helps to refill the water cup, along with a small fan. The system is powered by an Arduino Uno with an Adafruit Motor Shield using the Adafruit Motor Shield Library v2.

As awesome as it all sounds, you really have to see these gadgets in action and their finished works (many of which can be found on Instagram).

Circuit Bender Artist bends Fresnel Lens for Art

Give some mundane, old gear to an artist with a liking for technology, and he can turn it into a mesmerizing piece of art. [dmitry] created “red, an optic-sound electronic object” which uses simple light sources and optical elements to create an audio-visual performance installation. The project was the result of his collaboration with the Prometheus Special Design Bureau in Kazan, Russia. The inspiration for this project was Crystall, a reconstruction of an earlier project dating back to 1966. The idea behind “red” was to recreate the ideas and concepts from the 60’s ~ 80’s using modern solutions and materials.

The main part of the art installation consists of a ruby red crystal glass and a large piece of flexible Fresnel lens, positioned in front of a bright LED light source. The light source, the crystal and the Fresnel lens all move linearly, constantly changing the optical properties of the system. A pair of servos flexes and distorts the Fresnel lens while another one flips the crystal glass. A lot of recycled materials were used for the actuators – CD-ROM drive, an old scanner mechanism and old electric motors. Its got a Raspberry-Pi running Pure Data and Python scripts, with an Arduino connected to the sensors and actuators. The sensors define the position of various mechanical elements in relation to the range of their movement. There’s a couple of big speakers, which means there’s a beefy amplifier thrown in too. The sounds are correlated to the movement of the various elements, the intensity of the light and probably the color. There’s two mechanical paddle levers hanging in there, if you folks want to hazard some guesses on what they do.

Check out some of [dmitry]’s earlier works which we featured. Here’s him Spinning a Pyrite Record for Art, and making Art from Brainwaves, Antifreeze, and Ferrofluid.


Filed under: hardware, musical hacks

Go Behind the Scenes of Installing an Interactive LED Art Exhibit

Nick Squires details his time spent using his maker skills to produce an interactive art installation and performance.

Read more on MAKE

The post Go Behind the Scenes of Installing an Interactive LED Art Exhibit appeared first on Make: DIY Projects and Ideas for Makers.

Macchina poetica converts sounds into onomatopoeic words


Macchina Poetica is a digital prototype converting sounds into onomatopoeic words and images and it’s inspired by the art of the Futurism movement.

Futurism is a modernist, avant-garde artistic movement originated in Italy in the early 20th century. Thanks to sound representation, Futurism artists aimed to emphasize speed, technology, youth and violence, all concepts arising from industrial innovations and war.

In order to keep continuity with this particular artistic movement, the authors, Alessandra Angelucci, Aris Dotti, Rebecca Guzzo, students at Master of Advanced Studies in Interaction Design SUPSI, decided to design an object that looks like the musical instrument of Futurism movement (precisely a Celesta). The object plays a metallic sounds and the user is facilitated in understanding how to use the object due to a instrument-like interface.

The machine is built using 4 piezo sensors, a thermal printer, a board, electrical cables, 4 resistors (1K), a 6 volt power supply and a Genuino Uno board.

The instrument’s interface is designed with plywood, metal plates and sponge that serves as a shock absorber. Between the metal plates and the sponge there are the piezo sensors along with resistors communicating with the Genuino Uno board every time the user interacts with the metallic plates. Once the Genuino receives the signal, it sends a command to the thermal printer that will print a word or a Futurism poem.

The interaction takes place when the user with the help of a metal tool (for example a screwdriver or a wrench) strikes the metal plates with different pressures. At the end of the performance the user and the viewers can have a clear overview of the produced sounds reviewing the printed paper outputs.

The prototype is the result of two weeks physical computing class Creating Tangible Interfaces held by Ubi De Feo at Maind program SUPSI  in Lugano, the goal of the course is how to make tangible interfaces via learning fundamentals of electronics prototyping and interaction design.  (Applications are open for the next edition 2016/2017 starting in September 2016)