Posts with «arduinocertified» label

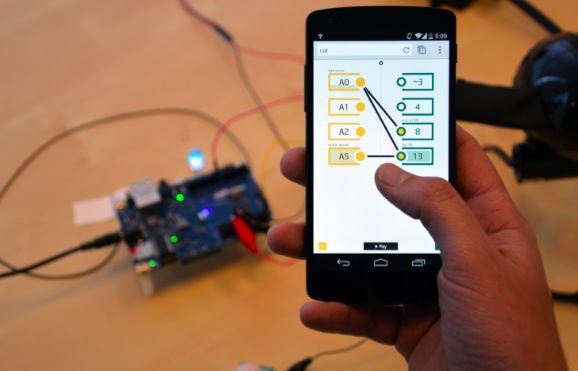
Real-time tinkering on Intel Galileo using a mobile device

If you are a beginner and want to start prototyping easily with  Intel Galileo, it could be fun to use ConnectAnyThing. It  makes it easy for novices to start tinkering in hardware before jumping into example code and the IDE but it’s also useful for experienced builders that want to try something out really quickly.

To get started, you will need:

  • Galileo (with updated firmware)
  • Wi-Fi card and antenna.  (Tested with Centrino n-135, n-6205, n-6235)
  • Micro SD card, 2gb up to 32gb capacity, with ConnectAnyThing loaded (instructions on github)

Download the latest release of ConnectAnyThing, follow the instructions and enjoy tinkering: on a webpage you’ll be able to  read inputs and control outputs in real-time from your mobile device!

Make your lasercut datamonster with Intel Galileo

Datamonsters are creatures that respond to you. They can see you and respond to your presence and movement. In addition to responding to immediate interactions, they can also be influenced by events happening in the world outside.


The project you see in the picture was made by Lucas Ainsworth  using Intel Galileo board and needs 3 main things:

- a physical structure
The physical structure uses commonly available materials and a relatively easy-to build wooden kit pattern, so that the physical form “gets out of the way”
as much as possible. If you cut this kit and put it together, you will have a robot with 5 joints: waist rotation, waist elevation, mid-body elevation, neck rotation, and head movement.

- sensing
For this version, we’re using 3 long range active IR sensors for simplicity and low cost. This sensor pack estimates object location in 3D space. Next gen could possibly use a webcam and OpenCV to include face-detection and motion in addition to presence.

- software
This is where the fun is and where the most work remains to be done. We have code for the Arduino IDE (written for the Intel Galileo board) that you
can use to calibrate and control your monster. If you use our code unchanged, you’ll have some basic reactions to objects, and a connection over WiFi to Thingspeak. Thingspeak is an easy-to-use repository for data collected from the internet or any data sources you create.

You can make your own Datamonster following the detailed documentation at this link. The Galileo code to get started (for the Arduino IDE) is on GitHub.