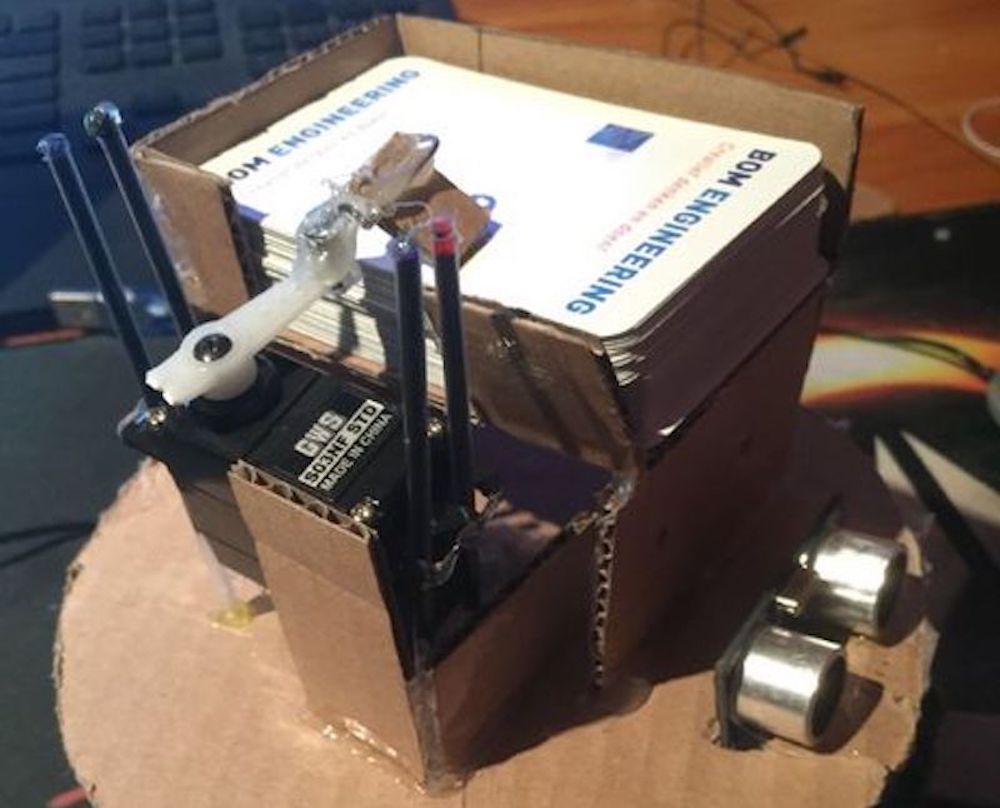
Ruben, aka “Ruubz0r,” a mechanical engineering student, was tasked with building a smart object. As he enjoys card games, he decided to make a playing card distributor.
The resulting device uses a single servo to slide cards off of a deck, along with a stepper motor and ultrasonic sensor to aim it at the human recipient. An Arduino Uno provides the brains of the operation.
The system is made out of wood and cardboard, and while it may not be ready for casino use, it’s a great example of what can be done with readily available materials. Check it out in action in the video seen here!
Tired of doing the mundane task of opening your door? This hack from Sieuwe Elferink takes care of that for you, using an Arduino Uno for control.
When someone comes within 50 cm of an ultrasonic sensor attached to the door, the Arduino uses an H-bridge relay to power a windshield wiper motor, which opens and closes it via a linkage setup. Another sensor is implemented on the opposite side of the door, allowing hands-free travel both ways!
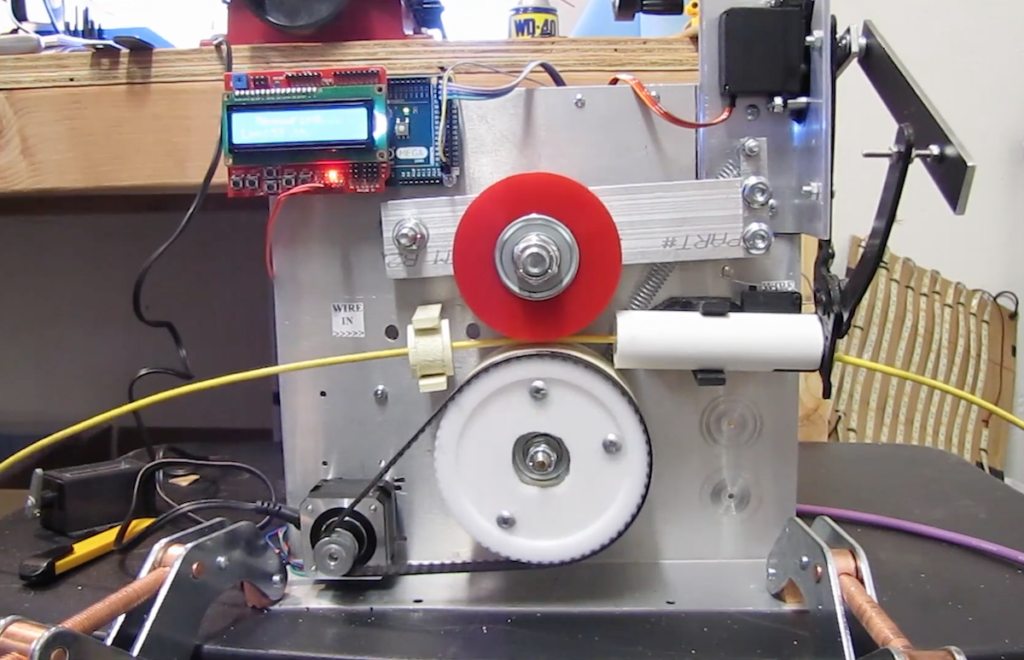
What do you do when faced with measuring and cutting a bunch of cables? If you’re Edward Carlson, you “simply” build a machine to do it for you!
While it may not save time on this run, at least on the next occasion that he needs a few cables cut, he can just program his device to snip everything to size!
His setup uses an Arduino Mega with an LCD/button shield to tell the machine how long to snip each wire, then employs a stepper motor to move the cable between two rollers to the correct length. When in position, a high-torque servo actuates a (normally) manual pair of clippers to cut it to size.
Be sure to check out the project explanation in the video seen here, or skip to around 5:30 to see it in action!
Instead, an Arduino Nano powers a novel mechanical gear assembly via two motors, which causes the two hands to physically switch positions between the second arm being mounted on the base and on the tip of the first arm. This strange representation of time changes form every fifteen minutes.
The Edgytokei which literally means edge clock is inspired from the Japanese nunchucks. Just like the nunchucks the clock is just a pair of two arms displaying time by balancing themselves on the edge. The clock consists of two arms and the base on which the arms are anchored. Both the arms are of equal length as the role of the arms changes with different hours of the day.
The fulcrum of the clock flips from the center to the left or right of the clock every quarter hour so that the clock can stand on the edge to represent the time between quarter past and quarter to hour. This flipping of the arms keeps the clock dancing on the edge throughout the day. The base which contains the electronics of the clock provides a anchor for the clock and prevents the arms from falling over.
The display was prototyped on a huge breadboard assembly, along with an Arduino Mega, then finished using a custom PCB and Arduino Nano.
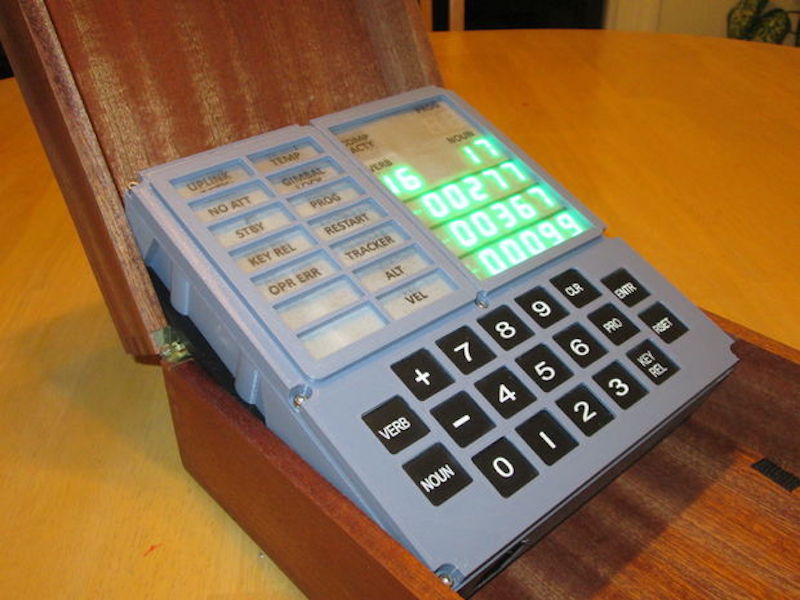
3D-printed parts are used to form the housing, in addition to a variety of electronics. These include an actual GPS unit, along with a custom three-segment LED assemblies to display “+” and “-” as needed.
Be sure to check it out in the video seen here, showing off its interface, as well as an MP3 unit that plays back a 1962 JFK speech about going to the moon.
In a project, repetitive tasks that break the flow of development work are incredibly tiresome and even simple automation can make a world of difference. [Simon Merrett] ran into exactly this while testing different stepper motors in a strain-wave gear project. The system that drives the motor accepts G-Code, but he got fed up with the overhead needed just to make a stepper rotate for a bit on demand. His solution? A grbl man-in-the-middle jog pendant that consists of not much more than a rotary encoder and an Arduino Nano. The unit dutifully passes through any commands received from a host controller, but if the encoder knob is turned it sends custom G-Code allowing [Simon] to dial in a bit acceleration-controlled motor rotation on demand. A brief demo video is below, which gives an idea of how much easier it is to focus on the nuts-and-bolts end of hardware when some simple motor movement is just a knob twist away.
[Simon]’s jog pendant moves a single motor which is exactly what he needs to ease development of his 3D printed strain-wave gear using a timing belt, but it could be programmed with any G-Code at all. Speaking of DIY jog pendants for CNC machines, don’t forget this wireless one made from an Atari 2600 joystick that jogs a plasma cutter in X and Y, and zeroes it with a push of the button.
What do you do, when you need a random number in your programming? The chances are that you reach for your environment’s function to do the job, usually something like rand() or similar. This returns the required number, and you go happily on your way.
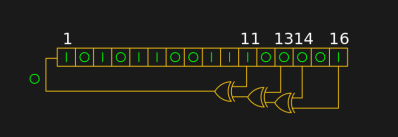
A shift register configured as a pseudo-random number generator. [by KCAuXy4p CC0 1.0]Except of course the reality isn’t quite that simple, and as many of you will know it all comes down to the level of randomness that you require. The simplest way to generate a random number in software is through a pseudo-random number generator, or PRNG. If you prefer to think in hardware terms, the most elementary PRNG is a shift register with a feedback loop from two of its cells through an XOR gate. While it provides a steady stream of bits it suffers from the fatal flaw that the stream is an endlessly repeating sequence rather than truly random. A PRNG is random enough to provide a level of chance in a computer game, but that predictability would make it entirely unsuitable to be used in cryptographic security for a financial transaction.
There is a handy way to deal with the PRNG predictability problem, and it lies in ensuring that its random number generation starts at a random point. Imagine the shift register in the previous paragraph being initialised with a random number rather than a string of zeros. This random point is referred to as the seed, and if a PRNG algorithm can be started with a seed derived from a truly unpredictable source, then its output becomes no longer predictable.
Selecting Unpredictable Seeds
Computer systems that use a PRNG will therefore often have some form of seed() function alongside their rand() function. Sometimes this will take a number as an argument allowing the user to provide their own random number, at other times they will take a random number from some source of their own. The Sinclair 8-bit home computers for example took their seed from a count of the number of TV frames since switch-on.
The not-very-random result of a thousand analogRead() calls.
The Arduino Uno has a random() function that returns a random number from a PRNG, and as you might expect it also has a randomSeed() function to ensure that the PRNG is seeded with something that will underpin its randomness. All well and good, you might think, but sadly the Atmel processor on which it depends has no hardware entropy source from which to derive that seed. The user is left to search for a random number of their own, and sadly as we were alerted by a Twitter conversation between @scanlime and @cybergibbons, this is the point at which matters start to go awry. The documentation for randomSeed() suggests reading the random noise on an unused pin via analogRead(), and using that figure does not return anything like the required level of entropy. A very quick test using the Arduino Graph example yields a stream of readings from a pin, and aggregating several thousand of them into a spreadsheet shows an extremely narrow distribution. Clearly a better source is called for.
Noisy Hardware or a Jittery Clock
As a slightly old-school electronic engineer, my thoughts turn straight to a piece of hardware. Source a nice and noisy germanium diode, give it a couple of op-amps to amplify and filter the noise before feeding it to that Arduino pin. Maybe you were thinking about radioactive decay and Geiger counters at that point, or even bouncing balls. Unfortunately though, even if they scratch the urge to make an interesting piece of engineering, these pieces of hardware run the risk of becoming overcomplex and perhaps a bit messy.
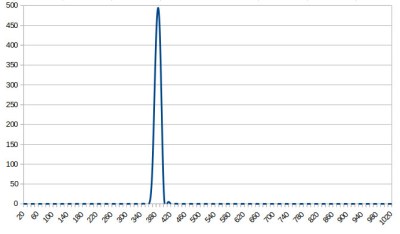
The significantly more random result of a thousand Arduino Entropy Library calls.
The best of the suggestions in the Twitter thread brings us to the Arduino Entropy Library, which uses jitter in the microcontroller clock to generate truly random numbers that can be used as seeds. Lifting code from the library’s random number example gave us a continuous stream of numbers, and taking a thousand of them for the same spreadsheet treatment shows a much more even distribution. The library performs as it should, though it should be noted that it’s not a particularly fast way to generate a random number.
So should you ever need a truly random number in your Arduino sketch rather than one that appears random enough for some purposes, you now know that you can safely disregard the documentation for a random seed and use the entropy library instead. Of course this comes at the expense of adding an extra library to the overhead of your sketch, but if space is at a premium you still have the option of some form of hardware noise generator. Meanwhile perhaps it is time for the Arduino folks to re-appraise their documentation.
If you’re tired of classic tower building games like Jenga or stacking cards and would like a new challenge, “mr_fid” has come up with a game where you balance blocks on a tree assembly. The nicely crafted device then moves around to throw the blocks off using three servos and push rods.
Everything is controlled by an Arduino Nano that randomly selects the intensity of the movement and which color of block to be stacked, displayed on a circular arrangement of programmable LEDs.
Once a block has been added, a button in the middle of the LEDs is pushed and tree movement starts, potentially destabilizing the player’s work.
Nice Arduino project. Featuring an Arduino Nano controlling 3 servos to move the tree. Firstly the “Roll” button is pressed to give you a colour and amplitude once the correct bit has been placed on the tree the “Shake” button is pressed and the tree moves around. Any bits which fall off are given to the person whos go it was! the idea of the game is to get rid of all your bits first. If when you press the “Roll” button you don’t have the correct colour OR the strength is to high then if you wish you can miss your go.
You can check the game out in the first video below, or see the second video for information on how to avoid jittery servos in this type of setup.


 In a project, repetitive tasks that break the flow of development work are incredibly tiresome and even simple automation can make a world of difference. [Simon Merrett] ran into exactly this while testing different stepper motors in a strain-wave gear project. The system that drives the motor accepts G-Code, but he got fed up with the overhead needed just to make a stepper rotate for a bit on demand. His solution? A


