Posts with «arduino pro mini» label

Turn your old cellphone into a smartwatch

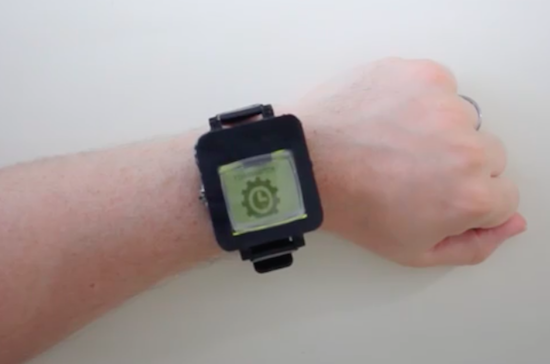
Do you have an old cellphone lying around somewhere? Don’t know what to do with it? Time to blow off that dust and convert the ‘dumb’ device into a smartwatch? This is exactly what Tinkernut has done. His DIY wearable not only tells time, but connects wirelessly to his smartphone over Bluetooth and notifies him of incoming calls and text messages via light and vibration.

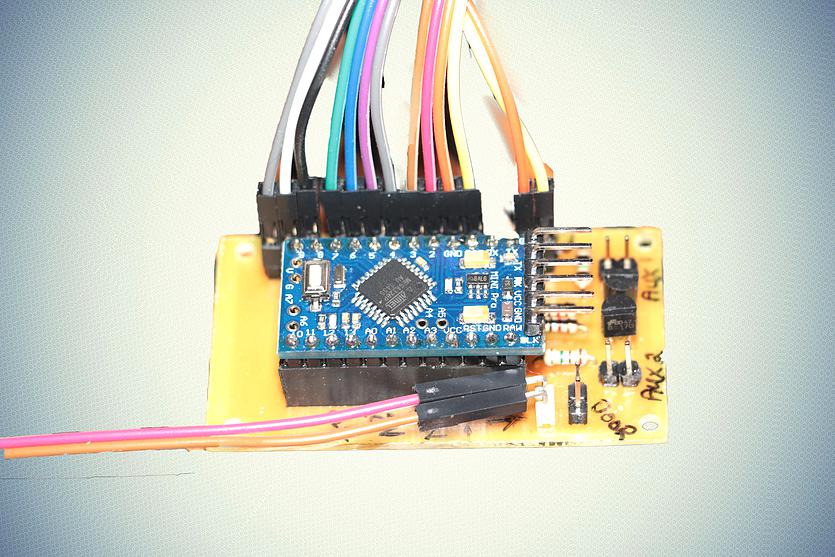
The build itself uses an LCD screen and vibrating motor from a Nokia 1100 along with an Arduino Pro Mini to drive the system. A 3.7V 1100mAh rechargeable battery powers the gadget. All the electronics are soldered together to a perfboard, and housed inside a 3D-printed case.

Have an obsolete phone you’d love to repurpose into modern-day tech? Tinkernut has put together a detailed three-video series that explains everything from extracting the display, to connecting it to the Arduino, to creating an app in the MIT App Inventor. Admittedly, this project kept things simple; however, there are plenty of other features you can add, including a pedometer to count steps or a real-time clock module so you can keep time without having the watch tethered to your mobile device.

Lawn Da Vinci is an open-source, remote-controlled lawn mower

Inspired by the one seen in Honey, I Shrunk The Kids, Blake Hodgson has built a remote-controlled lawn mower of his own dubbed ”Lawn Da Vinci.”

The robotic machine’s frame is made from angle iron and steel, while its wheels and motors were taken from a mobility scooter. Power is supplied by a pair of 12V car batteries wired in series, and it’s driven across the yard with an RC airplane remote.

The Lawn Da Vinci has two Arduino Pro Minis and a Raspberry Pi for a brain–one Arduino is used for the motors and RC signal, the other for the kill switches. Meanwhile, the Raspberry Pi is tasked with streaming video from an attached webcam to his phone.

To improve reliability and reduce complexity, the motor driver now gets its signal directly from the RC receiver once it goes through the two relays controlled by the Arduino, which is always looking for a good signal. The Arduino and Raspberry Pi are powered off of a disassembled car cigarette lighter USB charger which takes the 12v of the batteries down to a clean 5v. I originally had it powered off of the Sabertooth but have better reliability this way. There are many ways to kill the motors.  You can turn the remote off, push the trainer button, left with the right joystick, or push a button separate key fob and all of these will kill it.

Rather not to push a mower around all summer long? Check out Hodgson’s entire project–complete with its code–on his blog here, or read more on Hackaday.

This handheld gadget will scan and identify fonts

Fiona O’Leary, a design student at the Royal College of Art, has developed a handheld device that enables her to capture any font and color she sees in the real world, and magically imports them into Adobe’s InDesign. The gadget, called Spector, was born out of her own frustrations with designing for print on-screen and never actually knowing how the fonts and colors would appear in their physical form.

The tool, which was prototyped using an Arduino Pro Mini, works essentially like a “physical eyedropper” or a “Shazam for fonts.” Simply place Spector on a certain typeface and watch it change to that exact typeface right on your computer screen, all with the press of a button.

A built-in camera captures the media you’re looking at–whether that’s a billboard, a subway map, or text in a book–and an algorithm converts the image into data that detects the shape and color in CMYK/RGB values. That data is then sent to a font and color database, where the sample is further identified.

Additionally, Spector can store up to 20 fonts and colors so you can collect your favorite typography on the go and upload it later. The device is currently capable of recognizing seven different typefaces and IDs type size, kerning, and leading, although O’Leary says she is working to integrate it with a much larger database.

Hacking a rotary phone with an Arduino and a GSM shield

While cleaning out his closet, Instructables user “Acmecorporation”  discovered an old rotary telephone. Instead of tossing it away, the Maker decided to give the old-school device some modern-day technology using an Arduino Pro Mini and a SIM900 GSM shield.

Acmecorporation is able to use the aptly named TOWA Phone (There Once Was A Telephone) to make and receive calls, send single DMTF tones, and even program numbers on speed dial. Aside from its classic bell ringer, there’s an RGB LED that indicates GSM status: red for offline, green for online, and blue for an incoming call.

The Maker briefly explains how it works:

To make a phone call you have to pick up the handset and dial the number, that’s all. Terminate call hanging up the handset.

When phone is ringing, pick up the handset to answer. Terminate it hanging up.

If you call to a support center or an office, usually you have to dial numbers to connect a specific department. You can do this because TOWA sends single DMTF tones.

Inside the Arduino script, you can add your favorite telephone numbers and combine it with a specific integer number. For example, I’ve stored my favorites combined with numbers from 1 to 8. So when I pick up the handset and dial 1, it starts a call to my wife. When I dial 2 or 3, it calls one of my sons, and so on.

Although Acmecorporation didn’t design TOWA for everyday use, it has become a permanent fixture on his desk. Do you have a rotary phone lying around? Time to brush off the dust and rig your own!

Grab things with an Arduino robotic gripper

Sam Baumgarten and his friend have developed a pretty rad robotic gripper with the help of Arduino and 3D printing. The gripper itself consists of three large hobby servos joined to the fingers with a linkage. The underactuated fingers have a force sensor under each contact point, while the control glove is equipped with tiny vibrating motors at the fingertips. This, of course, provides haptic feedback to ensure that the user doesn’t crush anything–the greater the pressure, the stronger the motors vibrate.

The gripper is mounted to a handle with abrasive tape–the same kind found on staircases and skateboards. The tape is also used on each finger for optimal gripping. A box at the base of the pole houses all of the electronics, which include an Arduino Pro Mini for controlling the addressable LEDs on top, another Arduino for handling the communication and fingers, and a battery for power.

Aside from the vibration motors, the glove features flexible resistors on the back of the fingers, an LED strip for visualization, a breakout board for measuring the resistance from the flex sensors, a battery, an Arduino Uno for processing, and an XBee module for transmitting the signals to the Arduino in the gripper.

If you think this sounds awesome, wait until you see it in action. Baumgartnen has shared a demo of the project, along with a detailed breakdown of his build. Kudos to Hackaday for finding this incredible piece of work!

An Arduino tennis racquet that grunts when you swing it

Grand Slam tournaments, like Wimbledon, always prompt a discussion around the sometimes-disconcerting noises tennis players make on the court. Although some may argue that grunting helps apply the maximal force when striking the ball, others believe the shrieking is completely unnecessary and downright annoying. There are even top names in the game whose screams routinely top 100 decibels–only slightly less than the sound of a power saw–which has led many to call into question whether or not the behavior is actually a form of cheating.

Mindful of this, Maker Seiya Kobayashi has come up with a hilarious project that is the perfect blend of fun and function: a racquet that grunts whenever it’s swung. A user simply selects one of four notable noisemakers–Serena Williams, Maria Sharapova, Novak Djokovic and Rafael Nadal–and the aptly named Grunting Racket will take care of the rest.

In theory, this allows you to focus on your footwork and making proper contact, while the combination of an Arduino Pro Mini, an accelerometer, and speaker emits the obnoxious sounds. Additional components include a LiPo battery, an Adafruit Audio FX Sound Board, and a button on the grip for choosing between grunters.

The project has come a long way since its earliest prototype, which only used an accelerometer, FX Sound Board, and an Arduino Uno connected to a PC.  Now, the electronics are all neatly housed inside the racquet’s handle. While you won’t find a gadget like this around the All England Club anytime soon, you can check it out in action below!

Arduino Pro Mini powers this Pac-Man festival totem

Electric Daisy Carnival Las Vegas is just days away, and YouTuber “Korberos” is ready. The Maker has created an LED Pac-Man totem using 967 lines of code, 256 NeoPixels wired in succession and laid out in a game-inspired map, and an Arduino Pro Mini.

The controller and game lights are powered by a 5V power bank with 10,000mAh of storage, while blue EL wire lights (for the “walls”) are powered by a 12V supply coming from eight AA batteries wired in serial. A MAC7219 7-segment display shows the current level and score.

According to Korberos, two libraries were used in the project: FastLED to control the LED strips and LedControl2 to handle the scoreboard.

Arduino powers this Matrix-themed mortarboard

With graduation season upon us, Makers are coming up with creative ways to decorate their mortarboards. One thing is for certain, Fahad Mirza will stand out in the crowd of his classmates with a movie-themed cap that would even impress Keanu Reeves himself. Inspired by The Matrix, the headpiece is equipped with an Arduino Pro Mini, an Adafruit NeoPixel ring for its green LED effects, and a 3.7V lithium-ion battery for power. The electronics are all hidden inside the cap which aptly reads, “Everything that has a beginning has an end.”

Turning a toy piano into a standalone digital synthesizer

Electronic musical instruments are fun for Makers. With some cheap tools, know-how and passion, anyone can become a real synth geek. Just ask software developer Liam Lacey, who also happens to be a sound coder and freelance hacker. He recently won element14’s Open Source Music Tech design challenge for his Vintage Toy Synthesizer project — it’s an acoustic wooden toy piano converted into an open-source, standalone polyphonic digital synthesizer running on a BeagleBone Black and an Arduino Pro Mini.

Playing an instrument is about a lot more than just the sound you create – the way you play it; the physical feedback; and the overall feel and aesthetics of the instrument also play a big role in the overall experience, with these elements also helping to nurture inspiration, and can even affect your perception of the sound created.

Lacey developed the voice engine using the C++ audio DSP library Maximilian, and the keyboard mechanism uses homemade pressure sensors made out of Velostat. The instrument has 18 keys, with players able to also alter scales using the knobs on top of the mini piano’s lid.

Other dials are used to toggle dedicated waveform oscillators, various filters and onboard distortion effects, and there’s even vintage parameters for replicating old or broken analog synth voices. What’s neat is that the converted toy can also act as a MIDI controller to send velocity-sensitive note messages and polyphonic aftertouch to Logic Pro, Ableton Live and various music software programs.

Here’s a diagram of the software architecture of the synth:

You can read more about the hack here, as well as listen to some quick and rough sound/patch demos:

The project took three and a half months to bring to fruition, and let us just say, the final result is quite impressive! Check out the video below to learn more about  its specs and explore the complete documentation on GitHub.


DIY Garage Door KeyPad Project

Arduino user SamJBoz needed a way to quickly gain access to his garage when he did not have the remote. He designed a simple entry system with 4 digit access codes to allow himself, family and friends to gain quick access to the garage when a remote is not at hand, running on a 5V Arduino Pro Mini. The keypad allows for up to 10 4-digit pin numbers, has a user set master pin number to create and delete user pin numbers and flashes 2 color error codes if something goes wrong.

The hardware BoM consists of a 4×4 keypad, an Arduino Pro Mini, a small custom PCB and a few external electronic parts to complete the design.

He’s been using it flawlessly for a year and you could try to build one too: all the documentation is on github comprehensive of Eagle PCB files for the main board, the Arduino code, BoM, a user manual and some useful construction tips.