Posts with «arduino micro» label

Drive an RC car with first-person view

If you’ve ever dreamt of sitting in the driver’s seat of an RC car, you’ll love this recent project from Paul Yan. The designer has hacked together a first-person driving experience using a natural steering wheel that lets you feel like you’re playing a race kart game in real life.

As he describes in the video below, Yan used an old PS2 wheel controller, two Arduinos, a mini FPV camera, and a headset to act as a standalone monitor. The RC car–which is equipped with a Micro–interfaces with the wheel using an Uno and a PS2 Shield. Both Arduinos communicate via a pair of NRF24L01 modules.

I got the idea for this project while watching my three-year-old son play with his radio controlled toy cars. These all use the conventional two joysticks. The left is isolated to vertical movement to control the motor and the right stick is isolated to horizontal movement to control the turning direction of the front wheels.

Sorting cucumbers using AI, Raspberry Pi + Arduino

When it comes to farming veggies like cucumbers, the sorting process can often be just as hard and tricky as actually growing them. That’s why Makoto Koike is using Google’s TensorFlow machine learning technology to categorize the cucumbers on his family’s farm by size, shape and color, enabling them to focus on more important and less tedious work.

A camera-equipped Raspberry Pi 3 is used to take images of the cucumbers and send them to a small-scale TensorFlow neural network. The pictures are then forwarded to a larger network running on a Linux server to perform a more detailed classification. From there, the commands are fed to an Arduino Micro that controls a conveyor belt system that handles the actual sorting, dropping them into their respective container.

You can read all about the Google AI project here, as well as see it in action below!

This DIY stepper motor clock is weird yet wonderful

Just when you thought you’ve seen every possible kind of Arduino-driven clock, another one emerges. This “DIY strange-looking” device takes the form of a wheel with times written on it, which is rotated using an Arduino Micro and a 5V stepper motor. And while it may not be the most accurate timekeeper out there, it’s an excellent way for Makers to explore electronics, programming, and even geometry.

Unlike most clocks that have either two or three hands going around a 12-hour face, 17-year-old Instructables user “Electronics for Everyone” chose a fixed pointer to denote the time in 10-minute intervals instead.

The idea behind the clock is a circle with a circumfrence of 72cm that ticks at 1cm every 10 minutes, which means every 72 ticks will equal 12 hours…

You can find an entire breakdown of the build, along with its measurements and code, on its project page here.

Ride an Arduino-powered longboard with speed-reactive LEDs

For a recent column in the Dutch newspaper de Volkskrant, Rolf Hut built a slick longboard with LED strips that respond to speed. If you think that sounds awesome, wait until you see it in action.

As the Maker explains, four magnets and a Hall effect sensor are used to measure the longboard’s speed so the Adafruit NeoPixels can react at the same pace. To achieve this, the magnets are glued to the inside of each wheel, while a Hall sensor counts the number of revolutions and sends that information over to one of two Arduino Micros. The first Arduino translates that into a speed, while the second Micro converts that speed into a signal for the LEDs. Everything is powered by a power bank.

Intrigued? Head over to the Hut’s project page, where you will find a detailed breakdown of his build along with its code.

NS1 Nanosynth the hackable analog synthesizer is back!

We’ve been playing with NS1 Nanosynth in the last few weeks, when it first appeared under our radars on the Christmas’ Gift Guides (while going sold out in few days, after Synthopia blessed it with this interesting review).  It’s a hackable and customizable analog synthesizer coupled with an Arduino Micro platform.

Personally, it was one of my first steps into modular synthesizers. Nice sounds, easy approach. Peter Kirn is perfectly picturing this amazing compromise here!

Synths: they’re fun to tweak and play. Modulars: they’re fun to patch. Arduinos: they’re fun to hack. Small things: they’re fun to carry around.

But how to track patches? How to share sounds with friends? I was playing mainly with my son, and managed to print out a paper sketch depicting all the different pinout of the synth. I wasn’t satisfied with that, I needed more!

I started writing Sound Machines, about new patches, more sounds. It turned out I made a Fritzing part out of the Nanonsynth, and we started sharing each other patches. This repository holds them, and this is a short review of the best. Enjoy!


Here you can listen to the envelope Generator (ADSR) in action:


Want to add your very own sounds? You can either add it to their repository or comment here!

Automating a bubble blaster with Arduino Micro


Thomas Renck is a coder and a maker. He went to Disneyland, saw a bunch of little kids having fun with bubble guns and realized that a bubble blaster is a sure way to measurably improve joy and happiness in life.

Back home, it took only two hours to create and add-on to automate the bubble blaster using a 3d printer, Arduino Micro and a servo:

On his blog you can find the tutorial, the sketch and the 3d files to make one yourself and bring more happiness in your life too!

An open hardware quartz crystal microbalance for ultra high mass sensitivity

Marco Mauro is a physicist currently employed as Scientific Coordinator at Novaetech, the first Spin-off Company of the National Institute for Astrophysics (INAF) in Italy. He shared with us all the info about a project he’s been working on  and based on Arduino Micro.

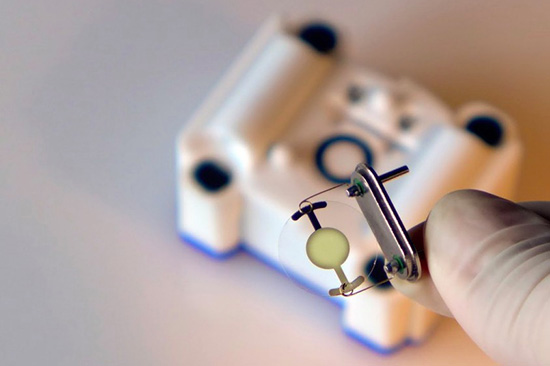
OpenQCM is a fully open source scientific microbalance capable of weighing mass deposition down to 1 billionth of gram:

The sensing core of the microbalance is a piezoelectric quartz crystal oscillator. The deposition of a very tiny mass on the surface causes the variation in the quartz frequency. openQCM belongs to a new generation of innovative smart sensor which boast high resolution and ultra high mass sensitivity. The open source strategy made the creation of openQCM available at low cost which represents a bit fraction of the cost of similar scientific products.

openQCM was built keeping in mind the emergent principles of the open source hardware movement. The open source hardware gives people the freedom to control their technology through the open exchange of all the project features, 3D design, electronics and software. The open hardware potentiality is even greater when it comes to hardware for scientific applications.

openQCM is exactly something like that, the first open hardware quartz crystal microbalance with applications in a wide range of scientific fields, such as chemical and biological sensing, material science.

openQCM has an Arduino Micro board inside at heart. By hacking the timer counter of the AtMega32U4 Arduino microcontroller, it is possible to measure the quartz crystal frequency variations using the 16 Mhz microprocessor clock. openQCM team has designed an Arduino Micro shield with an embedded quartz crystal oscillator driver circuit and a temperature sensor. The output of the quartz crystal oscillator driver is fed to the Arduino Micro timer counter and the analog value of the temperature sensor is fed to the analog pin of the board. This configuration allow you measure the quartz crystal frequency with a resolution of 1 Hz, which roughly corresponds to a mass resolution of 700 pg over the entire quartz surface in air.

One of the major challenge of an open hardware project is that such devices require funding to prototype and manufacture. That’s why the openQCM team have selected the 3d printing technology to keep high quality and low cost. Using 3d printing to print out the prototypes via the SLS process from OS Formiga P100, P110, P395, and P730, the openQCM team created the device’s parts, which required a precision down to 60 µm.

The open source concept made openQCM publicly available so that anyone (scientists, technology enthusiast, makers, hobbyist …) can study, modify, and develop the hardware based on the original design. openQCM is now working and ready to win the heart of the scientific community and more.

Go and make one yourself!

Make a 3D printed LEGO-compatible Arduino Micro casing

Here we are after winter break with a new tutorial on 3d printing with Arduino Materia 101. The 5-step tutorial allows you to design a Lego-compatible case for the Arduino Micro to be used together with the power function IR-receiver mentioned in this other Tutorial.

During the lesson you’ll learn also how to make the Lego-compatible pieces accurately and easily with FreeCAD without taking all the measurements!

Follow the steps and print yours >>

Check the previous tutorials on 3d printing with Material 101

Interested in getting in touch and showing your experiments? Join Kristoffer on the Arduino forum dedicated to Materia 101 and give us your feedback.

Recently Arduino user Botberg implemented an auto-levelling bed sensor  to be  sure that the placement of the first extrusion layer is placed well and increasing the printer successes!

Redundant Automated Water Filler For Your Coffee

We’ve always wondered why we have indoor plumbing if it isn’t hooked up to our coffee pots. We probably drink as much coffee as water anyway, so why not just hook up a water line to refill the pot? [Loose Cannon] aka [LC] has been working on just that problem, with a whole lot of extra features, creating a very robust automatically-filled, gravity-fed, vacuum-sealed water tank for whatever appliance you have that could use it, including your coffee pot.

[LC] tapped into the 1/4″ water line from the ice maker, which has the added bonus of being a common size for solenoid valves. He’s using an eTape sensor to measure the water level in the reservoir, but he ALSO is using a flow meter in the line itself to double-check that the reservoir won’t overflow. The flow meter allows a hard limit to be set for the maximum amount of water allowed into the tank. He’s used an Arduino Micro to tie the project together, which also handles a real-time clock so the tank can be filled on a schedule.

The tank that [LC] was trying to fill was vacuum-sealed as well, which made things a little trickier. Without a vacuum on the tank, the water would just run out of the overflow valve. This is an interesting project that goes way beyond the usual automatic water supplies for coffee pots we’ve seen before.


Filed under: home hacks

Automated Bed Warmer Control for Chilly Nights

For most of the Northern Hemisphere, winter is in full swing right now. That means long, chilly nights. We assume [LC] is in one of these climes because it seems like his bed warmer wasn’t doing quite a good enough job of getting his bed up to a reasonable temperature before he climbed in. To alleviate some of his discomfort, he hacked into the control unit and added some automation.

The original controller uses a mechanical potentiometer to set the heat level. [LC] added a digital potentiometer which he can switch to in order to allow the automation (using a real-time clock to handle scheduling) to take over control of the bed warmer. This also preserves the original functionality of the controller. There is also an Arduino involved which handles the override from mechanical to digital potentiometer when a capacitive touch sensor is activated. This means that when someone attempts to take manual control of the device, the Arduino can switch the override circuit off.

There is quite a bit of detail on the project site about this hack, including the source code for the controller. [LC] also mentions that this could be interfaced to the web to allow remote control of the bed warmer. This is a great hack, and also fits into the idea of heating the person, not the room.


Filed under: home hacks