Posts with «arduino mega» label

Home Pool Added to Home Automation

Anyone who owns their own pool knows it’s not as simple as filling it up with water and jumping in whenever you want. There’s pool covers to deal with, regular cleaning with the pool vacuum and skimmers, and of course, all of the chemicals that have to be added to keep the water safe. While there are automatic vacuums, there aren’t a whole lot of options for automating the pool chemicals. [Clément] decided to tackle this problem, eliminating one more task from the maintenance of his home. (Google Translate from French.)

The problem isn’t as simple as adding a set amount of chemicals at a predetermined time. The amount of chemicals that a pool owner has to add are dependent on the properties of the water, and the amount of time that’s elapsed since the previous chemical treatment, and the number of people who have been using the water, and whether or not the pool cover is in use. To manage all of this, [Clément] used an ORP/Redox probe and a pH probe, and installed both in the filtration system. The two probes are wired to an Arduino with an ethernet shield. The Arduino controls electrically actuated chemical delivery systems that apply the required amount of chemicals to the pool, keeping it at a nice, healthy balance.

[Clément] has all of the Arduino code available on his project page, as well as information about all of the various sensors he used. This should make this project re-createable for anyone who is tired of dealing with their own pool or paying a pool maintenance company to do it for them. [Clément] is no stranger to home automation projects, either, and we look forward to his next (often unconventional) project to automate something we might not have thought of before.


Filed under: Arduino Hacks

An Arduino-based cartridge reader for Nintendo systems

GitHub user Sanni has created a Nintendo cartridge and save game reader shield for the Arduino Mega.

The ROM gets saved to an SD card. You can also read/write save files to the SRAM, display information about the cartridge on a 0.96″ 128X64 OLED LCD, and calculate the checksum of your ROM dump. You control it using the push button–one click moves the selection down, a double-click moves it up, and a long press executes the current menu option.

As the Maker explains, this shield:

  • Reads SNES ROMs and reads/writes save games from and to the SNES cartridge–supported types include: LoRom, HiRom, ExHiRom, SuperFX, SuperFX2, SA1 (can’t write save back to SA1)
  • Read/writes SFC Nintendo Power cartridges
  • Reads N64 ROMs and reads/writes save games (4K/16K EEPROM + SRAM + Flash RAM)
  • Reads/writes N64 Controller Paks and also can test a N64 controller
  • Programs Flash ROMs like 29F016, 29F032, 29F033, 29F1610 and 29L3211 (needs 3.3V)

Monitor your solar energy with a dual-axis tracker

As part of a school project, Bruce Helsen built a dual-axis tracker for optimizing solar panel use during his time as exchange student in Finland. Although adding a tracking system to a larger installation isn’t really a cost-effective option, it can certainly come in handy for smaller units.

Helsen’s dual-axis tracker works by making sure that the two 12V 150W solar panels stay aligned with the sun for as long as possible, measuring the panels’ voltage and current then calculating the generated power and energy, and sending that data from the monitor to ThingSpeak. There’s also an LCD to display the readings.

The panel’s two axes are controlled by a pair of inexpensive linear actuators. It uses an Arduino Mega for a brain, and an ESP8266 for transmitting the data over to the cloud. Light direction is detected by a homemade light sensor housed inside an industrial lamp enclosure. A 3D-printed crossbeam separates the sensor into four quadrants, with a light-dependent resistor for each. By comparing the average LDR values, the panel is able to point in the best direction.

Looking to monitor your solar energy? Check out Helsen’s project page here.

Interactive sidewalks plays music to your shadows

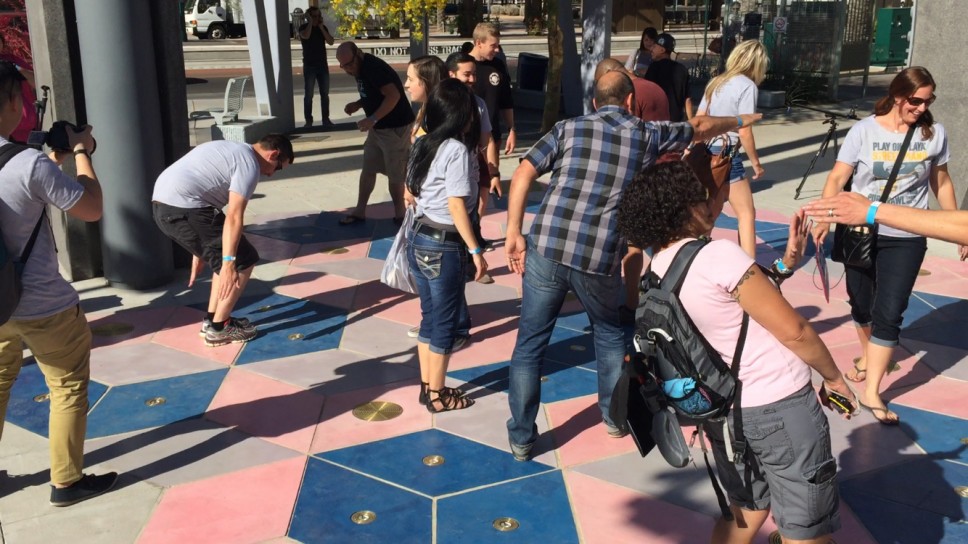
Designed by Montreal studio Daily tous les jours, Mesa Musical Shadows is a public installation which turns several blocks of pavement in Arizona’s Mesa Arts Center into a super-sized dance pad that reacts to your moving shadow with the sounds of singing.

Shadows cast on different tiles trigger different voices, all while singing in harmony. Length of shadow is dependent upon the season, the time of day and the weather; meaning, a visitor may never quite cast the same shadow twice. The sounds themselves also change with the angle of the sun, which makes interacting with the installation a dynamic experience in the morning, midday, evening, and in the middle of the night. As the day turns into night, the tracks shift from upbeat, Pitch Perfect-like acapella to creepier, ominous tones.

Though all the audio originates with recordings of the human voice, a large variety of sounds and moods are created throughout the day. The sounds triggered in the morning are peaceful and ethereal: sustained choral tones that follow your long shadow, singing you into your day. Later, when the sun is hot overhead, and shadows are shorter; the sounds are chopped and frenetic, creating a rhythmic, energetic soundtrack. As the shadows become long again toward sunset, clusters of complementary, interlocking melodies are triggered. Finally, after dark, the sounds harken toward the natural landscape: Insect or bird-like vocal sounds evoking a nocturnal meadow are triggered by users navigating their way through the night.

The system itself consists of sensors that respond to changes in light, which prompt a range of melodic or percussive sounds emitted through speakers embedded in the colorful fabricated tiles. As Creative Applications details, Mesa Musical Shadows is controlled by a MaxMSP patch linking Arduino Mega boards via OSC.

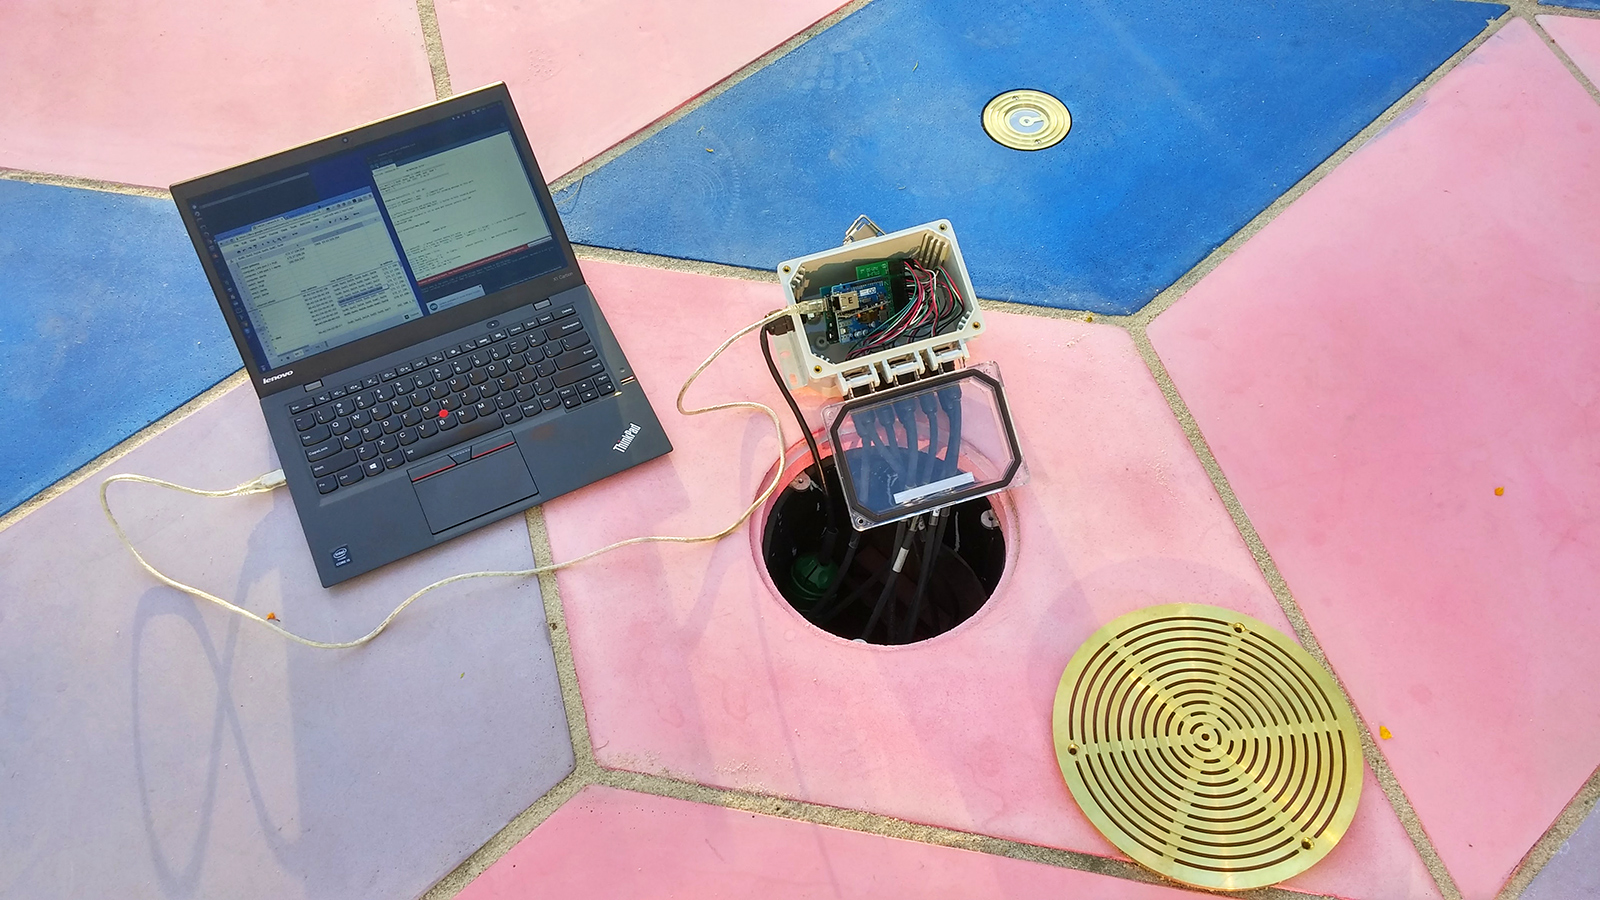
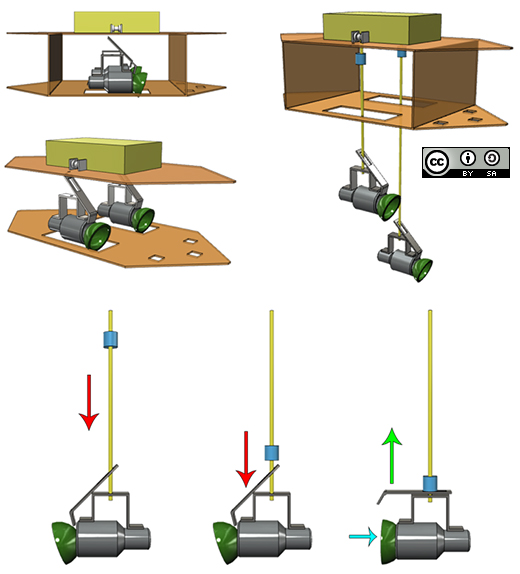
The installation’s 47 sensors are run through six control nodes, comprised of an Arduino Mega, Ethernet shields, and custom connector shields – each of which is protected in a waterproof enclosure, placed underneath the tiling. Each sensor unit has a custom PCB with a light sensor on top and an LED on its bottom, for nighttime illumination and the more sensitive gear (computers, amplifiers, etc.) is all installed in the museum.

If this musical public display seems a bit familiar, that’s because you may recall Daily Tous Les Jours’ earlier project, 21 Swings, which used playground swings to form a giant collective instrument. Read more about the singing sidewalk here, and see it in action below!

Building a water collection vessel with an Arduino Mega

As part of an electrical and electronic engineering course at Singapore Polytechnic, a group of students were challenged to build an aquatic vehicle that could collect samples from one and two meters underwater. After three months of hard work, the Imp Bot was brought to life!

Imp Bot is controlled by a mobile application made using the MIT App Inventor. Communication is achieved via a Bluetooth module hooked up to an Arduino Mega, while an onboard GPS sensor is used to log sampling locations in the app. Power is provided by a LiPo battery, which supplies high current to the two DC motors responsible for moving the 11-pound vessel around.

The sampler is actually a simplified Van Dorn Water Sampler, an ingenious method of water collection based upon elasticity and a quick-release mechanism. The main body of the vessel was initially made using laser-cut acrylic pieces assembled with PVC pipes, but the structure was too weak so they decided to use aluminium L-brackets instead.

Want to learn more? Check out the team’s video below, as well as read the story on one of the student’s blogs here. The code is also available on GitHub.

Autonomous machine makes music with 7 lasers and 42 fans

Russian artist ::vtol:: is no stranger to the Arduino blog. His latest project–which was designed for the Polytechnic Museum Moscow and Ars Electronica Linz–is an autonomous light-music installation called “Divider.” The wall-mounted soundscape consists of seven lasers that horizontally send rays through 42 fans, which act as modulators to turn the light signals into rhythmic impulses. Seven photo sensors on the end monitor the presence or absence of light, while four Arduino Mega boards control the system.

The lasers serve a “independent binary variables” which become the basis for all sound composition. Since the fans can each spin at variable speeds, this allows for a constant shift of modulation phases and a wide range of noises.

According to ::vtol::, the Divider is inspired by Léon Theremin’s Rhythmicon, the world’s first rhythm machine. The 1931 device also used rotating discs to interrupt light rays and optical sensors to pick up light and produce rhythms.

Sound interesting? Wait until you see it perform below! You can also check it out here.

Arduino Blog 27 Jun 23:25

Autonomous Musical Soundscapes from 42 Fans and 7 Lasers

[dmitry] writes in to let us know about a new project that combines lasers with fans and turns the resulting modulation of the light beams into an autonomous soundscape. The piece is called “divider” and is a large, wall-mounted set of rails upon which seven red lasers are mounted on one end with seven matching light sensors mounted on the other end. Interrupting the lasers’ paths are forty-two brushless fans. Four Arduino Megas control the unit.

Laser beams shining into light sensors don’t do much of anything on their own, but when spinning fan blades interrupt each laser beam it modulates the solid beams and turns the readings of the sensors on the far end into a changing electrical signal which can be played as sound. Light being modulated by fan blades to create sound is the operating principle behind a Fan Synth, which we’ve discussed before as being a kind of siren (or you can go direct to that article’s fan synth demo video to hear what kind of sounds are possible from such a system.)

This project takes this entire concept of a fan synth further by not only increasing the number of lasers and fans, but by tying it all together into an autonomous system. The lasers are interrupted repeatedly and constantly, but never simultaneously. Listen to and watch it in action in the video below.

There isn’t a lot of in-depth technical information on the project page, but there are many really good photos. We especially love the way that the whole assembly is highly visual with the lasers turning on and off and interacting with different fans.

Any changing electrical signal can be played as sound, and if there’s one thing projects like self-playing musical hardware can teach us, it’s that if you have an electrical signal that looks strange or chaotic, hook a speaker up to it because it probably sounds pretty cool!


Filed under: musical hacks

Build an LED game system with Arduino and a picture frame

The LEDmePlay is an open-source DIY gaming console powered by an Arduino Mega. Games are displayed on a 32 x 32 RGB LED matrix housed inside an IKEA picture frame, and played using any C64-compatible joystick from the ‘80s. LEDmePlay supports several games, each of which are downloadable for free online, and Makers are encouraged to develop their own as well.

Its creator Mithotronic has also built a handheld variant for on-the-go fun, LEDmePlayBoy. This device is based on the same Arduino Mega, powered by eight AA batteries, and uses an analog thumb joystick and two fire buttons for control.

Interested? You can check out the LEDmePlay’s construction manual, and find all of the games’ source codes here.

Make masterpieces with a homemade CNC painting machine

Longtime artist Jeff Leonard has built a pair of Arduino-driven CNC painting machines with the motivation to grow his toolbox and expand the kinds of marks he could make simply by hand. By pairing the formal elements of painting with modern-day computing, the Brooklyn-based Maker now has the ability to create things that otherwise would’ve never been possible.

Machine #1 consists of a 5’ x 7’ table and is capable of producing pieces of art up to 4’ x 5’ in size. The device features a variety of tools, including a Beugler pinstriping paint wheel, a brush with a peristaltic pump syringe feed, an airbrush with a five-color paint feed system and five peristaltic pumps from Adafruit, a squeegee, and pencils, pens, markers and other utensils.

In terms of hardware, it’s equipped with three NEMA 23 stepper motors, three Big Easy Drivers, as well as an Arduino Mega and an Uno. There are two servos and five peristaltic pumps on the carriage–the first servo raises and lowers the tool, while the second presses the trigger on the airbrush. An Adafruit motor shield on the Uno controls the pumps, and the AccelStepper library is used for the Big Easy Drivers.

According to Leonard:

I am coding directly into the Arduino. There are many different codes that I call and overlap and use as a painter overlaps techniques and ideas. There is a lot of random built into the code, I don’t know what the end result will be when I start. Typically on any kind of CNC machining the end result has been made in the computer and the machine executes the instructions. I am building a kind of visual synthesizer that I can control in real-time. There are many buttons and potentiometers that I am controlling while the routines are running. I take any marks or accidents that happen and learn how to incorporate them into a painting.

I am learning Processing now and how to incorporate it into the image making.

Machine #2, however, is a bit different. This one is actually a standup XY unit that was made as a concept project. It paints using water on magic paper that becomes black when wet and disappears as it dries, used mainly as a way to practice calligraphy or Chinese brush painting. Not only does it look great, there’s no clean up either!

In terms of tools, the machine has a brush and an airbrush. Two NEMA 17 stepper motors are tasked with the XY motion. There are also three servos–one servo lifts and lowers the armature away from the paper since there is no Z-axis, another controls the angle of the brush, and the third presses the trigger of the airbrush. A peristaltic pump helps to refill the water cup, along with a small fan. The system is powered by an Arduino Uno with an Adafruit Motor Shield using the Adafruit Motor Shield Library v2.

As awesome as it all sounds, you really have to see these gadgets in action and their finished works (many of which can be found on Instagram).

Build your own life-size, multipurpose robot with Arduino

If you’ve always wanted a bot for a friend, personal assistant or butler, you’re in luck. John Choi, a Carnegie Mellon University computer science and arts student, has managed to build his own life-size robotics platform for about $2,000. Sure, a price tag like that may not seem “cheap” but in comparison to other research-grade platforms out there, it’s a bargain.

Ideal for Makers, students, educators, artists and researchers alike, the Multipurpose Mobile Manipulator Mk 1 is capable of playing the piano, drawing pictures, preparing meals, watering plants, and engaging in toy sword duels, among many other things.

The Multipurpose Mobile Manipulator is divided into three major parts: the base, the arms, and the chest. The base contains motors for mobility and batteries to power the robot, enabling it to navigate around. The arms contain adaptable grippers, shoulder and elbow joints, and an extensible limb for grabbing and moving things with its environment. Meanwhile, the chest connects all of these together with control electronics and serves as a platform for an intelligent laptop-for-a-face. An Arduino Mega at its heart makes interfacing with sensors and actuators super easy, while the robot’s functionality can also be expanded by simply attaching new electronics and sensors to its mounting areas.

The open-source platform is compatible with Windows, Mac and Linux, and supports Python 2.7 and Arduino libraries. According to Choi, libraries for Unity, Processing, ROS, MATLAB, C++, and Scratch are also in the works.

Those interested in building their own should check out Choi’s incredibly-detailed 80-step tutorial, and watch the robot take on some tasks below. Prepare to be amazed!